14 L'Editeur de BibleWorks |
|
BibleWorks contient un puissant éditeur qui prend en charge une vaste gamme d'options. L'éditeur est basé sur le programme Rich Edit de Microsoft et offre toutes les fonctionnalités de l'éditeur WordPad de Windows, mais avec plus de fonctionnalités encore, le tout étroitement intégré à BibleWorks.
Accès à l'éditeur
Le menu Editeur
L'éditeur
de barre d'outils
Limitations
Setting
Editor Options
Unicode
Initialization
Files
Hypertext Links
Typing Hebrew in Microsoft Word
Accès à l'éditeur
L'éditeur de BibleWorks est accessible de trois
façons différentes. Il y a tout d'abord l'onget de l'Editeur dans
la fenêtre d'Analyse. Quand cet onglet est activé l'éditeur
occupe le tiers droit de la fenêtre principale. On peut également
ouvrir plusieurs fenêtres d'édition flotantes en
sélectionnant File | Open Editor dans le menu de la fenêtre
principale ou en cliquant sur l'icône ![]() de la barre d'icônes de la fenêtre principale.
de la barre d'icônes de la fenêtre principale.
Le menu
de l'Editeur
The Editor menu will appear at the top of the Editor
Window if you are using a floating editor window. Otherwise if appears in the
form of a context menu when you right click on the editor interior.
File Menu
![]()
§
New - Opens a new
editor window
§
Open - Opens and
existing editor window
§
Save - Saves the
current document
§
Save
As
- Saves the current document with a new name
§
Close - Closes the
editor
--------
§
Print - Prints the
current document
--------
§
Options - Displays the
editor options window
§
Toolbar - Displays the
toolbar configuration window.
Edit Menu
![]()
§
Cut - Cuts selected
text to the clipboard
§
Paste - Pastes an item
from the clipboard
§
Paste
(Use MS Word) - Pastes an item from the clipboard using MS Word as an intermediary.
§
Copy - Copies an item
to the clipboard
§
Search
BW for Selected Text - Searches on the selected text as if it had been
copied to the Command Line.
§
Select
All
- Selects the entire document
§
Clear - Clears the text
from the current document
--------
§
Filtered
Copy
- Copies selected text to the clipboard using the BW Editor Filter.
§
Apply
Filter - Applies the current Editor Filter to the selected text.
§
Filter
Options - Sets BibleWorks Editor filter options.
--------
§
Find - Searches for
specified text
§
Find
and Replace - Search and replace text
§
Search
Verse Notes - Opens a Window that permits you to search verse notes.
--------
§
Convert
to Unicode - Convert selected text to Unicode
§
Undo - Undoes the last
operation
§
Redo - Redoes the last
undone operation
Insert menu
![]()
§
Bitmap - Inserts a
specified bitmap file
§
Link - Insert a
hypertext link
You must first select some text in the document.
§
Table - Inserts a table.
The number of rows and columns, and the colors used, are determined by settings
in the Editor Options window (see under FILE | Options)
§
Verse - Inserts the
specified verse.
The verse and versions used are determined by the text in the verse and version
list box controls on the button bar.
Text Menu
![]()
§
Font - Opens the font
window which permits you to set font attributes.
§
Bullet
Style - Changes the paragraph bullet style.
--------
§
Superscript - Selects
superscript text.
§
Subscript - Selects
subscript text.
§
Text
Color - Sets the text color.
§
Background
Color - Sets the text background color.
§
Underline - Selects
underlined text.
§
Bold - Sets the Bold
text attribute.
§
Italic - Sets the Italic
text attribute.
§
Strike-through - Sets the
strike-through text attribute.
Paragraph Menu
![]()
§
Left
to Right Text - Selects Left-to-Right text.
§
Right
to Left Text - Selects Right-to-Left text
§
Align
Center - Centers paragraph.
§
Align
Left
- Left aligns paragraph.
§
Align
Right - Right aligns paragraph.
§
Increase
Left Indent - Increase left indent
§
Decrease
Left Indent - decrease left indent
§
Increase
Right Indent - increase right indent
§
Decrease
Right Indent - decrease right indent
§
Increase
Paragraph Spacing - increase paragraph spacing
§
Decrease
Paragraph Spacing - decrease paragraph spacing
§
Fix
Outline Level Numbering - Checks outline numbering and fixes inconsistencies.
View menu
![]()
§
Status
Bar
- Turns the editor status bar on and off
§
Toolbar - Turns the editor
button bar on and off
L'éditeur
de barre d'outils
The Editor
toolbar appears across the top of the Editor Window. It has multiple rows, with
only one visible initially. To view the other rows click on the ![]() button.
You can customize the toolbar in two ways. To move buttons around all you have
to do is click and drag with the left mouse button with the ALT key depressed.
Or you can also click on the
button.
You can customize the toolbar in two ways. To move buttons around all you have
to do is click and drag with the left mouse button with the ALT key depressed.
Or you can also click on the ![]() button to open up a utility that
permits you to add and remove buttons. This utility can also be opened up by
double-clicking on a blank space on the toolbar.
button to open up a utility that
permits you to add and remove buttons. This utility can also be opened up by
double-clicking on a blank space on the toolbar.
|
Configuration Functions |
|||
|
|
Wraps and
unwraps the button bar to show either one row of buttons or all buttons in
multiple rows. |
||
|
|
Opens the
Button bar Configuration Window. This is a standard Operating System Window
that allows you to add and remove buttons. The configuration window can also
be opened by double-clicking on an empty space in the button bar. |
||
|
|
Opens the
Editor Options Window to permit you to set editor defaults and options. |
||
|
File Functions |
|||
|
|
Opens a new editor window. |
||
|
|
Opens an existing document. |
||
|
|
Saves and
reopens the editor window as a floating window. This is useful if you are
editing a document in the Analysis Window and want to open it up in a
floating window. |
||
|
|
This
button saves the current file. The dropdown provides options to save the file
or save it with a different name. |
||
|
|
Closes the current document. |
||
|
General Editing Functions |
|||
|
|
Clears
the text in the current document. |
||
|
|
Undoes the last operation. |
||
|
|
Redoes the last operation. |
||
|
|
Inserts a
graphic in the current document at the current insertion point. You will be
prompted for a file name. BMP and Jpeg files are supported. |
||
|
|
Opens the
File Search menu. This permits you to search an entire directory for a
specified word or phrase. Currently only Roman text is supported. The
directory defaults to the User Notes Directory. |
||
|
|
Opens the
Search Window to search the current document for a specified word or phrase. Currently
only Roman text is supported. The directory defaults to the User Notes
Directory. |
||
|
|
Opens the
Search and Replace Window which permits you to search specified text and
replace it with a word or phrase. |
||
|
|
Cuts the
currently selected text to the clipboard. |
||
|
|
Copies
the currently selected text to the clipboard. |
||
|
|
Prints
the current document on the system printer. |
||
|
|
Opens a
window that permits you to select a new User Notes Directory. You can create
a new directory or choose an existing one. |
||
|
Text Formatting Functions |
|||
|
|
Changes
the font of selected text. |
||
|
|
Changes
the point size of selected text. |
||
|
|
Opens the
Font Attributes Window to permit you to specify the font attributes of
selected text. |
||
|
|
Changes
the font attribute of selected text to Bold. |
||
|
|
Changes
the font attribute of selected text to Italic. |
||
|
|
Changes
the font attribute of selected text to Underline. |
||
|
|
Changes
the font attribute of selected text to Strike-Through. |
||
|
|
Changes
the selected text to superscript or removes the superscripting from selected
text. |
||
|
|
Changes
the selected text to subscript or removes the subscripting from selected
text. |
||
|
|
Opens a
window to permit you to insert any character from any font, including
Unicode. |
||
|
|
Sets the
current default English font to the default Roman font (specified in the
Editor Setup Window). |
||
|
|
Sets the
current default Greek font to the default non-Unicode Greek font (specified
in the Editor Setup Window). |
||
|
|
Sets the
current default Greek font to the default Unicode Greek font (specified in
the Editor Setup Window). |
||
|
|
Sets the
current default Hebrew font to the default non-Unicode Hebrew font (specified
in the Editor Setup Window). This also activates a mode which enables
emulation of right-to-left Hebrew in the editor using BibleWorks non-Unicode
Hebrew fonts (Bwhebb). The program determines from the character after the
cursor whether or not to decrement the cursor. This mode is turned off by
selecting any other font. This mode does not support left-wrapped text. If
you want that you must use a Unicode Hebrew font (see the next button). |
||
|
|
Sets the
current default Hebrew font to the default Unicode Hebrew font (specified in
the Editor Setup Window). |
||
|
|
Sets the
text color of selected text to the current default. The dropdown permits you
to set the default color at the same time. |
||
|
|
Sets the
background color of selected text to the current default. The dropdown
permits you to set the default color at the same time. |
||
|
Paragraph Formatting Functions |
|||
|
|
Left
justifies the current paragraph. |
||
|
|
Centers the current paragraph. |
||
|
|
Right
justifies the current paragraph. |
||
|
|
Adds
bullets to the selected paragraphs. |
||
|
|
Adds
automatic numbering to the selected paragraphs. The dropdown has options for
specifying the format of the numbering and checking the numbering consistency
of selected text or the entire document. |
||
|
|
Selects
Right-to-Left typing mode. |
||
|
|
Selects
Left-to-Right typing mode. |
||
|
|
Decreases the left indent. |
||
|
|
Increases the left indent. |
||
|
|
Increases the paragraph spacing. |
||
|
|
Decreases the paragraph spacing. |
||
|
|
Decreases the right indent. |
||
|
|
Increases the right indent. |
||
|
Bible Text Insertion Functions |
|||
|
|
Inserts a
verse or range of verse in the editor. The version and range are specified in
the two subsequent items. |
||
|
|
Inserts a
verse or range of verses in the editor. |
||
|
|
Specifies
the version of inserted version text (see the previous item). |
||
|
|
Selects
formatting options for Bible version text copied to the editor. |
||
|
|
Opens a
window to permit you to select the versions of text to copy to the editor. The
selected versions will be copied to the previous list box. |
||
|
|
Copies
the specified verse range (see the previous items) to a table. |
||
|
Miscellaneous |
|||
|
|
Decreases the magnification setting for the current document. The dropdown contains common magnification presets. |
||
|
|
Increases the magnification setting for the current document. The dropdown contains common magnification presets. |
||
|
|
Inserts a
graphical dividing line in the text. The dropdown permits you to set the
color and dimensions of the dividing line. |
||
|
|
Adds or
modifies a hyperlink. To add a link highlight some text and select this
option. The dropdown has options to do the following:
Add Link to Selected Text
Insert Current Verse as Link
Insert Link to Last LG Resource
Insert Link to Last Lexicon Access |
||
|
|
Inserts a
table into the text. The color and dimensions are preset in the Editor Setup
Window. |
||
If the editor has keyboard
focus the following shortcuts are defined:
|
Shortcut |
Function |
|
Ctl + B |
Set Bold Text |
|
Ctl + D |
Set Roman
Text using default font |
|
Ctl + F |
Repeat Find |
|
Ctl + G |
Set Greek
Text (non-Unicode) |
|
Ctl + H |
Set
Hebrew Text (non-Unicode) |
|
Ctl + I |
Set Italic Text |
|
Ctl + K |
Create Link |
|
Ctl + S |
Save File |
|
Ctl + U |
Set Underline Text |
|
Ctl + Y |
Redo |
In addition
to these, the usual keyboard shortcuts defined for all Windows Rich Edit
Controls are defined.
 The
Copy and Export Filter
The
Copy and Export Filter
The BibleWorks Editor has a
configurable Filter that permits you to change text attributes when text is
copied to the clipboard. To copy text through the filter all you have to do is
select Edit | Filtered Copy from the main Editor Menu (or Editor Context
Menu if you are using the Analysis Window Editor) instead of Edit | Copy.
To set up filter options
select Edit | Filter Options from the Editor Menu. The left hand side
contains a series of font list boxes and Bold (B), Italic (I) and Underline (U)
checkboxes. To activate one of the filter lines, check the "Enable"
checkbox and choose the attributes that you want changed when the text is
copied or exported. Then on the right side choose the attributes that you want
the final attributes to be.
You cannot convert a
Unicode font to Non-Unicode with this filter, or vice versa.
Using MS Word to Filter
Text
The Edit Menu also has an
option called "Paste Using MS Word". What this option does is
paste clipboard text first into Microsoft Word (if it is installed) and then
into the BibleWorks Editor. This is useful when pasting Internet Explorer or
HTML Help text into the editor. It is necessary because the Microsoft Richedit
subsystem does not do a very good job of converting HTML text in the clipboard
to RTF format. And many HTML-based applications do not do a very good job of
converting to RTF when placing text on the clipboard. Recent versions of
Microsoft Word do a better job so this feature in effect uses Microsoft Word as
a conversion tool.
Limitations
The
BibleWorks editor is derived from a system library called the Rich Edit Control
library. The capabilities of this library will depend on the version of Windows
that you are running. Tables, hyperlinks and Unicode all require that you be
running Windows XP, Service Pack 1 or later. Microsoft is working on a new
release of this library which may remove some current limitations. Note also
that files including tables will not print correctly. This is a Windows
limitation and not a BibleWorks bug.
Setting Editor Options
When you
click on the ![]() button on the Editor toolbar the
Editor Options Window will open:
button on the Editor toolbar the
Editor Options Window will open:

This window
allows you to configure the way that several editor options work.
Quick
Set Font Buttons
The Editor
toolbar has five buttons that allow you to quickly set the default format to
English, Greek, Hebrew, Unicode Greek or Unicode Hebrew. This section allows
you to configure what each of these buttons does. You can set the font, point
size and Windows Keyboard.
Table
Settings
This section
allows you to configure what kind of table is inserted when you click on the ![]() button. The "Verse Table"
setting determines the column width when you insert Bible verses in tabular
form (using the
button. The "Verse Table"
setting determines the column width when you insert Bible verses in tabular
form (using the ![]() button). When inserting tabular
verses, this number overrides the "Column Widths" settings. Note that
because of limitations with the Richedit Control in Windows, you cannot resize
a table after it has been placed. You can insert lines by mouse-clicking to the
right of a row and then pressing the return key. You can always clip the table
to a Word Processor like Word, edit the table, and then paste it back.
button). When inserting tabular
verses, this number overrides the "Column Widths" settings. Note that
because of limitations with the Richedit Control in Windows, you cannot resize
a table after it has been placed. You can insert lines by mouse-clicking to the
right of a row and then pressing the return key. You can always clip the table
to a Word Processor like Word, edit the table, and then paste it back.
Miscellaneous
1.
Open
last file on startup - If this option is checked, when you open the editor
the last file you worked on will be loaded automatically.
2.
Save
& Restore file state - if this option is checked, when you save a file and
reload it, your place in the file will be preserved.
3.
Enable
verse popups - This option enables verse popups which you can insert into BibleWorks
editor documents.
4.
Use
BW kb for Unicode Heb - If this option is enabled the editor will use the
BibleWorks keyboard for Unicode Hebrew rather than the Windows Hebrew keyboard.
5.
Renumber
file on change - If you sections of text that have automatic numbering active, when
you make a change in the file, the entire file will be renumbered.
6.
Use
tab / shift tab to promote - If this option is turned on, tab and shift-tab will
cause the outline level of the current paragraph to be prompted or demoted.
7.
Hide
Word when pasting - Microsoft Word can be used in the background as a
converter when you cut and paste text from external sources like Internet
Explorer. If this option is enabled Word will be hidden when it is used in this
way.
8.
Enable
auto-save - If this option is checked your document will be saved periodically.
The time between saves is set using the "Auto-save" text box at the
bottom of the window.
9.
Auto-save
(mins) - This text box allows you to set the period between auto-saves.
10. Undo Levels - This
option allows you to se the number of undo levels maintained by the editor.
Performance and memory usage may degrade on some systems if you make this too
high.
 Verse
Export Options
Verse
Export Options
Clicking on
the ![]() button will open up a window which
permits you to configure how Bible text is formatted when you import text. This
functions in exactly the same way as the similar window on the Main BibleWorks
toolbar. It however affects only text entered via the editor interface. Note
that the Hebrew line wrap width is used ONLY for non-Unicode text. If you have
Hebrew Unicode enabled this setting is ignored. This setting is necessary to
permit users to paste Hebrew using the non-Unicode BibleWorks Hebrew fonts.
Hebrew text will appear properly only when the window width is greater than
this setting. Unlike the previous BW editor, the new editor does NOT support
left-wrapped Hebrew with non-Unicode Hebrew fonts. If you want to use Hebrew
you must either set this line wrap parameter to an appropriate value or enable
Hebrew Unicode (which require Windows XP).
button will open up a window which
permits you to configure how Bible text is formatted when you import text. This
functions in exactly the same way as the similar window on the Main BibleWorks
toolbar. It however affects only text entered via the editor interface. Note
that the Hebrew line wrap width is used ONLY for non-Unicode text. If you have
Hebrew Unicode enabled this setting is ignored. This setting is necessary to
permit users to paste Hebrew using the non-Unicode BibleWorks Hebrew fonts.
Hebrew text will appear properly only when the window width is greater than
this setting. Unlike the previous BW editor, the new editor does NOT support
left-wrapped Hebrew with non-Unicode Hebrew fonts. If you want to use Hebrew
you must either set this line wrap parameter to an appropriate value or enable
Hebrew Unicode (which require Windows XP).
Unicode
BibleWorks
supports Unicode Greek and Hebrew. Internally BibleWorks still uses non-Unicode
fonts. This is done to optimize the speed of searches and maintain
compatibility with older versions. It also enables us to continue supporting
users who do not have full Unicode capability, which requires Windows XP
(service pack 1 or later) and a Word Processor that handles Unicode Hebrew
well. If you want to produce documents with maximum transportability,
non-Unicode is still a good option.
However,
because many users need to work with Unicode text, and because Unicode provides
a solution for properly formatted and wrapped Hebrew text, we have implemented
a mechanism to provide seamless Unicode support. The way it work is that any
time you export text from BibleWorks, the Greek and Hebrew can (at your
discretion) be converted to Unicode. For these purposes copying text from BW
into the BW editor is considered "exporting" because such text will
most likely be used outside of BibleWorks. Copying text to the clipboard or
clicking and dragging text from BW to an external word processor, are also
considered exporting. This mechanism is transparent to the user and provides
support to both users with Unicode capability, and users without it.
Note that in
order to enable Unicode in BibleWorks you must be using Windows XP, Service
Pack 1 or later.
By default
Unicode support is turned off. In order to turn it on you should proceed as
follows:
1.
Open the BibleWorks
Options Window by clicking on the ![]() button on the
BibleWorks Main Window button bar (NOT the Editor button bar which has a
similar button).
button on the
BibleWorks Main Window button bar (NOT the Editor button bar which has a
similar button).
2.
Go to the FONTS Tab.
3.
Select the "Export
Fonts" Radio Button and make sure the "Activate Export Fonts"
Button is checked.
4.
Check the Unicode
checkbox in the Greek and Hebrew font rows. Note that many people will want to
use Unicode just for Hebrew (to get the formatting capability). You don't have
to change the Greek to Unicode.
5.
Then you must select
Unicode fonts in the Typeface list boxes for the Hebrew and Greek. If you want
to use Microsoft Fonts you can select Arial Unicode for both. The Microsoft
Arial Unicode font works well for Greek, but all Microsoft fonts currently have
serious Hebrew problems. We suggest choosing SBL Hebrew or Ezra SIL SR,
both of which ship with BibleWorks, for Hebrew, and Arial Unicode for Greek.
6.
You will also want to
change the point sizes for Greek and Hebrew. We suggest 14 for Hebrew and 12
for Greek.
Once you
make these changes Hebrew text exported from BibleWorks will be in Unicode and
should wrap correctly if the target Word Processor can
handle Unicode Hebrew (we recommend Word 2003 or later). The new BibleWorks
editor is itself fully Unicode capable if you are running Windows XP, service
pack 1 or later. Note that not all Word Processors are Unicode-capable, even
running under Windows XP. Word XP 2003 works very well but we have not tested a
wide array of Word Processors.
 Entering
Unicode Characters
Entering
Unicode Characters
If you click
on the ![]() button on the Editor toolbar a
window will open that permits you to insert any character from any font into
the editor. It is also Unicode enabled. For example, if your system has the
Arial Unicode font, you have access to almost the entire Unicode character set.
To try it select "Arial Unicode MS" from the font menu in the middle
at the top of the window. The menu on the top left displays the various
language ranges available in the Unicode specification. You can select and
deselect the ranges to determine which characters are displayed. The list box
on he right determines which system keyboard is activated when you insert the
character. To insert a character just double-click on the character block.
button on the Editor toolbar a
window will open that permits you to insert any character from any font into
the editor. It is also Unicode enabled. For example, if your system has the
Arial Unicode font, you have access to almost the entire Unicode character set.
To try it select "Arial Unicode MS" from the font menu in the middle
at the top of the window. The menu on the top left displays the various
language ranges available in the Unicode specification. You can select and
deselect the ranges to determine which characters are displayed. The list box
on he right determines which system keyboard is activated when you insert the
character. To insert a character just double-click on the character block.
Initialization
Files
User
preferences for the BibleWorks editor are stored in the INIT directory in files
named bwedit.ini, bweditc.ini and bweditn.ini. Separate INI files are
maintained for floating editor windows, the Analysis Window editor, and the
editor used to edit user notes (also in the Analysis Window). This permits you
to maintain different preferences for each one.
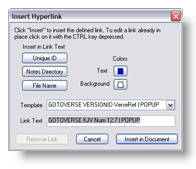 Hypertext
Links
Hypertext
Links
The
BibleWorks editor permits you to add hypertext links to your document. To
insert a link select the text that you want to contain the link, and select
Insert | Link from the main editor menu. The Insert Hyperlink
Window will then open. All you have to enter the link text in the "Link
Text" box and click on the "Insert in Document". You can also
click on the ![]() button. To remove a link, right
click on the link and click on the "Remove Link" button.
button. To remove a link, right
click on the link and click on the "Remove Link" button.
|
|
Clicking on this button will remove the link under the mouse cursor
when you right click on a link. This button will be grayed out of you right
click on selected text to create a new link. |
||
|
|
The text box labeled "Link Text" is where you type the link
text. |
||
|
|
This button adds the current "Notes Directory" to the
"Link Text" box at the current insertion point. |
||
|
|
This button adds a unique ID string to the "Link Text" box
at the current insertion point. This is useful when you are creating jumps
within a file. |
||
|
|
This button opens a window that permits you to select a file. The
selected file name will be inserted into the "Link Text" box at the
current insertion point. |
||
|
|
When you click this button the hypertext link will be inserted in your
document. |
||
|
|
|
|
|
|
|
This button allows you to change the background color of the hypertext
link. |
||
|
|
This button allows you to change the text color of the hypertext link.
|
||
The Template List Box
![]()
The
"Template" list box has templates for all the different kinds of
links that you can add. When you choose a list box option the template is
copied to the "Link Text" box for editing. The options are as
follows:
§
GOTOVERSE VERSIONID VerseRef | POPUP
This option will create a popup verse reference. When the mouse moves over the
link a window will pop up containing the text of the verse. You must use the
BibleWorks name for the version and the three letter BibleWorks abbreviation
for the book name. For example:
"GOTOVERSE NAS Rom 8:28 | POPUP".
§
LEXICON GREEK/HEBREW word
This inserts a link which will look up the specified word in the default Greek
or Hebrew Lexicon.
§
LEXNUM lexname wordnum [showverse]
This link will open up the specified lexicon at the specified entry number. You
can optionally specify a verse reference to highlight wherever it occurs in the
lexicon. For example:
"LEXNUM GIN 5 Gal 4:6".
§
COMMAND ...
This option
sends a command to the system command shell (e.g. DOS prompt).
§
JUMP linktext | filename
This creates a link that will jump to the specified location (bookmark) in the
specified file.
§
JUMP linktext
This creates a link that will jump to the specified location (bookmark) in the
current file.
§
JUMPOUT linktext | filename
This similar
to the previous jump type except that the jump target is in another file, which
you must specify. The file name should have the full path.
§
BOOKMARK linktext
This option adds a bookmark which can be used as a destination for the JUMP and
JUMPOUT link types. To use a unique id for the "linktext" click on
the "Unique ID" button.
§
OPEN ShellCommand
This is for programmers or others familiar with the system ShellExec command.
It executes whatever text you specify with the "ShellCommand"
parameter. You could, for example, specify and executable to run. You can use
this command to open Web Sites, run executables, or play sound files. It
basically mimics what happens when you double-click on a file name in Windows
Explorer. So, for, example:
OPEN www.bibleworks.com
will open the BibleWorks Web site in Internet Explorer.
OPEN myhtml.htm
Will open myhtml.htm in IE or whatever you have defined as the system handler
of HTML files.
You can specify the full path of the file if you like. If you specify a partial
path like "databases\myhtml.htm" BibleWorks will assume that the name
is relative to the BibleWorks base directory.
§
PLAY Soundfile
This option will play a sound file. The only parameter is the full path of the
sound file (WAV).
§
HTMLHELP linktext
This option
opens the specified HTML Help (CHM) file. "Link text" should contain
the file name for the CHM file followed by the subfile and bookmark within the
file. For example:
"HTMLHELP mychm.chm chapter1.htm#section1".
The dropdown
arrow on the ![]() button contains several shortcuts that
add various hypertext links without going through the Hypertext Links Window.
This permits you to easily enter common links with a single click. The options
are:
button contains several shortcuts that
add various hypertext links without going through the Hypertext Links Window.
This permits you to easily enter common links with a single click. The options
are:
§
Add Link to Selected Text
§
Insert Current Verse as Link
§
Insert Link to Last Resource Summary Resource (LG)
§
Insert Link to Last Lexicon Access
Example:
Adding a link to a Web Site
For,
example, to add a Web Site link to a selected portion of text:
1. Select
the text.
2. Choose Insert
| Link from the Editor Main Menu (or context menu).
3. Click on
the "Template" List box and select "OPEN ShellCommand".
4. In the
"Link Text" box type the Web Site location after the OPEN command,
5. Click
"Insert in Document".
Remember
that the editor is smart. If you just type the name of a Web Site in the text,
it will be turned automatically into a link.
Typing Hebrew in Microsoft Word
In
Microsoft Word 2003 and following users can type left-to-right Hebrew text
natively in Unicode. However, for users who have older versions of Word or
prefer to use non-Unicode fonts, we provide a set of macros to permit simple
left-to-right typing in Word with the BibleWorks non-Unicode fonts.
The Word
Macros
The
BibleWorks CD contains an "Add-In" that allows you to type
Right-to-Left Hebrew in Microsoft Word using BibleWorks non-Unicode fonts. To
install the Hebrew "Add-In", follow these steps:
§
Any earlier versions of
the Hebrew "Add-In" that you installed must be
uninstalled using the hebword.doc you used to install it. See below for
details.
§
For Word 6.0 and 7.0,
open the file hebword.doc in Word. For Word97 and Word2000, open the
file "hebwrd97.doc".
§
Double-click on the INSTALL
button.
§
Restart Word.
If you need
to uninstall the Hebrew "Add-In", follow these steps:
§ You must uninstall using the SAME
hebword.doc or hebwrd97.doc that you used to install the add-in. Open it in the
same version of Word you used.
§ Double-click on the UNINSTALL
button.
§ Go to the MSOffice/winword/startup
directory (or winword/startup or Microsoft Office/Office/startup) and make sure
all whad*.dot and wheb*.wll files are deleted.
§
You can turn the Hebrew
typing mode on and off via items that are added to the Format menu when
you install the Hebrew "Add-In". See the documentation provided in
the Hebword document for more details.
Font
Problems in Microsoft Word
If you are
running Word 97 or greater and have documents that were made using older
BibleWorks fonts, you may find that these documents will not display correctly
in Word. If you encounter this problem, read the Word document called fix97bug.doc
which is installed in the BibleWorks folder.