26 The Diagramming Module |
|
The Diagramming Module
An Overview of the Diagramming Window
Learning to Diagram
Loading a Diagram File
Opening the Greek New Testament Diagrams
Loading Text into the Text Window
Working with Symbols
Changing symbol thickness and color
Drawing lines, curves, and text callouts
Changing the Symbol List
Setting the Print Layout
Placing Guide Lines
The Diagramming Module Button Bar
The Diagramming Module
Diagramming has long been considered a very useful tool to help both students and pastors better understand the meaning of Biblical texts. Increasingly, seminaries and Bible Colleges are emphasizing the importance of analyzing texts using diagramming techniques. Diagramming tools have thus become essential to the detailed study of Scripture.
The Diagramming Module in BibleWorks provides all features needed for diagramming analysis of Biblical text. It supports diagramming by word as well as diagramming at a phrase level. The interface is elegant and powerful but very easy to use. A rich set of diagramming symbols is provided, and the user can access any Bible version in BibleWorks as a source of text to be diagrammed.
In addition, BibleWorks comes with example files and a fully diagrammed Greek New Testament (by Randy Leedy). These files fully illustrate how the different diagramming symbols are used.
To open the Diagramming Module you can click on the
Diagramming Module Button ![]() in
the Main Window Button Bar or select Tools | Diagramming Module from the
main menu of BibleWorks.
in
the Main Window Button Bar or select Tools | Diagramming Module from the
main menu of BibleWorks.
An Overview of the Diagramming Window
The Diagramming Module Window consists of three main areas:
· The Text Window at the top - This window is where you load the text you want to diagram. You can load it from a text file or from any version in BibleWorks.
· The Canvas on the lower right - This area is where you construct your diagram.
· The Symbols List on the left - This list contains the diagramming symbols you will use.
Using the diagrammer is very straightforward. First, load the text you want to diagram in the Text Window. Then, drag the symbols you want from the Symbols List to the proper location. You can then drag words from the Text Window and drop them into the symbols. Alternatively, you can just place the symbols for your diagram and then manually type in the words for each symbol.
Once you have constructed the diagram, you can save, load, print, or copy your work.
Learning to Diagram
The Diagramming Module includes an article by Randy Leedy presenting a detailed survey of how to diagram Greek New Testament sentences. To open this article, select Help | How to Diagram from the menu. This article makes the case for diagramming and then proceeds to outline a method for diagramming the Greek New Testament. The article discusses the various symbols in the Symbol List and gives examples.
Loading a Diagram File
To load a saved diagram, click the ![]() button
or choose File | Open from the Diagrammer menu. Diagrammer files have
the .dgm extension and normally are saved in the "diagram"
folder (within the BibleWorks folder). BibleWorks ships with example diagrams
illustrating the use of the various diagramming symbols
button
or choose File | Open from the Diagrammer menu. Diagrammer files have
the .dgm extension and normally are saved in the "diagram"
folder (within the BibleWorks folder). BibleWorks ships with example diagrams
illustrating the use of the various diagramming symbols
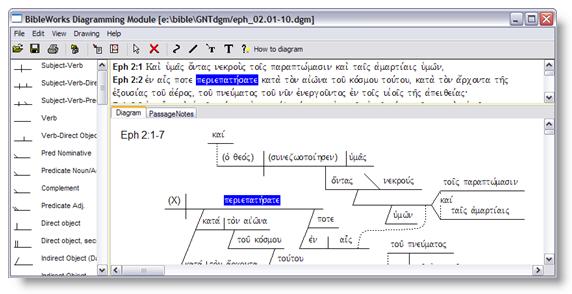
 Opening the Greek New Testament Diagrams
BibleWorks comes with Randy Leedy’s fully diagrammed
Greek New Testament. To load a saved diagram into the Text Window click
on the ![]() button
or choose File | Open Diagrammed Greek NT Browser from the Diagrammer
menu. In the window that opens, select the verse you want to load and
click the OK button.
button
or choose File | Open Diagrammed Greek NT Browser from the Diagrammer
menu. In the window that opens, select the verse you want to load and
click the OK button.
The documentation for this database can be opened by selecting Help | Introduction to BW GNT Diagrams.
If passage notes exist for a given diagram, a tab will appear above the diagramming canvas labeled Passage Notes. Click on the tab to view the passage notes.
Loading Text into the Text Window
There are two ways to load text into the Text Window. You can load a text file or import text from any Bible version in BibleWorks.
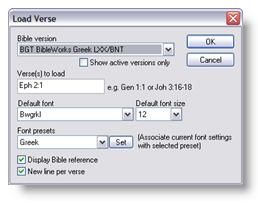 ·
To load Bible text into the Text Window, click on the
·
To load Bible text into the Text Window, click on the ![]() button
or select File | Load Into Text Window | From Bible Version from
the Diagrammer menu. You will be presented with the window at the right. You
will specify a Bible version, range of verses, font, and font size for the text
to be loaded. When you click on the OK button, the specified verses will
be loaded into the Text Window.
button
or select File | Load Into Text Window | From Bible Version from
the Diagrammer menu. You will be presented with the window at the right. You
will specify a Bible version, range of verses, font, and font size for the text
to be loaded. When you click on the OK button, the specified verses will
be loaded into the Text Window.
· To import a text file, select File | Load Into Text Window | From File from the Diagrammer menu. The text file should be a standard ASCII .txt file. You will be prompted for a file name with the usual Windows "Open File" window. After selecting a file name, you will see the window in the adjacent diagram. If the text is from a BibleWorks Bible version saved in ASCII format, you can specify which version it comes from and whether or not each line begins with a verse reference. This information is needed to format the text properly. In any case, you must specify the language of the text and the font and font size to use in the Diagrammer Text Window. When you click on "OK", the text will be loaded into the Text Window with the specified attributes. Normally, however, you will import text directly from BibleWorks as described below.
Working with Symbols
Adding a symbol
Once you have text in the Text Window, you can start combining text and symbols. To add a symbol to the Canvas, scroll the Symbol List until you find the symbol you want. Then double-click on the symbol, and it will be added to the Canvas. You can then use the mouse to drag it to the desired location in your diagram. Alternately, you can just drag the symbol from the Symbol List onto the Canvas.
Inserting words
Once you have placed diagramming symbols onto the Canvas, you can then plug words into the symbols. There are three ways to plug a word into a diagramming symbol:
· If the diagramming symbol has no word plugged into a given "slot" (a place on a diagramming symbol that would typically have a word plugged into it), you can double-click on the slot. A window will open in which you can specify a word to plug into the slot.
· You can drag words from the Text Window and drop them into a slot on a diagramming symbol.
· You can drag a word from one slot on a diagramming symbol and drop it into another slot.
Working with words in symbols
To select a word already plugged into a symbol, click once on the symbol to select it. Then, then click once on the word you want to select. This will select the specific word, and it should now be highlighted.
To edit the highlighted word, simply double-click on it. If you want to move the highlighted word to another symbol, you can drag the highlighted word and drop it onto a different symbol. To delete the highlighted word, simply hit the Delete key on your keyboard.
Undoing mistakes
If you make a mistake and need to back up, select Edit | Undo from the menu. You can go backwards many steps. To keep “un-doing” select Undo over and over again. To re-do something you have undone, simply select Edit | Redo from the menu.
Connecting symbols
You can connect two symbols by dragging them over each other. There are several ways to connect symbols. As you drag one symbol over another symbol, a red highlight will appear to show how the symbols will be connected. Endpoints on a symbol can connect with endpoints or line segments on another symbol. Not all endpoints or line segments can be used for connections.
Positioning symbols
When aligning different symbols, you can use a placement grid or guidelines. You can turn on the placement grid under Edit | Properties | Show Grid. When checked, you will see a grid of dots that can help you align symbols or sentences on the screen. To adjust the spacing between grid dots, enter the spacing in the Grid size control. If Snap to grid is checked, symbols will “snap” to the nearest grid dot when you drag symbols with the mouse. This behavior can be temporarily disabled by holding down the Control key while dragging symbols.
Alternately, you can use guide lines to align diagramming symbols on the screen. See Placing Guide Lines below.
Disconnecting symbols
To disconnect two symbols, click on them once to select them. Then, move the mouse over the point at which the symbols are connected. A red "X" should appear. If you click on the red "X", the symbols will be disconnected.
Resizing symbols
If a symbol can be resized, the resizing points will be highlighted with a sizing handle (a black square). Click and drag on the sizing handles to resize the symbols.
Changing symbol thickness and color
You can change the line thickness and line color of a symbol. When you double-click on a symbol, a Line Properties window will open. In this window, you can specify line thickness and line color.
Scaling symbols and text
At times you make want to enlarge or reduce the size of some of the symbols and text in your diagram. To accomplish this, select the symbols to scale. Then, select Edit | Scale selected symbols from the menu. In the window that opens, you can specify the amount to scale the highlighted symbols and text.
Drawing lines, curves, and text callouts
In addition to the diagramming symbols, you can draw lines, arrows, curves, and text callouts on the canvas. These objects may be helpful in highlighting or annotating specific areas on your diagram. Under the Drawing menu, select the drawing item that you want to place onto the Canvas. The button bar contains buttons for each of these drawing elements, for quicker access.
Changing the Symbol List
Depending on how you work, you may want to re-order the diagramming symbols that appear in the Symbol List. To do this, select Edit | Properties from the menu. In the window that opens you can change the display order of the diagramming symbols.
Setting the Print Layout
 If you want to print your diagrams, you can choose between
two options. The first options is to copy your diagram (using Edit |
Copy…) to the clipboard and then paste it into your word
processor. You may prefer this option if you are writing an article or a
paper. From within your word processor, you can then print the diagram.
If you want to print your diagrams, you can choose between
two options. The first options is to copy your diagram (using Edit |
Copy…) to the clipboard and then paste it into your word
processor. You may prefer this option if you are writing an article or a
paper. From within your word processor, you can then print the diagram.
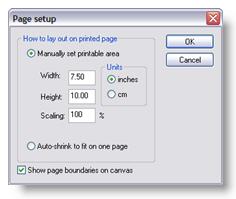
Alternately, you may want to print your diagrams from within BibleWorks. In that case, you will want to know how the diagrams will be arranged on a printed page. Select File | Page setup from the menu. In the window that opens, you can specify the page size and margin size. Once you can set the page size and margins in this window, the page margins will appear as a dotted line on the Canvas if you check Show page boundaries on canvas.
Placing Guide Lines
When creating multiple diagrams, it is sometimes helpful to use guide lines. Guide lines are horizontal or vertical lines that you can place on the screen to assist you in aligning symbols or text. Guide lines are visible on the screen, but do not print. Guide lines can also be turned on and off.
To place guide lines, select View | Guides | Add vertical (or horizontal) guide. Then, click on the canvas at the point where you want a guide.
You can turn on and off the guide lines under Edit | Properties | Show guides. If Snap to horizontal/vertical guides is checked, symbols will “snap” to the nearest guide line when you drag symbols with the mouse. This behavior can be temporarily disabled by holding down the Control key while dragging symbols.
The Diagramming Module Menu
This section briefly describes the menu entries in the Diagramming Module menu.
![]()
|
New |
Opens a new, empty diagram file. |
|
Open |
Opens an existing diagram file. |
|
Save |
Saves current changes to the diagram file. |
|
Save as |
Saves current diagram to a new diagram file. |
|
Open Diagrammed Greek NT browser |
Opens the browser showing all of the Greek New Testament diagram files. |
|
Load into text window |from Bible version
|
Loads verses from Bible versions into the Text Window. |
|
Load into text window |from file
|
Loads words from a text file into the Text Window. |
|
Page setup |
Opens a window where you can set up page margins and scaling before printing the current diagram. |
|
|
Prints the current diagram, using the settings specified in File | Page setup. |
|
Exit |
Closes the Diagramming Module. |
![]()
|
Undo |
Undoes the last action. If you moved, added, deleted, resized, etc. any of the diagramming elements, you can step back or undo the previous actions using this feature. |
|
Redo |
Re-applies the last “undo” actions. If you have just applied Edit | Undo, this step reverses the last actions that were “undone”. |
|
Copy selected items as vectors (for external program) |
Copies the currently selected diagramming elements to the clipboard. The elements are copied as vectors, which can be smoothly resized or otherwise edited in many word processors. |
|
Copy selected items as bitmap (for external program) |
Copies the currently selected diagramming elements to the clipboard. The elements are copied as a bitmap and can be pasted into an external program, such as a bitmap editor, a word processor, or an email program. |
|
Copy selected items |
Copies the currently selected diagramming elements to the clipboard. Use this option to paste diagramming elements back into the Diagramming Module. |
|
Cut selected items |
Copies the currently selected diagramming elements to the clipboard and then deletes them from the diagramming canvas. Use this option to paste diagramming elements back into the Diagramming Module. |
|
Paste |
Pastes the diagramming elements in the clipboard onto the diagramming canvas. |
|
Delete selected |
Deletes all currently selected diagramming elements from the diagramming canvas. |
|
Select all |
Selects all diagramming elements in the diagramming canvas. |
|
Disconnect selected symbols |
Disconnects all selected diagramming elements from any other diagramming element to which they are attached. |
|
Scale selected symbols |
Allows you to uniformly increase or decrease the size of the selected diagramming elements. |
|
Properties |
Opens a window controlling various Diagramming Module options, such as grid settings, guide line settings, etc. |
![]()
|
Show descriptive labels in symbols |
Toggles descriptive labels under each slot in the diagramming symbols on the canvas. |
|
Word details | Word only |
Shows only the form/word in the diagramming symbols. |
|
Word details | Word and morph/Strongs |
Shows both the form and any associated morphology code or Strong’s number. This only words for text taken from tagged Bible versions (BGM, KJV, WTM, etc.) |
|
Word details | Lemma, form, and morph/Strongs |
Shows the form, the lemma, and any associated morphology code or Strong’s number. This only words for text taken from tagged Bible versions (BGM, KJV, WTM, etc.) |
|
RTL/Hebrew symbols |
Reverse all symbols so that they accommodate a right-to-left presentation, as used in Hebrew. |
|
Zoom |
Zoom in/out on the current diagramming canvas. |
|
Guides | Show guides |
Hides/shows guide lines. |
|
Guides | Add vertical guide |
Adds a vertical guide line at the point where you next click on the diagramming canvas. |
|
Guides | Add horizontal guide |
Adds a horizontal guide line at the point where you next click on the diagramming canvas. |
|
Guides | Remove guide |
Deletes the next guide line on which you click. |
|
Clear text window |
Deletes all text from the Text Window. |
![]()
|
Draw curve |
Allows you to draw a curve on the diagramming canvas. |
|
Draw line |
Allows you to draw a line on the diagramming canvas. |
|
Draw callout |
Allows you to place a text callout on the diagramming canvas. |
|
Draw text box |
Allows you to place a text box on the diagramming canvas. |
|
Display order | Move selected items to top |
Moves the selected diagramming elements to the top of the “picture” (last to be drawn). |
|
Display order | Move selected items to bottom |
Moves the selected diagramming elements to the bottom of the “picture” (first to be drawn). |
|
Display order | Move selected items up |
Moves the selected diagramming elements to the up in the “picture” (making them drawn later). |
|
Display order | Move selected items down |
Moves the selected diagramming elements to the down in the “picture” (making them drawn earlier). |
![]()
|
Online help |
Opens the online help section for the Diagramming Module. |
|
How to Diagram |
Opens to an article by Randy Leedy, containing an introduction to Greek NT sentence diagramming, with examples. |
|
Introduction and Policies for the BibleWorks GNT Diagrams |
Opens the documentation for the BibleWorks Greek NT sentence diagrams. |
The Diagramming Module Button bar
Below is a brief description of each of the buttons on the Diagramming Module button bar:
|
|
Same as File| Open |
|
|
Same as File| Save |
|
|
Same as File| Print |
|
|
Same as File | Open Diagrammed Greek NT browser |
|
|
Same as File | Load into text window | from Bible version |
|
|
Same as View | Clear text window |
|
|
Switch back to standard mouse mode, where you select objects by clicking on them. |
|
|
Same as Edit | Delete selected |
|
|
Same as Drawing | Draw curve |
|
|
Same as Drawing | Draw line |
|
|
Same as Drawing | Draw callout |
|
|
Same as Drawing | Draw text box |
|
|
Same as Help | How to Diagram |
The Diagramming Symbols
The BibleWorks Diagramming Module does more than merely place lines and text together. The various diagramming symbols have semantic import. Thus, when you drag a symbol, such as the Prepositional Phrase symbol, onto the canvas and insert text into it, that text is internally tagged with its role in the prepositional phrase. Furthermore, the relationships of connected symbols are internally preserved. For example, if a Prepositional Phrase symbol were connected under a Verb slot of another symbol, the relationship between the words in the Verb slot and the words in the connected Prepositional Phrase symbol is noted. Our intention is to allow for the searching of the BibleWorks text databases using the implicit tags defined in diagram files.
For certain grammatical constructions, there are multiple symbols from which to choose. Sometimes the choice is stylistic (angled corners versus right-angled corners, double slants versus single slants). At other times, the difference is dependant on the language and diagramming style (predicate noun in English versus predicate nominative in Greek).
The following is a brief description of the various diagramming symbols that come with the Diagramming Module. The included BibleWorks Greek NT Diagrams demonstrates the usage of these symbols. For more discussion on how to use these symbols, we suggest you consult Randy Leedy’s article, available under Help | How to diagram.
|
|
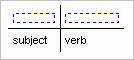
This symbol diagrams a subject and a verb. The subject is placed in the left slot and the verb is place in the right slot. Modifiers can be hung below each slot. Objects and predicates can be attached to the right. |
|
|
|
|
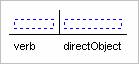
This symbol diagrams a subject, a verb, and a direct object. The subject is placed in the left slot, the verb is place in the center slot, and the direct object is placed in the right slot. Modifiers can be hung below each slot.
|
|
|

|
|
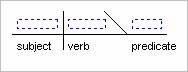
This symbol diagrams a subject, a verb, and a predicate. The subject is placed in the left slot, the verb is place in the center slot, and the predicate is placed in the right slot. Modifiers can be hung below each slot.
|
|
|
|
|
This symbol diagrams a verb. The verb is placed into the slot. Modifiers can be hung below the slot. The verb symbol can be attached to other symbols on its left side (e.g. to a conjunction symbol) or on its right side (e.g. to a direct object symbol).
|
|
|
|
|
This symbol diagrams a verb and a direct object. The verb is place in the left slot, and the direct object is placed in the right slot. Modifiers can be hung below each slot. Other symbols (e.g. a conjunction symbol) can be attached to either side of the symbol.
|
|
|
|
|
This symbol diagrams a predicate nominative. The predicate nominative is placed in the right slot. Modifiers can be hung below each slot. |
|
|

|
|
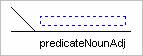
This symbol diagrams a predicate noun or predicate adjective. The predicate noun or adjective is placed in the right slot. Modifiers can be hung below each slot. |
|
|
|
|
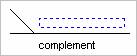
This symbol diagrams a complement. The complement is placed in the right slot. Modifiers can be hung below each slot. |
|
|
|
|
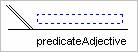
This symbol diagrams a predicate adjective. The predicate adjective is placed in the right slot. Modifiers can be hung below each slot. |
|
|
|
|
This symbol diagrams a direct object. The direct object is placed in the right slot. Modifiers can be hung below each slot. |
|
|

|
|
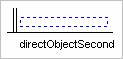
This symbol diagrams a second direct object or a double accusative. The direct object is placed in the right slot. Modifiers can be hung below each slot. |
|
|
|
|
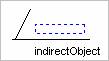
This symbol diagrams an indirect object. The indirect object is placed in the right slot. Modifiers can be hung below each slot. The symbol is attached below a verb by the angled line. |
|
|
|
|
This symbol diagrams an indirect object. The indirect object is placed in the right slot. Modifiers can be hung below each slot. The symbol is attached below a verb by the vertical line. |
|
|

|
|
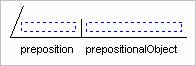
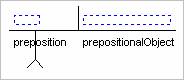
This symbol diagrams a prepositional phrase. The prepositional phrase is placed in the left slot, and the object of the preposition is placed in the right slot. Modifiers can be hung below each slot. The symbol is attached below another symbol by the angled line. |
|
|
|
|
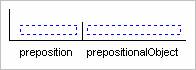
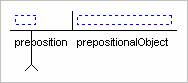
This symbol diagrams a prepositional phrase. The prepositional phrase is placed in the left slot, and the object of the preposition is placed in the right slot. Modifiers can be hung below each slot. The symbol is attached below another symbol by the vertical line. |
|
|
|
|
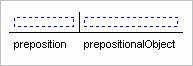
This symbol diagrams a prepositional phrase. The prepositional phrase is placed in the left slot, and the object of the preposition is placed in the right slot. Modifiers can be hung below each slot. The symbol is attached to another symbol on the left end of the horizontal line. This symbol may be used in constructions involving a compound prepositional phrase, connected to another prepositional phrase by a conjunction symbol. |
|
|
|
|
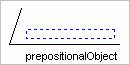
This symbol diagrams a prepositional phrase without a preposition. The object of the preposition is placed in the right slot. Modifiers can be hung below each slot. The symbol is attached below another symbol by the angled line. |
|
|
|
|
This symbol diagrams a prepositional phrase. The prepositional phrase is placed in the left slot, and the object of the preposition is placed in the right slot. Modifiers can be hung below each slot. The symbol is attached to another symbol via the bottom of the stilt. This symbol could be used in cases where the prepositional phrase is used as a predicate adjective. |
|
|
|
|
This symbol diagrams a substantival prepositional phrase. The prepositional phrase is placed in the left slot, and the object of the preposition is placed in the right slot. Modifiers can be hung below each slot. The symbol is attached to another symbol via the bottom of the stilt. This symbol could be used in cases where the prepositional phrase is used as a noun (e.g. as a subject or as an object). |
|
|
|
|
This symbol diagrams a preposition. The preposition is placed in the lone slot. This symbols could be used in cases where multiple prepositions are being diagrammed, connected by a conjunction. |
|
|
|
|
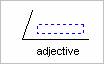
This symbol diagrams an adjective. The adjective is placed in the slot. Modifiers can be hung below the slot. The symbol is attached under another symbol, connected by the angled line. |
|
|
|
|
This symbol diagrams an adjective. The adjective is placed in the slot. Modifiers can be hung below the slot. The symbol is attached under another symbol, connected by the vertical line. |
|
|

|
|
This symbol diagrams an adverb. The adverb is placed in the slot. Modifiers can be hung below the slot. The symbol is attached under another symbol, connected by the angled line. |
|
|

|
|
This symbol diagrams an adverb. The adverb is placed in the slot. Modifiers can be hung below the slot. The symbol is attached under another symbol, connected by the vertical line. |
|
|

|
|
This symbol diagrams a subordinate clause. The subordinate clause is attached to the right end of the horizontal line. The top of the angled line connects the entire subordinate clause construction to the baseline of the main clause. The connecting conjunction is placed in the slot on the angled line. |
|
|

|
|
This symbol diagrams an infinitive. The infinitive is placed in the right slot. Modifiers can be hung below the slot. The left end of the symbol connects this symbol to another symbol. Objects of the infinitive can be connected to the right end of the symbol. |
|
|

|
|
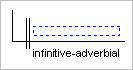
This symbol diagrams an adverbial infinitive. The infinitive is placed in the right slot. Modifiers can be hung below the slot. Objects of the infinitive can be connected to the right end of the symbol. The vertical line of the symbol connects this symbol to the word being modified. |
|
|
|
|
This symbol diagrams a substantival infinitive. The infinitive is placed in the right slot. Modifiers can be hung below the slot. The symbol is attached to another symbol via the bottom of the stilt. This symbol could be used in cases where the infinitive is used as a noun (e.g. as a subject or as an object). |
|
|

|
|
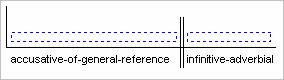
This symbol diagrams an adverbial infinitive with an accusative of general reference. The infinitive is placed in the right slot, and the accusative of general reference is placed in the left slot. Modifiers can be hung below the slot. Objects of the infinitive can be connected to the right end of the symbol. The vertical line of the symbol connects this symbol to the word being modified. |
|
|
|
|
This symbol diagrams a conjunction. The conjunction is placed in the slot. The top of the upper vertical line and the bottom of the lower vertical line attached to the symbols to be joined by the conjunction. |
|
|

|
|
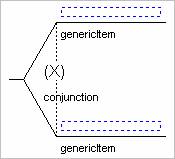
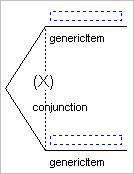
This symbol diagrams a conjunction. The conjunction is placed in the slot in the middle of the “Y”. The words/phrases being joined are placed into the top and bottom slots.
Verbs/objects/modifiers/etc. may be attached to the end and bottom of the horizontal lines. The conjunction symbol is attached to other symbols by the small horizontal “stub”. Multiple conjunctions can be attached to the dotted vertical line. |
|
|
|
|
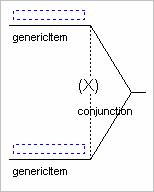
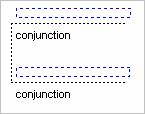
This symbol diagrams a conjunction. The conjunction is placed in the slot in the middle of the “Y”. The words/phrases being joined are placed into the top and bottom slots. Modifiers may be attached to the bottom of the horizontal lines. The conjunction symbol is attached to other symbols by the small horizontal “stubs” on the right and the left ends of the symbol. Multiple conjunctions can be attached to the dotted vertical line. |
|
|
|
|
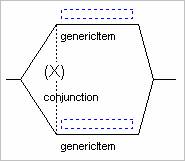
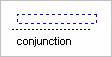
This symbol diagrams a conjunction. The conjunction is placed in the slot in the middle of the “Y”. The words/phrases being joined are placed into the top and bottom slots. Verbs/objects/modifiers/etc. may be attached to the end and bottom of the horizontal lines. Multiple conjunctions can be attached to the dotted vertical line. This symbol may be used when there is no need to attached the conjunction construction to other symbols (e.g. when the conjunction is joining two sentences). |
|
|
|
|
This symbol diagrams a dual conjunction, such as “both… and…” or “not… but…” constructions. The conjunctions are placed in the horizontal slots. This symbol is attached to other symbols by the end of the upper horizontal line. When the dual conjunction is attached to another symbol, the dotted vertical sizing line is hidden. |
|
|
|
|
This symbol diagrams a single conjunction. The conjunction is placed in the slot. This symbol is used to add multiple conjunctions to the above “Y” shaped conjunction symbols. |
|
|
|
|
This symbol diagrams a single subordinating conjunction. The conjunction is placed in the slot. This symbol is used to add multiple conjunctions to the above subordinate clause symbol. |
|
|
|
|
This symbol diagrams an introductory conjunction. The conjunction is placed in the horizontal slot. The symbol is attached to another symbol by the bottom end of the vertical line. This symbol might be used when a sentence begins with a conjunction. |
|
|

|
|
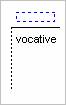
This symbol diagrams a vocative construction. The vocative is placed in the horizontal slot. The symbol is attached to another symbol by the bottom end of the vertical line. |
|
|
|
|
This symbol diagrams a substantival clause. The clause is attached to the top of this symbol. Any conjunction used in connecting the clause to the main sentence can be placed in the conjunction slot. The symbol is attached to the main sentence using the bottom of the vertical stilt. |
|
|

|
|
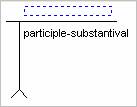
This symbol diagrams a substantival participle. The participle is placed in the horizontal slot. Modifiers can be hung below the slot, and other symbols can be attached to the right end of the horizontal line. The symbol is attached to the main sentence using the bottom of the vertical stilt. |
|
|
|
|
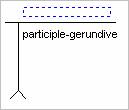
This symbol diagrams a gerundive participle. The participle is placed in the horizontal slot. Modifiers can be hung below the slot, and other symbols can be attached to the right end of the horizontal line. The symbol is attached to the main sentence using the bottom of the vertical stilt. |
|
|
|
|
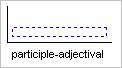
This symbol diagrams an adjectival participle. The participle is placed in the slot. Modifiers can be hung below the slot. Other symbols, such as objects of the participle, can be attached to the right end of the horizontal line. The symbol is attached under another symbol, connected by the vertical line. |
|
|
|
|
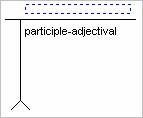
This symbol diagrams an adjectival participle. The participle is placed in the horizontal slot. Modifiers can be hung below the slot, and other symbols can be attached to the right end of the horizontal line. The symbol is attached to the main sentence using the bottom of the vertical stilt. |
|
|
|
|
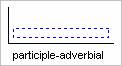
This symbol diagrams an adverbial participle. The participle is placed in the slot. Modifiers can be hung below the slot. Other symbols, such as objects of the participle, can be attached to the right end of the horizontal line. The symbol is attached under another symbol, connected by the vertical line. |
|
|
|
|
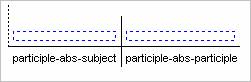
This symbol diagrams an absolute participle. The subject of the participle is placed in the left slot, and the participle is placed in the right slot. Modifiers can be hung below the slots. Other symbols, such as objects of the participle, can be attached to the right end of the horizontal line. The symbol is attached under another symbol, connected by the dotted vertical line. |
|
|
|
|
This symbol diagrams an indirect discourse participle. The participle referent is placed in the left slot, and the participle is placed in the left slot. Modifiers can be hung below each slot. Other symbols, such as objects of the participle, can be attached to the right end of the horizontal line. The symbol is attached to the main sentence using the bottom of the vertical stilt. |
|
|

|
|
This symbol connects a relative clause to the main sentence. One end of this symbol is connected to the baseline of the relative clause, and the other end of this symbol is connected to the baseline of the main sentence. |
|
|
|
|
This symbol connects a relative clause to the main sentence. One end of this symbol is connected to the baseline of the relative clause, and the other end of this symbol is connected to the baseline of the main sentence. |
|
|

|
|
This symbol connects a pendent nominative to the main sentence. One end of this symbol is connected to the baseline of the pendent nominative (usually a “Generic Item” horizontal line), and the other end of this symbol is connected to the resumptive element in the main clause. |
|
|
|
|
This symbol connects a genitive absolute construction to the main sentence. The right end of this symbol is connected to the left end of the baseline of the genitive absolute, and the top end of this symbol is connected to the element in the main clause. |
|
|
|
|
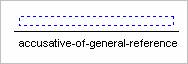
This symbol diagrams an accusative of general reference. The accusative construction is placed in the slot. Modifiers can be hung below the symbol. The right end of the symbol can be connected to other symbols (such as a conjunction symbol). |
|
|
|
|
This symbol connects a parenthetic nominative construction to the main sentence. The right end of this symbol is connected to the left end of the baseline of the parenthetic nominative, and the top end of this symbol is connected to the element in the main clause. |
|
|
|
|
This symbol diagrams a quotation. The quotation is attached to the bottom end of the symbol, and the remainder of the sentence is connected to the top end of the symbol. That conjunction slot along the vertical line of the stilt may be used for a word that introduces the quotation. |
|
|

|
|
This symbol diagrams an appositive. The word and renamed word are connected by the ends of the lowest line in the symbol. Once both ends are connected, the lowest line is rendered invisible, leaving only a ‘=’ between the two words. |
|
|
|
|
This symbol diagrams a verbal appositive. The word and renamed word are connected by the ends of the lowest line in the symbol. Once both ends are connected, the line is rendered invisible, leaving only a space between the two words. |
|
|
|
|
This symbol diagrams a pair of brackets. Words within the bracket are attached to the dotted vertical line. The dotted line is only visible when the symbol is selected. |
|
|

|
|
This symbol diagrams a left bracket. Words within the bracket are attached to the dotted vertical line. The dotted line is only visible when the symbol is selected. |
|
|
|
|
This symbol diagrams a right bracket. Words within the bracket are attached to the dotted vertical line. The dotted line is only visible when the symbol is selected. |
|
|
|
|
This symbol is used to indicate relationships between two constructions. The horizontal lines are independently re-sizeable. Baselines can be connected to the ends of these horizontal lines. This symbol is provided for alternate diagramming systems. |
|
|
|
|
This symbol is an extender, commonly used to prevent a sentence diagram from becoming too wide. It is used to extend and connect any vertical lines between symbols. |
|
|

|
|
This symbol is an extender, commonly used to prevent a sentence diagram from becoming too wide. It is used to extend and connect any vertical lines between symbols. |
|
|

|
|
This symbol diagrams a generic, unclassified construction. It might be used as a simple horizontal line, for extending existing lines. It is also provided for alternate diagramming systems. |
|
|

|
|
This symbol is a generic vertical line. It is provided to extend existing lines and for alternate diagramming systems. |
|
|
|
|
This symbol diagrams a generic, unclassified construction. It might be used as a simple dotted horizontal line, for extending existing lines. It is also provided for alternate diagramming systems. |
|
|

|
|
This symbol is a generic dotted vertical line. It is provided to extend existing lines and for alternate diagramming systems. |
|
|
|
|
This symbol diagrams a generic “lower” shelf. Words can be placed in the horizontal slot, with modifiers hung below it. The top of the vertical line connects it to a symbol above it. This symbol is provided for alternate diagramming systems. |
|
|

|
|
This symbol diagrams a generic “upper” shelf. Words can be placed in the horizontal slot, with modifiers hung below it. The bottom of the vertical line connects it to a symbol above it. This symbol is provided for alternate diagramming systems. |
|
|

|
|
This symbol is used to indicate relationships between two constructions. This symbol is provided for alternate diagramming systems. |
|
|