34 BibleWorks Maps |
|
The BibleWorks map module contains hundreds of megabytes of high resolution mapping data for the Bible lands. Pre-made, yet editable maps, for the Exodus, the conquest of Canaan, the ministry of Christ, etc. are installed with the module. The module also includes dozens of overlays for the maps, showing labels and sites for the various Bible eras and events. In addition, you can use the module to create your own detailed maps, with custom sites and labels. In all of the maps, you can zoom in and out, pan, tweak the colors, and export your current view.
Overlays and Views
Common Tasks
Reference
The Main Window
The Map Buttonbar
The Map Window Menus
The Overlays window
The Find Place Window
The Color Adjustment Window
The Travel Speed Window
The Edit Sites Window
The Editing Tools Window
The Site Label Properties Window
The Text Label Properties Window
The Polyline Properties Window
Overlays and Views

The map module uses overlays to present map data. You can think of an overlay as a transparent sheet with map features printed on it. Overlays can contain lines signifying boundaries and rivers, points and text designating sites, or photographs of the land. For example, one overlay might contain colored lines showing the journeys of Abraham. Another overlay might contain points a text showing major New Testament cities. Yet another overlay might contain an overhead satellite image of Israel.
Overlays can be stacked on one another, combining all of the data in the individual overlays into one map image. You can turn on and off individual overlays. You can edit existing overlays or even create your own overlays. Information for existing overlays can be copied to other overlays. Each overlay is stored in its own file. When changes are made to an overlay, the changes are saved in that file.
The BibleWorks map module comes with a large collection of overlays. 14 of the overlays are bitmaps – they depict overhead satellite photography or elevation data. The overlays are presented at various resolutions, but are aligned so that different overlays can be easily swapped in place. About 10 of the overlays contain water and boundary lines for the land surrounding the Mediterranean Sea. The remaining 100 or so overlays contain sites and labels for various Biblical events and locations from different time periods.
The map image that you see in the BibleWorks map module is a collection of one or more overlays, stacked on one another. We refer to this as a map or a view. Specifically a given map (or view) is comprised of two things: a collection of overlays, and a specific initial presentation for those overlays. For example, the pre-made view might use two overlays, an overlay showing a relief image of the Mediterranean and an overlay showing the travels of Paul. This pre-made view would use these two overlays, and the initial presentation might be the portion of the overlays which show Italy and Greece. Thus, when the map was opened, those two overlays would be displayed, zoomed and centered to show Italy and Greece.
A given map or view is stored in a small file, apart from the underlying overlays that are used. The BibleWorks map module comes with about 25 maps depicting different archaeological eras, 66 maps depicting the sites mentioned in each book of the Bible, and 30 maps depicting various major events or overviews of the Bible. These are editable and can be used as a base from which to create your own custom maps.
Common Tasks
This section contains descriptions of how you perform common tasks with the BibleWorks Map module.
Loading a pre-made map
To load a pre-made map, select File | Open from the menu. In the window that opens, you can select any of the pre-made maps. Note that In this window there are sub-folders for maps of the archaeological eras and for maps for the books of the Bibles. When you double-click on these folders, you will see the available maps.
Zooming
There are several ways to zoom in and out on the currently
loaded map. The quickest way to ![]() zoom out is to click the right mouse button (as long as it
isn’t over a text label or line). Using the keyboard, you can use the Page
Up and Page Down keys to zoom in or out. Likewise, the View |
Zoom in/out menu options do the same thing. On the buttonbar the control
shown here allows you to zoom in and out using the slider and the buttons on
either side of the slider.
zoom out is to click the right mouse button (as long as it
isn’t over a text label or line). Using the keyboard, you can use the Page
Up and Page Down keys to zoom in or out. Likewise, the View |
Zoom in/out menu options do the same thing. On the buttonbar the control
shown here allows you to zoom in and out using the slider and the buttons on
either side of the slider.
For the finest control over the zoom level, you can use the
Zoom mouse mode. To enter this mode, click Mode | Zoom from the main
menu, or click the ![]() button
on the buttonbar. In this mode, you can click and drag a bounding
rectangle around any area in the map window. When you finish dragging the
rectangle, the surrounded area will be zooms to fill the map window.
Clicking with the right mouse button in this mode zooms out.
button
on the buttonbar. In this mode, you can click and drag a bounding
rectangle around any area in the map window. When you finish dragging the
rectangle, the surrounded area will be zooms to fill the map window.
Clicking with the right mouse button in this mode zooms out.
Panning
If you want to shift the current map north, south, east, or west, you can move the mouse to the edge of the map. When the mouse is near the borders of the map window, the cursor will turn into an arrow, indicating that if you click, the map will pan in the direction indicated by the arrow.
For more detailed control over how much to pan, you can use
the Pan mouse mode. To enter this mode, click Mode | Pan from the main
menu, or click the ![]() button
on the buttonbar. In this mode, you can click and drag with the mouse to
re-position the displayed area of the map.
button
on the buttonbar. In this mode, you can click and drag with the mouse to
re-position the displayed area of the map.
Displaying/hiding overlays
 You can view all of the available overlays in the
Overlays window, shown below.
You can view all of the available overlays in the
Overlays window, shown below.
If this window is not visible, you can activate it using the ![]() button
on the buttonbar, or by selecting View | Toggle Overlays window from the
main menu. In this window, check the overlays you want to view, and
uncheck the ones you want to hide. The overlays at the top of the list are the
ones first drawn. The overlays at the bottom of the list are the ones last
drawn. For this reasons, the bitmap overlays are at the top of the list,
otherwise they will cover the text and line overlays.
button
on the buttonbar, or by selecting View | Toggle Overlays window from the
main menu. In this window, check the overlays you want to view, and
uncheck the ones you want to hide. The overlays at the top of the list are the
ones first drawn. The overlays at the bottom of the list are the ones last
drawn. For this reasons, the bitmap overlays are at the top of the list,
otherwise they will cover the text and line overlays.
The Overlays window can be made semi-transparent. From the menu in the Overlays window, you can toggle this options using Option | Make this window transparent. When this option is on, the window become semi-transparent unless the mouse is positioned over it.
Measuring the distance between two points
If you want to measure the distance and travel time between
two points, use the Ruler mouse mode. Click the ![]() button
or select Mode | Ruler from the menu. You are now in Ruler mouse mode.
Now, click on the place where you want to begin measuring. As you move the
mouse, a green measuring line will extend from that first point and the bottom
of the window will show you the distance and travel time for the line. With
each subsequent click, a new line segment will start, attached to the previous
line segments. This allows you to measure travel distances in a journey that
visits several points. When you double-click, the measuring line will
end, and the final total distance and travel time is displayed at the bottom of
the window.
button
or select Mode | Ruler from the menu. You are now in Ruler mouse mode.
Now, click on the place where you want to begin measuring. As you move the
mouse, a green measuring line will extend from that first point and the bottom
of the window will show you the distance and travel time for the line. With
each subsequent click, a new line segment will start, attached to the previous
line segments. This allows you to measure travel distances in a journey that
visits several points. When you double-click, the measuring line will
end, and the final total distance and travel time is displayed at the bottom of
the window.
The travel time is computed using a range of travel speeds and a range of hours traveled per day. You can adjust these parameters by selecting Options | Set time travel parameters.
Finding a site
If you want to find all overlays containing a site, click the
![]() button
or select Edit | Find from the main menu. This opens a window in which
you can type the name, or part of the name, of a location you want to display.
The search results list the overlays containing the location you type.
Double-click on an overlay to activate it in the map window.
button
or select Edit | Find from the main menu. This opens a window in which
you can type the name, or part of the name, of a location you want to display.
The search results list the overlays containing the location you type.
Double-click on an overlay to activate it in the map window.
Finding elevation and coordinates
As you move the mouse across the map, the latitude and longitude for the point under the mouse is displayed at the bottom of the window. If the map is showing a region for which elevation data is available, the elevation for the point under the mouse is also displayed after the coordinates.
Toggling the text color
Depending on the current background of the map, you may find
the text labels more readable in black (or white). To quickly toggle all of the
text labels between black and white, click the ![]() button,
or select Options | White on black labels.
button,
or select Options | White on black labels.
Tweaking the background color
According to your personal preferences, you may want to
adjust the color of the bitmap overlays, brightening the overlays, dimming
them, or even converting them to grayscale. The Color Adjustment window lets
you control contrast, brightness, red level, green level, blue level, and
de-saturation. To open this window, click the ![]() button
or select Options | Adjust color balance from the menu.
button
or select Options | Adjust color balance from the menu.

Copying the map to clipboard
At times you may want to capture the current map image and insert it into your word processor. From the Edit menu on the main menu you can copy the current map to the clipboard, using either Edit | Copy as bitmap or Edit | Copy as vectors. Then when you switch to your word processor, select Edit | Paste and the map will be pasted into your document. Depending on your word processor, you may find that one option works better than the other. If you copy the map as vectors, you may be able to edit the text labels and line, if this is supported in your word processor.
Saving changes
 When you make changes to a given map or its overlays, you
can save the changes using the
When you make changes to a given map or its overlays, you
can save the changes using the ![]() button
or by selecting File | Save from the main menu. When you save your
work, the following window will open:
button
or by selecting File | Save from the main menu. When you save your
work, the following window will open:
Because a given map is a complex object, this window makes you explicitly indicate to which files you want to save your changes. Changing label text, or line colors would affect the overlay file containing the label or line changed. Changing a global view setting, such as the color balance or the default zoom level for the map would change the map’s view file. In this window, place a check next to the files containing changes that you want to keep. To save no changes, uncheck all boxes and click the OK button.
Linking to BibleWorks
It’s easy take a site displayed in a map and look for its occurrence in the Bible text. Simply move the mouse over a site, and click the right mouse button. A menu will open, allowing you to search the Bible text for the site. The RSV, KJV, NAS, and NIV naming conventions are available for most of the sites.
Linking from BibleWorks
If you’re working with Bible text in BibleWorks, it’s easy to jump from BibleWorks to the map module. If you right click on an English word in the Browse Window you will see a menu item "Lookup in BibleWorks Maps". If you select this the Maps Module will open and the name lookup window will open to the selected word.
Editing text labels and lines
The labels and lines shown in the map module’s overlays can be edited. You can adjust coordinates, font size, font color, marker style, alternate spellings, and more. For lines, you can adjust the thickness, color, style, curve tension, and more.
To edit labels and lines, you need to be in Edit mode. Select
Mode | Edit from the main menu, or click the ![]() button
on the buttonbar to enter Edit mode. Now you can double-click on a text label
or line, opening a window where the attributes can be changed. In Edit mode,
you can also click and drag on lines and labels to reposition them.
button
on the buttonbar to enter Edit mode. Now you can double-click on a text label
or line, opening a window where the attributes can be changed. In Edit mode,
you can also click and drag on lines and labels to reposition them.
A given line or label resides in a specific overlay, so you will need to save your changes to that overlay if you want to keep the changes. See Saving changes, above.
Creating custom overlays
 The map module allows you to create your own overlays.
For instance, you might want to create an overlay showing a handful of selected
sites, with arrows representing lines of travel connecting certain sites. You
might also add to this overlay some text boxes containing comments.
The map module allows you to create your own overlays.
For instance, you might want to create an overlay showing a handful of selected
sites, with arrows representing lines of travel connecting certain sites. You
might also add to this overlay some text boxes containing comments.
To create a custom overlay, you will need to be in Edit mode.
Select Mode | Edit from the main menu, or click the ![]() button
on the buttonbar to enter Edit mode. Once you have done this, the Editing
Tools window will appear:
button
on the buttonbar to enter Edit mode. Once you have done this, the Editing
Tools window will appear:
Click on the New overlay button.
 At this point, you must select a filename for the new
overlay. The contents of the new overlay will be stored in this file, and this
overlay can then be used in maps/views with other overlays.
At this point, you must select a filename for the new
overlay. The contents of the new overlay will be stored in this file, and this
overlay can then be used in maps/views with other overlays.
Once you have selected a filename, the Overlay Properties window opens. In this window, you fill in the details, including the display name, of your new overlay.
When you are done, click the OK button. At this point, you have created a new, empty overlay, and the overlay should be visible in the Overlays window.
Now you are ready to add elements (sites, text labels, lines,
etc.) to your overlay. In the Editing Tools window, the active overlay is
should. This is the overlay into which new element will be added. The various
buttons in the Editing Tools window let you select between adding curves,
lines, sites, or text labels. To add a line, click on the line button ![]() and
then draw the line onto the map. To add a text label, click on the text label
button
and
then draw the line onto the map. To add a text label, click on the text label
button ![]() and
then click on the map to add a text label.
and
then click on the map to add a text label.
When you are done making changes, you must save your changes. See Saving changes above.
Copying sites between overlays
 When you are creating your own overlays, it can be
tedious to manually locate the exact coordinates for every new site that you
want to add. If you are adding sites that are already used in other overlays
(such as the pre-made overlays that come with the map module), you can easily
copy the sites from one overlay to another overlay.
When you are creating your own overlays, it can be
tedious to manually locate the exact coordinates for every new site that you
want to add. If you are adding sites that are already used in other overlays
(such as the pre-made overlays that come with the map module), you can easily
copy the sites from one overlay to another overlay.
To copy sites from one overlay to another overlay, select Overlays | Edit from the main menu. The following window opens:
In this window, the list on the left side shows all sites used in all overlays. The list on the right shows the sites used in the current overlay. In the control titled Choose the overlay to edit, make sure you have selected your desired destination overlay. Then, scroll the list on the right to find the sites you want to add. When you find a site in the list, simply double-click on it and it will be added to the overlay on the left.
Reference
The Main Window
The main window of the BibleWorks map module is filled with the current map image. The main menu runs across the top of the window. Below that is the buttonbar. Across the bottom of the window, the statusbar shows the current coordinates, elevation (where available), and the travel time information. The current zoom level is shown as ppd (pixels per degree of longitude/latitude).
 Mouse and keyboard use in the main window
As you move the mouse over the window, the coordinate of the current position under the mouse is shown at the bottom of the window. For areas around Israel, elevation data is also shown.
If you hold the mouse over a site, a popup window appears, displaying details for the site. You can edit this information in Edit mode (see Mode | Edit).
In all mouse modes, if you click with the right mouse button in an area without a label or a site, the map view is zoomed out. The Page up and Page down keys also zoom in and out.
In all mouse mode, if you move the mouse toward the edge of the map, the mouse cursor will switch to a directional arrow. When the arrow is displayed you can scroll the window by clicking with the left mouse button.
If the mouse is over a text label or a site, you can click on it with the right mouse button. A context menu will open, enabling you to search for this site in the Bible text in BibleWorks.
The Map Buttonbar
|
|
This button lets you open a new map file. |
|
|
|
This button opens a window in which you specify which changes you want to save. You can individually select among the changed overlays and map view files. |
|
|
|
This button toggles the Overlays window. |
|
|
|
This button toggles the map auto-info window. |
|
|
|
This button toggles the map inset. The inset is a small, moveable image that shows the zoomed-out surrounding area. |
|
|
|
This button activates the pan mouse mode. In this mode, you can click and drag with the mouse to scroll the map window contents. |
|
|
|
This button activates the zoom mouse mode. In this mode, you can click and drag a rectangle. The area in the rectangle will be enlarged and fill the map window. Right-clicking in this mode will zoom out. |
|
|
|
This button activates the ruler mouse mode. In this mode, you can measure the distance and travel time between points. See Measuring the distance between two points |
|
|
|
The button activates the edit mouse mode. In Edit mode, you can move and edit sites, labels, and lines. |
|
|
|
These controls adjust the zoom level of the map window. The buttons on the right and left zoom out and in, while the slider shows the relative zoom level. |
|
|
|
This button opens the Find Place window, allowing you type in a place and then to find and display overlays containing that place. |
|
|
|
This button copies the current map window to the clipboard. |
|
|
|
This button prints the current map window. |
|
|
|
This button centers the current map onto Israel. |
|
|
|
This button centers the current map on the Mediterranean Sea area. |
|
|
|
This button centers the current map on the default position saved with the current map. |
|
|
|
This button toggles the text and site labels between black and white. |
|
|
|
This button temporarily increases the site of all text and site labels in the map window. |
|
|
|
This button temporarily decreases the site of all text and site labels in the map window. |
|
|
|
This button hides small text labels on the current map window. |
|
|
|
This button opens the Color Adjustment window, in which you can tweak the colors of bitmap overlays. |
|
|
|
|
|
The Map Window Menus
File
· New – Creates a new map view
· Open – Opens an existing map view
· Save – Saves changes to changed overlays and map view files
· Save as – Saves current map view to a new file
· Print – Prints current map window
· Properties – Displays properties of current map view
· Exit – Exits the map module
Edit
![]()
· Copy as vectors – Copies the current map window to the clipboard in a vector format. This format may enable you to edit the text labels and lines when pasted in your word processor.
· Copy as bitmap – Copies the current map window to the clipboard in a bitmap format
· Find – Opens the Find Places window, allowing you to search for a place.
· Move selected items to active overlay – When items are selected in Edit mode, this command moves the items into the currently active overlay (specified in the Editing Tools window).
· Properties of selected items – When items are selected in Edit mode, this command allows you to set colors, fonts, etc. for all selected items at once. This command can be used to edit multiple lines and multiple text objects.
View
![]()
· Zoom in – Zooms in on the current view
· Zoom out – Zooms out from the current view
· Jump to | Israel – Centers the map view onto Israel
· Jump to | Mediterranean – Centers the map view onto the Mediterranean Sea area
· Jump to | Default position for current view – Centers the map view on the default position saved in the current map view file
· Toggle Overlays window – Toggles the Overlays window
· Toggle Label Info window – Toggles the Label Info window. This window shows details for the site or label under the mouse, automatically tracking as the mouse moves.
Options
![]()
§ Set current settings as default position – Takes the current area displayed in the window and makes the current zoom level and position the default position for the current map. When the map is next opened, it will open to the position currently displayed.
§ Adjust color balance – Opens the Adjust Color Balance window
§ Toggle grid – Toggles a labeled grid, overlaying the current map window
§ Toggle map overview – Toggles an inset zoomed out image of the surrounding area. The inset can be dragged and re-positioned.
§ Use smoothing (slower) – When you zoom out on a large bitmap overlay, the map modules’ zooming algorithm only displays some of the data when building the screen image. This can result in “sparkle” in the image. To eliminate this subtle defect, this option will smooth the image and remove the sparkle. Unfortunately, this is an intensive process that will increase the time it takes to draw zoomed out views.
§ Increase label size – Temporarily increases the font size of all text and site labels on the current map view.
§ Decrease label size – Temporarily decreases the font size of all text and site labels on the current map view.
§ White on black labels – Toggles the text color between black and white. For bitmap overlays with predominantly dark areas, you may prefer white text. For bitmap overlays with predominantly light, areas, you may prefer black text.
§ Use drop shadow for text – Toggles the shadow that appears under text and site labels
§ Hide small text – Hides all small text and site labels
§ Auto-shrink labels when zooming in – With a paper map, the text and site labels would get larger and larger as you zoom in. When this option is on, the text and site labels are automatically re-sized so that as you zoom in, the text does not become enlarged.
§ Set travel time parameters – Opens the Travel Time window. These parameters are used in Ruler mode to estimate the time needed to travel a given distance.
Overlays
![]()
§ New overlay – Creates a new overlay
§ Edit sites – Opens the Edit Sites window. This window lets you manages sites between overlays. You can delete sites, and copy sites between overlays.
§ Arrange selected items | Move to top – Used in Edit mode, this command moves the selected items to the end of the drawing order, so that they are drawn last.
§ Arrange selected items | Move up – Used in Edit mode, this command moves the selected items down in the drawing order, so that they are drawn later.
§ Arrange selected items | Move down – Used in Edit mode, this command moves the selected items up in the drawing order, so that they are drawn later.
§ Arrange selected items | Move to bottom – Used in Edit mode, this command moves the selected items to the beginning of the drawing order, so that they are drawn first.
Mode
![]()
§ Pan – Activates pan mouse mode. In this mode, you can click and drag with the mouse to scroll the map window contents.
§ Zoom – Activates the zoom mouse mode. In this mode, you can click and drag a rectangle. The area in the rectangle will be enlarged and fill the map window. Right-clicking in this mode will zoom out.
§ Ruler – Activates the ruler mouse mode. In this mode, you can measure the distance and travel time between points. See Measuring the distance between two points.
§ Edit overlay – Activates the edit mouse mode. In Edit mode, you can move and edit sites, labels, and lines.
Help
![]()
§ Contents – Opens the help file
§ About BibleWorks Maps – Shows the current version of the map module.
The Overlays window
The Overlays window determines which overlays are
displayed in the map window. The window lists all of the overlays currently
installed. If an overlay is checked, it will be drawn in the map window.
The Overlays window also determines the drawing/stacking order for the overlays. The overlays at the top of the list are drawn first (putting them at the bottom of the drawn map). The overlays at the bottom of the list are drawn last (putting them at the top of the drawn map). To change the order of an overlay, simple click on the overlay, and drag it to the new position in the list.
The Overlays window also provides a convenient interface in which you can edit the overlays. If you right click on an overlay, a context menu opens with a variety of overlay options.
The Overlays window contains the following menu items:
Folder
![]()
§ New – Create a new overlay folder. This folder is only used for organizational purposes in the Overlays window. No folder is created in the file system.
§ Rename selected – Rename the currently highlighted folder.
§ Delete selected – Delete the currently highlighted folder.
Overlay
![]()
§ New – Create a new overlay.
§ Duplicate selected – Create a copy of the currently selected overlay.
§ Delete selected – Delete the currently selected overlay.
§ Edit sites – Open the Edit Sites window, in which you can copy sites from one overlay to another overlay.
§ Properties – Show the Overlay Properties window for the currently selected overlay.
Option
![]()
§ Unselect all – Uncheck all overlays. This turns off all overlays.
§ Make this window transparent – This option cause the Overlays window to become semi-transparent until the mouse moves over it. It enables the user to keep the Overlays window open without obscuring the map window
 The Find Place Window
From this window, you can search for a site or text label. For instance, to find all overlays where “Jerusalem” is used, enter “Jerusalem” in the edit control at the top of the window. The list in the bottom half of the screen will show all overlays where the site appears. If you want to display the site in the map window, simply double-click on the entry in the list.
From this window, you can also search using wildcards. For instance, to search for all labels containing the word “journey”, you would enter “*journey*”. The matching sites are show in the site list.
This window will also be opened when you right click on an English word in the BibleWorks Browse Window and select "Lookup in BibleWorks Maps". This allows you to quickly locate in the maps database a particular word in the version that you are reading.
The Color Adjustment Window
 The Color Adjustment window controls the brightness and
color levels of the bitmap overlays. It is opened by choosing Options
| Adjust Color Balance from the Main Menu or by clicking on the
The Color Adjustment window controls the brightness and
color levels of the bitmap overlays. It is opened by choosing Options
| Adjust Color Balance from the Main Menu or by clicking on the ![]() button
in the Main Window Button Bar. Bitmap overlays include the satellite map
overlays and the stylized elevation overlays. In this window, brightness,
contrast, and color levels can be adjusted. Each map can have custom color
settings. As you adjust the sliders, you instantly see the results in the map
window.
button
in the Main Window Button Bar. Bitmap overlays include the satellite map
overlays and the stylized elevation overlays. In this window, brightness,
contrast, and color levels can be adjusted. Each map can have custom color
settings. As you adjust the sliders, you instantly see the results in the map
window.
§
Contrast
This slider controls the contrast level. When you increase the contrast, bright
colors are made brighter, and dark colors are made darker.
§
Brightness
This slider controls the brightness level. When brightness increases, the
colors in the entire image are made brighter.
§
Red/Green/Blue
These sliders let you boost or dim the red/green/blue balance in a bitmap.
§
Make grayscale
When checked, this option desaturates the current bitmap and converts it
into a black-and-white image.
§
Auto-dim
This button sets the brightness and contrast level to a level that dims the
bitmaps, making it easier to display black text labels over the bitmap image.
 The Travel Speed Window
The Travel Speed Window can be opened by selecting Options | Set Travel Time Parameters from the Main Map Menu. It allows you to customize the travel speed and travel time used in Ruler mode calculations. In ruler mode, a minimum and maximum travel time is computed for the distance drawn on the map. These travel times are computed using the range of travel speeds and the range of travel times entered in this window. The minimum travel time is computed as (distance) / (maximum travel speed) / (maximum hours traveled per day). The maximum travel time is computed as (distance) / (minimum travel speed) / (minimum hours traveled per day).
The Edit Sites Window
 The Edit Sites Window can be opened by selecting Overlays
| Edit Sites from the Main Menu. It permits you to copy sites between
overlays, delete sites, and create new overlays.
The Edit Sites Window can be opened by selecting Overlays
| Edit Sites from the Main Menu. It permits you to copy sites between
overlays, delete sites, and create new overlays.
You can create your own overlays from scratch but it is usually easier to start with a copy of an existing overlay. The Edit Sites Window permits you to do that.
The list on the left side of this window shows you all of the sites in the currently selected overlay (the overlay shown in the Choose the overlay to edit control). The list on the right side of this window shows you al of the sites in all of the overlays, sorted alphabetically.
To delete a site from the current overlay, simply select it and click Delete selected.
To add a site from the list on the right, simply double-click on the site to add, automatically copying it to the list on the left.
The Editing Tools Window
When you are in Edit mode, this window automatically
appears. This window lets you switch between the various editing tools used in
Edit mode.
New items are placed in this map overlay – This dropdown control lets you select the overlay into which new sites, labels, or lines will be added. When in Edit mode, you can edit or move any of the sites, labels, or lines in the map window. This control specifies to which overlay new elements will be added.
|
|
The mouse is set to selection mode. Map elements such as sites, text labels, and lines can be edited by double-clicking on them. Map elements can be dragged and moved or re-sized by clicking with the mouse. |
||
|
|
The mouse is set to curve-drawing mode. As you click, a new point is added to a curve. When you double-click, the last point in the curve is added at the point where you double-clicked. The curve is added to the overlay selected in the Editing Tools window. |
||
|
|
The mouse is set to line-drawing mode. As you click, a new point is added to a multi-segment line. When you double-click, the last point in the multi-line is added at the point where you double-clicked. The line is added to the overlay selected in the Editing Tools window. |
||
|
|
The mouse is set to site mode. A new site is added to the overlay selected in the Editing Tools window. When you click to add a site, the Site Label Properties window opens, in which you can specify the title, size, marker, style, etc. for the new site. |
||
|
|
The mouse is set to text label mode. A new text label is added to the overlay selected in the Editing Tools window. When you click to add a label, the Text Label Properties window opens, in which you can specify the title, size, angle, etc. for the new label. |
||
|
|
Creates a new overlay. You will need to specify a file name in which to store the new overlay. An Overlay Properties window will also open, in which you can enter the title of the new overlay. |
||
|
|
Opens the Edit Sites window, in which you can copy sites from one overlay to another. |
||
|
|
|
|
|
 The Site Label Properties Window
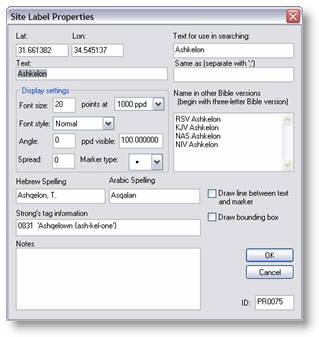
This window is opened when you double-click on a site label when you are in Edit Mode. It permits you to edit site details. Some of the fields are purely informational, while other fields control the way the site is drawn on the map.
§
Lat/Lon
Contains the latitude and longitude for the site marker
§
Text
The text that is shown on the screen attached to the site marker
§
Text for use in searching
The text used for indexing this site in the Find Places window. This can be
the same as or different from the text used in the Text control.
§
Same as
This field lists alternate names for a site. Informational only.
§
Name in other Bible versions
This control lists the various ways that a site may be named in various
Bible versions. When you right-click on a site, you can easily search for the
site in BibleWorks in the versions listed here. To add an entry, use this
format: “[Bible abbreviation] [Site spelling]”. For example,
to create an entry for the Gerasenes in the NAS, you would enter “NAS
Gerasenes”. To create an entry for Gadarenes in the KJV, you would enter
“KJV Gadarenes”.
§
Hebrew Spelling
The transliterated modern Hebrew spelling for the site. Informational only.
§
Arabic Spelling
The transliterated modern Arabic spelling for the site. Informational only.
§
Strong’s tag information
Shows Strong’s tagging information for the site. Informational only.
§
Notes
Shows any notes or details about the site. Informational only.
§
Font size … points at…
Font size, in points, of the site’s text label. However, since a map
can be viewed at different zoom levels, you also need to specify the zoom level
at which the font size is to be interpreted. The zoom level is given in
“ppd”, which stands for pixels per degree. We advise that you use
the same ppd for all sites in an overlay.
§
Font style
Specifies the font style (normal, bold, italic, etc.).
§
Angle
Specifies the angle at which to draw the text.
§
ppd visible
Specifies the zoom level at which the site show become visible. This is
specified in ppd, which is pixels per degree. The ppd of the current view is
shown at the bottom of the map window.
§
Spread
Specifies how far to space out the letters in the site’s label. The
default value, 0, specifies that you want to use the regular default spacing
between letters.
§
Draw a line between text and marker
Draws a connecting line between the site’s marker and the
site’s text label. This is useful in crowded maps where it may be
difficult to distinguish which site label belongs to your site’s marker.
§
Draw bounding box
Draws a rectangle around the text of the site’s label.
§ ID – Specifies a unique ID code for this site. When drawing multiple overlays that may contain the same site, this field enables the map module to only draw a given site once.
The Text Label Properties Window
 This window is opened when you double-click on a text
label while in Edit Mode. It permits you to set the details for a text label.
Some of the fields are purely informational, while other fields control the way
the text is drawn on the map.
This window is opened when you double-click on a text
label while in Edit Mode. It permits you to set the details for a text label.
Some of the fields are purely informational, while other fields control the way
the text is drawn on the map.
§
Lat/Lon
Contains the latitude and longitude for the text label’s upper left
corner.
§
Text
The text that is shown on the screen
§
Text for use in searching
The text used for indexing this label in the Find Places window. This can
be the same as or different from the text used in the Text control.
§
Same as
This field lists alternate names for the label. Informational only.
§
Name in other Bible versions
|This control lists the various ways that a label may be named in various Bible
versions. When you right-click on a label, you can easily search for the label
in BibleWorks in the versions listed here. To add an entry, use this format:
“[Bible abbreviation] [label spelling]”. For example, to
create an entry for the Gerasenes in the NAS, you would enter “NAS
Gerasenes”. To create an entry for Gadarenes in the KJV, you would enter
“KJV Gadarenes”.
§
Hebrew Spelling
The transliterated modern Hebrew spelling for the label. Informational
only.
§
Arabic Spelling
The transliterated modern Arabic spelling for the label. Informational
only.
§
Strong’s tag informaion
Shows Strong’s tagging information for the label. Informational only.
§
Notes
Shows any notes or details about the label. Informational only.
§
Font size … points at…
Font size, in points, of the text label. However, since a map can be viewed
at different zoom levels, you also need to specify the zoom level at which the
font size is to be interpreted. The zoom level is given in “ppd”,
which stands for pixels per degree. We advise that you use the same ppd for all
label s in an overlay.
§
Font style
Specifies the font style (normal, bold, italic, etc.).
§
Angle
Specifies the angle at which to draw the text.
§
ppd visible
Specifies the zoom level at which the site show become visible. This is
specified in ppd, which is pixels per degree. The ppd of the current view is
shown at the bottom of the map window.
§
Spread
Specifies how far to space out the letters in the site’s label. The
default value, 0, specifies that you want to use the regular default spacing
between letters.
§
Draw bounding box
Draws a rectangle around the label.
§
Plot text on a curve
When checked, this draws the label on a curve, whose shape you can adjust
with the mouse, in Edit mouse (using the selection tool).
§
Convert to site
Converts the text label into a site.
§
ID
Specifies a unique ID code for this label. When drawing multiple overlays that
may contain the same label, this field enables the map module to only draw a
given label once.
The Polyline Properties Window
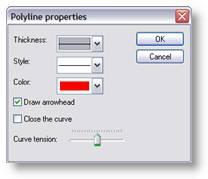 In this window you specify the drawing style of a curve
or line. When in Edit mode, you can double-click on a curve or a line to get to
this window.
In this window you specify the drawing style of a curve
or line. When in Edit mode, you can double-click on a curve or a line to get to
this window.
§
Thickness
Sets the thickness of the curve/line.
§
Style
Sets the line style (solid, dashed, dotted, etc.) of the curve/line.
§
Color
Sets the color of the curve/line.
§
Draw arrowhead
Draws an arrowhead at the end of the curve/line.
§
Close the curve
(Curves only) Closes the curve, connecting the last point on the curve with
the first point on the curve.
§
Curve tension
This slider adjusts how much the curve should bow when connecting the
points of the curve.