40 The BibleWorks Timeline |
|
The Timeline Window can be opened by choosing Resources | Miscellaneous | BibleWorks Timeline from the BibleWorks Main Menu.
Functionality
Overview
The Timeline Window
Using BibleWorks Timelines
Functionality
 The Timeline
module lets you manipulate and display thousands of chronological events on a
timeline. With this module, you can do the following:
The Timeline
module lets you manipulate and display thousands of chronological events on a
timeline. With this module, you can do the following:
· Create and customize complex timelines using a variety of colors and styles
· Print timelines (or portions of timelines)
· Copy timelines to the clipboard (allowing you to paste timelines into word processors as editable objects)
· Search for events
· Jump directly from an event on the timeline to a BibleWorks Bible reference or dictionary entry
Overview
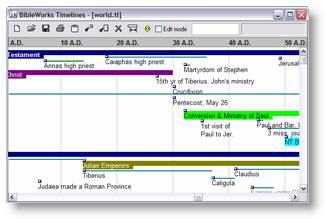
A timeline consists of an axis, eras, and events.
The axis of a timeline consists of a start and end date for the entire timeline and the time unit for the dates in the timeline (years, weeks, days).
A timeline also contains eras. An era is defined here as a "long" period of time. For example, the previous picture shows an era called "The New Testament", starting at about 4 B.C. and continuing off the screen. A timeline can have many eras, and eras may overlap one another.
The final part of a timeline are the events. An event is conceptually some occurrence in an era (for example, in the previous picture, Pentecost and the Conversion and Ministry of Saul are events in the New Testament era). Each event in the timeline is assigned to an era.
The Timeline Window
The scroll bars let you scroll through the timeline, and the box in the lower right-hand corner of the window lets you resize the window.
The Buttonbar across the top of the screen has buttons which
manipulate timelines. From here you can create, open, save, and print
timelines. You can also use these buttons to copy portions of the timeline to
the clipboard, to insert and delete items from the timeline, and to modify the
colors, spacing, and labeling of the timeline. A ![]() appears on the
Buttonbar when there are more timeline items visible by scrolling up or down. As
the mouse passes an item on the screen (an era, event, button, etc.), the
status line on the Buttonbar displays information about the item.
appears on the
Buttonbar when there are more timeline items visible by scrolling up or down. As
the mouse passes an item on the screen (an era, event, button, etc.), the
status line on the Buttonbar displays information about the item.
Using BibleWorks Timelines
This section describes how to do common tasks with Timelines.
Scrolling
To move to different times on the timeline, scroll using the
horizontal scrollbar. The ![]() appears in the Buttonbar when
there are more items visible by scrolling up or down. The vertical scrollbar is
used to scroll up and down.
appears in the Buttonbar when
there are more items visible by scrolling up or down. The vertical scrollbar is
used to scroll up and down.
Alternatively, you can use the right and left arrow keys to scroll left and right on the timeline. The <Up>, <Down>, <Page up>, and <Page down> keys will scroll the timeline up and down.
Resizing
To make the window larger, click and drag the box in the lower right corner of the timeline window.
Searching for a Date or Term
In the Command Line on the Buttonbar, you can type in a date or term and press <Enter>. For terms you can use wild-cards just as you can on the BibleWorks Search Window Command Line. When a date is entered, the timeline will scroll to that date on the timeline. When a term is entered, the events that match that term will be displayed in a Search Browse Window. Double-clicking on the term will make the timeline jump to the event.
Copying Timelines
 Portions of
the timeline may be copied to the clipboard. To copy to the clipboard, click
the Copy button
Portions of
the timeline may be copied to the clipboard. To copy to the clipboard, click
the Copy button ![]() . This opens a window where you can
specify what to copy to the clipboard (current screen or a range of time) and
how to copy it (in color or in black and white). The timeline portion is copied
as a Windows Metafile (as opposed to a bitmap), so that after you paste it into
a word processor, you should be able to edit the individual lines and labels.
You can also paste the timeline into the Windows95/98/NT Paint program (where
it will become a bitmap).
. This opens a window where you can
specify what to copy to the clipboard (current screen or a range of time) and
how to copy it (in color or in black and white). The timeline portion is copied
as a Windows Metafile (as opposed to a bitmap), so that after you paste it into
a word processor, you should be able to edit the individual lines and labels.
You can also paste the timeline into the Windows95/98/NT Paint program (where
it will become a bitmap).
Printing Timelines
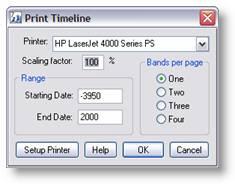 To print the
timeline, click on the print button
To print the
timeline, click on the print button ![]() . This will open the print window. From
here you can specify the following:
. This will open the print window. From
here you can specify the following:
· Range to print - Specifies the dates of the portion of the timeline to be printed.
· Zoom - The scaling factor to be applied to the printed image. A value of 100(%) will print the timeline at the size displayed on the screen. A value of 50(%) will print the timeline at half the size displayed on the screen.
· Bands per page - specifies the number of sections into which the page will be divided for printing.
Edit Mode
![]() To modify the timeline (moving
items, editing labels, etc.), the timeline must be in edit mode. To
activate edit mode, check the edit mode box on the Buttonbar. To deactivate
edit mode, uncheck the edit mode box on the Buttonbar.
To modify the timeline (moving
items, editing labels, etc.), the timeline must be in edit mode. To
activate edit mode, check the edit mode box on the Buttonbar. To deactivate
edit mode, uncheck the edit mode box on the Buttonbar.
Modifying the Axis
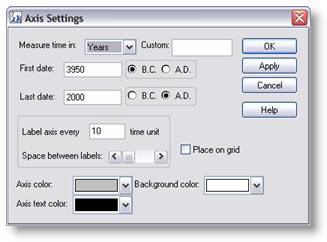 Check the Edit
mode box on the Buttonbar. To modify the time axis and screen appearance,
click the Axis Settings button
Check the Edit
mode box on the Buttonbar. To modify the time axis and screen appearance,
click the Axis Settings button ![]() , or double-click on the axis, or click
on the axis with the right mouse button. A window will appear with which you
can control the labeling, colors, and appearance of the entire timeline.
, or double-click on the axis, or click
on the axis with the right mouse button. A window will appear with which you
can control the labeling, colors, and appearance of the entire timeline.
· Measure time in - The time unit of the dates (days, weeks, or years)
· First date, Last date - Dates of the timeline
· Label axis every - Time units between time axis labels
· Space between labels - Controls visual space between each time axis label
· Axis Color - Color of the time axis and divider lines
· Axis Text Color - Color of the text on the time axis
· Background Color - Color of timeline background
· Place on grid - Toggles whether to place items on an invisible grid when moving items with the mouse
Modifying the Eras and Events
 Check the Edit
mode box on the Buttonbar. To modify the properties of an era or event
simply double-click the item, or select "Properties" from the
item’s context menu (click on the item with the right mouse button). A
window will appear with these options:
Check the Edit
mode box on the Buttonbar. To modify the properties of an era or event
simply double-click the item, or select "Properties" from the
item’s context menu (click on the item with the right mouse button). A
window will appear with these options:
· From, To - The dates of the era/event. The two values can be equal.
· Caption - The text describing the era/event. Items can also be added to the item’s context menu from here.
· Extent Style - Defines how the colors are applied to the item.
· Line - The caption color will be applied to the text, and the time span will appear as a thin line (using the Extent Color) over the text.
· Era Bar - The caption color will be applied to the text, and the time span will appear as a thick line (using the Extent Color) behind the text. Also, a rectangle will appear behind the text using the Extent Color.
Modifying the Context Menus
Check the Edit mode box on the Buttonbar. Double-click the item, and the Properties window for the item will appear. The entries that appear on the context menu are defined in the Caption entry of the Properties window. The text appearing after a symbol ‘ | ’ in the Caption entry will define the contents of the context menu. For example, the following Caption entry
The Beginning | Gen 1:1; Gen 2:1; Eas Creation
defines an item with the caption "The Beginning". The item will have a context menu for three items: a BibleWorks lookup for Genesis 1:1, a BibleWorks lookup for Genesis 2:1, and a BibleWorks lookup for "creation" in Easton’s dictionary. The following types of lookup from the context menu are supported:
· Nave’s Dictionary Entry - The format is <NAV dictionary-term>
· Treasury of Scripture Knowledge Entry - The format is <TRE dictionary-term>
· Easton’s Dictionary Entry - The format is <EAS dictionary-term>
· Simple BibleWorks queries - An entry using the format <.word1 word2 word3... > will look up all verses with the terms word1and word2 and word3 .... in the last English version used in BibleWorks.
· Scripture references - The format is <Book-abbrev reference>. For example, Gen 5:2, Mat 12:5, Rev 5:5.
· Web page links - The format is http://www.webaddress.com where http://www.webaddress.com is a URL pointing to a web page.
Each entry must be separated by a semicolon (;).
Moving and Resizing Eras and Events
Check the Edit mode box on the Buttonbar. To move an era or event, click and drag the item. To confine item placement to a grid, check the "Place on grid" box in the Axis Settings window. Keep in mind that when you move an era, all of its underlying events will move with it.
To resize the caption of an event, click on the event. A box will appear around the caption to highlight it.
Click and drag the square in the lower right of the highlight box to resize the caption.
Inserting Eras and Events
Check the Edit mode box on the Buttonbar. To add an
era to the timeline, click the Insert Era button ![]() . A window will appear,
allowing you to fill in the details. To add an event to the timeline, click the
Insert Event button
. A window will appear,
allowing you to fill in the details. To add an event to the timeline, click the
Insert Event button ![]() , or press the Insert key. You will
have to assign the event to an era, and then fill in the details for the event
(a window will appear).
, or press the Insert key. You will
have to assign the event to an era, and then fill in the details for the event
(a window will appear).
Deleting Eras and Events
Check the Edit mode box on the Buttonbar. Click the
event or era to delete. Once the item is highlighted, click on the delete
button ![]() ,
or press the Delete key. Keep in mind that when an era is deleted, all of its
underlying events will also be deleted.
,
or press the Delete key. Keep in mind that when an era is deleted, all of its
underlying events will also be deleted.
File Operations
· Note: All timeline data files must be in the BibleWorks directory.
·
To Create a new, empty timeline Click on ![]() .
.
·
To Load a timeline Click on ![]() .
.
·
To Save changes to current timeline Click on
![]() .
.
Snap to Grid
To move all of the events of an era onto an invisible grid, select "Snap to grid" from the context menu of the era (click on the era with the right mouse button).