42 Solving Problems and Getting Help |
|
BibleWorks wants each customer to obtain the most from his/her BibleWorks program and encourages customers to contact BibleWorks Technical Support for help with difficulties (see Reaching Technical Support for details).
First, however, try these hints; they may solve the problem without a Technical Support call.
Solving the Most Common Problems
An Overview of the Help System
Getting Updates
Installing Support for Cyrillic and Eastern European Fonts
Adding Support for Non-English Keyboards
Solving the Most Common Problems
Note that many program difficulties can be fixed by starting BibleWorks with the SHIFT key depressed. When you do this a Window containing startup options will open. These options can be used to fix many common problems. See the Startup Options section for details.
1. The BibleWorks Help System - See An Overview of the Help System elsewhere in this document. Most problems can be solved through referencing this system.
2. Installation Difficulty Caused by Virus Detection Programs - Some virus checking software hinders program installations. Turning virus checking off during BibleWorks installation solves this. BibleWorks checks for viruses before CD duplication, so no danger results. Virus checking software should be re-enabled after BibleWorks installation.
3. Sudden Unexplained Problems Caused by Damaged Initialization File(s)- If BibleWorks suddenly exhibits problems after once working, try deleting the BibleWorks initialization file, bw700.ini, located in the BibleWorks root directory. If you have not changed the default directory configuration, and deleting the bw700.ini file does not help, you can also try deleting the bwdir.ini file. Pressing the SHIFT key during BibleWorks startup allows reloading of fonts and creating new .ini files.
4. Problems Caused by Viruses - It's good practice to defragment your hard drive, run a virus check program on your system, and create a Windows System Restore Point before installing major programs such as BibleWorks. If you share diskettes with friends or download files from the Internet, the chances of catching a computer virus are not small. Anti-virus programs are available at any computer store and on the Internet.
5. Problems Caused by Conflicts with Another Program - Windows is a multi-tasking operating system, meaning multiple programs are almost always running concurrently. BibleWorks will run compatibly beside standard programs, but if you suspect a conflict between BibleWorks and another running program try installing BibleWorks without that program running. To prevent that program from starting up during a Windows reboot, click with the RIGHT mouse button on the "Start" button, choosing the "Open" option, then double-click the "Programs" folder and delete the suspected conflicting program from the "Startup" folder.
6. Problems Caused by Insufficient Memory - BibleWorks 7 requires main memory of 64 megabytes or more to run satisfactorily beside other typical Windows programs.
7.
Problems Caused by File
Corruption - Seeing strange
verse numbers, having BibleWorks working for some verse ranges or lookup words
and not for others, or having unexplained crashes, suggests corruption of data
or program files. Hard drives do sometimes develop bad sectors, and some
real-time disk compression programs can cause file corruption.
If you suspect files may be corrupted, check your hard drive for bad sectors
and isolate them (you can use a Windows tool such as chkdsk.exe).
Once you have isolated bad sectors from the hard drive, you can eliminate
corruption of installed BibleWorks files by re-installing BibleWorks from the
CD.
8. Problems Caused by Installation at Hard Drive Root - The error message, "No valid registration file was found; please run Setup" encountered when starting BibleWorks means BibleWorks was installed on the root of a hard drive (for example, to D:\ instead of to a folder like D:\BibleWorks 7). To correct this, uninstall BibleWorks (see instructions elsewhere in this section) and reinstall it to a non-root folder such as D:\BibleWorks 7.
9. Uninstalling BibleWorks - To uninstall BibleWorks, open the Windows "Control Panel" Folder and double-click on the "Add-Remove Programs" Icon. The uninstall procedure will remove all BibleWorks fonts and DLLs installed on your system. It will also delete all files installed in your BibleWorks directory. It will not delete the BibleWorks directory if any files have been added to it since the initial installation: in this case, to complete the uninstall process you must delete the BibleWorks directory yourself. Before you do this, make sure you have backed up any files you may need later.
10. General Protection Faults - BibleWorks may sometimes produce "GENERAL PROTECTION FAULT (GPF)"(also called "You have performed an illegal operation") errors. If while running BibleWorks you encounter a reproducible GPF, please contact BibleWorks Technical Support for problem diagnosis.
11. Problems with Sluggish Performance - A badly fragmented drive can affect program performance significantly. Before calling Technical Support, defragment your hard drive using the Disk Defragmenter provided with Windows (usually in Programs | Accessories | System Tools).
12. Square Characters in Greek or Hebrew Text - Installing BibleWorks over an older version may result in strange square-shaped characters being displayed with Greek and/or Hebrew text. To correct the problem, which is caused by the presence of obsolete fonts on your system, restart Windows and use the Windows Control Panel Font utility to delete the old Greek and Hebrew fonts. Then install the fonts called BWHEBB and BWGRKL, which can be found in your BibleWorks directory.
13. Problems with Older Fonts in Microsoft Word- To display, in Word 97 or a later version, some older BibleWorks fonts (or the Graeca/Hebraica fonts from older versions of BibleWorks), may require the application to your document of the macro FIX97BUG.doc (available from the BibleWorks Web Page or the BibleWorks folder in your hard drive). (This is a Word problem, not a BibleWorks problem.)
14. Greek or Hebrew (e.g. qames) Character Not Appearing Properly in Word Processor - After receiving copied Greek or Hebrew text from BibleWorks, a word processor may try to make automatic changes. It is especially common for word processors with features like "Smart Quotes" to replace the single quote (') automatically with a different character such as a backquote. The workaround is to turn off, typically in the Tools | Auto-Correct and Tools | Auto-Format menus, the word processor's automatic replacement features, such as "Replace Straight Quotes with Smart Quotes."
15.
Problems Displaying Greek
and Hebrew Fonts -
BibleWorks uses the now-standard capability of negative character offsets in
its fonts to implement overstrikes for Greek accents and Hebrew pointing.
Old video drivers not having this capability will need to be updated. To
determine if a video driver update is needed, open your word processor, change
to the BWGRKL font, and type something in Greek using accents. If the
Greek does not display properly in your word processor, contact the
manufacturer of your video driver for an updated driver. (They are
usually available via the Internet.)
A temporary workaround is frequently available by changing display property
settings, such as resolution (from the Control Panel).
16.
Installing Postscript Greek
and Hebrew Fonts - Most people will want to use the TrueType
Greek and Hebrew fonts installed automatically in BibleWorks. Although we
discourage use of the PostScript fonts included with BibleWorks (in the
BibleWorks root directory), they may be installed by using the Control Panel
Fonts option to uninstall the TrueType fonts BWHEBB and BWGRKL and installing
the PostScript fonts using a separate PostScript font manager (such as Adobe
Type Manager).
Macintosh versions of the BibleWorks fonts are installed to the BibleWorks
folder in a file called "fonts.sit".
An Overview of the Help System
There are numerous ways to get help in BibleWorks:
The online help gives detailed documentation, linked to the BibleWorks program, for all BibleWorks features. When you click the Help button in any BibleWorks window, or when you press the F1 key, online help will open to the appropriate page. Online help also has a table of contents, an index, and a keyword search.
BibleWorks has extensive context-sensitive help. Even if there is no "Help" button in a BibleWorks window, context-sensitive help can be obtained by placing the mouse cursor over the item or window you have questions about and pressing the F1 key. The online help will open to the appropriate page.
If you move your mouse over any of the buttons in the Main Window and let the mouse dwell there for a moment, a small message (called a tool tip) will pop up, describing the purpose of that button. Most other windows with their own button bars also have tool tip messages.
Most areas of the Main Window have associated with them a context menu, accessed by right clicking on the area with the right mouse button.
BibleWorks also comes with an extensive set of Study Guides and Videos to help you get the most out of BibleWorks.
The BibleWorks web site (http://www.bibleworks.com/) contains BibleWorks updates, news, and customer support resources. A special Internet resource is the BibleWorks Forums (http://www.bibleworks.com/forums), at which questions and comments may be sent to other users at any time of day. The BibleWorks Forums are organized into subtopics for various interest groups: you may join as many subtopics as you wish.
Reaching Customer Service and Technical Support
BibleWorks has a Customer Service office for help with ordering and other non-technical matters. Contact BibleWorks Customer Service as follows:

BibleWorks registered users receive, at their option, periodic updates, tips, and news of future upgrades. Users can register free of charge with the card included in their product package or at the BibleWorks web site (above).
Finally, registered BibleWorks users may also obtain free help from BibleWorks Technical Support. (Unregistered users will be required to register by giving their BibleWorks Serial Number and mailing address before receiving support.) Contact BibleWorks Technical Support as follows:

 Getting Updates
BibleWorks is updated regularly as a free service to our users. Sometimes, updates are made to add new features or customizations to the program, as a result of user requests and suggestions. At other times, updates are made to fix database bugs or program bugs. There are two ways to obtain these updates:
Checking the BibleWorks Web Site for Updates
If you want to download free program updates from the Internet, select Help | BibleWorks on the Web | Check for web updates on the main menu. You can also click on the "Check for Updates" Button in the "Updates" Tab of the Options Window . BibleWorks will then attempt to connect to the Internet.
In order to connect to the BibleWorks updates server, you will need to have Internet Explorer (version 4.0 or greater) installed. It is available for free at http://www.microsoft.com/ie. Some Internet providers may not allow programs to connect to the Internet automatically, so you may need to connect first to the Internet before starting the BibleWorks updater.
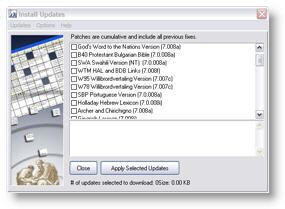
Once the connection is made the BibleWorks Updates Window will open.
The upper list box will show you the updates that are available if there are any. When you click with the left mouse button on an entry, details about that particular update and its contents will appear in the Description window under the list of available updates. If you have already downloaded updates to your hard drive, and want to re-apply a previously downloaded update, you can click on the Options Menu and select the menu item labeled Show Downloaded Patches. This displays patches that have already been downloaded in previous sessions as well as any new patches that are available.
Check the boxes next to the updates that you want to download. When you are ready to download and apply the patches, click the Apply Selected Updates button. The BibleWorks updater will then begin downloading the patches. After they are all downloaded, BibleWorks will apply the patch to your copy of BibleWorks and restart the program.
If you check the Save Patch File After Applying option in the Options Menu, a copy of your downloaded patches will be placed in the "patches\applied" folder after they have been unpacked and installed. If you want to delete patches that are already downloaded and stored on your hard drive, select the Show Downloaded Patches option in the Options Menu and select the patches to delete. Then click on the Delete Selected Updates option in the Updates menu. This will erase the patches from the hard drive but will not undo the patch. This same procedure can also be used to remove patches from the available patches list that you do not want to apply. This will prevent them from reappearing every time you check for updates.
If you select the Backup Files Changed by Patches item in the Options Menu, a backup copy of BibleWorks files that are updated or replaced by the patch with be placed in the "patches\backup" folder. Saving copies of patches and backing up the patched files can consume a considerable amount of disk space.
How the Updater Works
This section provides some technical details on how the updater works. Most people will not need this information but it is provided for those few who need it. This section also provides answers to some of the most common questions about the updater.
Patches are *.pbn files. Whether you download them from the website, or whether you have the updater do it automatically for you, it is the same file. The updater takes a .pbn file and applies it to your BibleWorks files. For every file in your BW directories that is changed by a patch, a backup copy is placed in "patches\backup" if "Backup Patched Files" is checked. You can delete these files if you need to free up space. When the updater is finished applying the patch, the .pbn file itself is stored in "patches\applied" if you check "Save Patches When Done". The patches stored here are available to be applied again if you select "Show All Patches" (or "Show Downloaded Patches"). The contents of "patches\applied" can also be deleted if you want. You can individually select them within the updater, and click the "Delete Selected Patches" button.
Updates
![]()
§
Delete Selected Updates
If you select this option the selected updates will be deleted from your
system. This deletes the patches but does not restore the system to a previous
state.
§
Apply Selected Updates
This option applies the selected updates. If they have not been
downloaded they will be downloaded before being applied.
Options
![]()
§
Show Downloaded Patches
If this option is checked all patches will be shown even if they have been already
applied. This allows you to reapply patches or revert to a previous patch.
§
Backup Files Changed by Patches
If this option is checked, files changed by patches will be backed up in the patches\backup
directory.
§
Save Patch File After Applying
Normally patches are deleted after being applied. If this option is checked
patches will be saved after being applied.
§
Configure Proxy Settings ...
This option opens a window to permit you to set your system proxy settings.
This is not necessary for most systems.
§
Enter Access Code(s)
This option allows you to enter access codes to gain access to special posts as
directed by technical support staff. See below.
Help
![]()
§
Online Help
This option opens the Online Help for the Updater.
§
Show Update History
This option displays a history of posted updates.
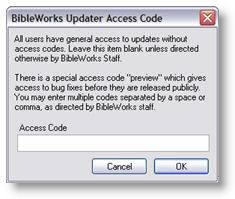
The Updater Menu Options | Enter Access Code(s) opens a window that permits you to enter access codes to gain access to special updates. All users have general access to updates without access codes. Leave this item blank unless directed otherwise by BibleWorks Staff.
There is a special access code "preview" which gives access to bug fixes before they are released publicly. You may enter multiple codes separated by a space or commas, as directed by BibleWorks staff.
Common Questions:
What happens if I remove the check from the "Save Patches When Done" box? Are the previous files removed, or does the system just stop saving patches from that point on?
It just stops saving future patches. The ones you previously saved will still be saved. You can delete them using the "Delete Selected Patches" button.
Would I also need to delete the present files from the "applied" folder? I assume the patches are saved in the "applied" folder. Is that correct?
If you want to delete all previous patches that were saved, select "Show All Downloaded Patches", check the ones you want to delete, and click "Delete Selected Patches."
Why are there files in the backup folder when I have never checked the "Backup Patched Files" box? What are the consequences of deleting these files?
If you ever ran the updater even once with "Backup Patched Files" checked, those files will have been saved here. You can manually delete these files if you don't want them.
What are the "base" files for? What are the consequences of deleting these files?
These files must NOT be deleted. If you delete these files, the updater will not work and you will have to re-install from the CD. These files are used by the updater to apply patches.
Could some or all of these .gz files be saved to an external disk for future use in the case of needing to reformat the hard drive and/or reload the BW program? Or in this case would it be better just to get all the updates from the web page using the normal procedure?
The .gz files in the backup folder can be deleted. They are not used by BW. The .gz files in the base folder are used for updating. If you lose them, you will have to re-install from the CD. As long as you have your CD, the only thing you might want to store are the .pbn files. If you have the .pbn files, and you need to restore an installation, all you have to do is re-install from the CD, run the program once (this registers the .pbn file type), and then double-click on the .pbn files you want to apply. Alternately, you could just re-download the particular patches you want to apply.
Patches are cumulative, so unless you want to revert to some old patch, you don't need to store the previous versions of patches (e.g., the current .exe patch has all changes from the previous .exe patches. You don't need to keep the other .exe patches.).
Ordering Updates on CD
If you do not have access to the Internet you can also order an update CD with the current BibleWorks updates. This CD is available for a small fee from our web site or from BibleWorks Customer Service.
Installing Support for Cyrillic and Eastern European Fonts
If you have chosen to install any versions using Cyrillic (Russian, Ukrainian, etc.) or Eastern European (Polish, Czech, etc.) fonts and BibleWorks cannot find the Windows Central European and/or Cyrillic fonts then BibleWorks will install its own CE and/or Cyrillic fonts. These fonts are of lower quality than the equivalent Windows fonts (because they have not been micro-hinted). The difference in print will not be noticeable, but the Windows fonts look much better on the screen.
You can tell which fonts have been installed by opening up the Font Options Window . You can do this by clicking on the button that looks like a wrench and selecting the Fonts Tab. Look at the list boxes labeled "Cyrillic" and "Central Euro". If the Windows fonts are being used, you will see "Arial CYR and "Arial CE" shown as selected in the list boxes. If the BibleWorks fonts are being used, you will see "Bwcyrl" and "Bwssee". If the BibleWorks fonts are being used, and you want to use the Windows fonts instead, you must install Microsoft support for these fonts. The following paragraphs will show you how to do this. You should exit all applications, including BibleWorks, before proceeding.
Installing the Appropriate Fonts
You will need to install the Windows Arial CE and/or Arial CYR font(s) depending on which versions you have chosen to install. If you are running Windows 95/98/ME you will need to install the Multi-Language Support Module. If you are running Windows 2000 you will need to select certain options in the Control Panel | Regional Applet. You should proceed as follows depending on your operating system:
Microsoft Windows 95, 98, ME
1. Click Start, point to Settings, and then click Control Panel.
2. In the Control Panel, double-click Add/Remove Programs.
3. Click the Windows Setup tab.
4.
Click the Multilanguage Support check box to select it.
NOTE: Multilanguage Support is only available if Windows 95 is installed from
CD.
5. Click OK.
6. In the Control Panel, double-click Keyboard.
7. On the Language tab, click Add.
8. Click the language you want to use, and then click OK.
9. Click OK.
Microsoft Windows NT, 2000, XP
1. Click Start, point to Settings, and then click Control Panel.
2. Double-click the Regional Options icon, and then click the General tab.
3. In the Language Settings for the system section, select the language you want to use. Click OK.
4. Restart your computer for the languages to take effect.
5. To select a specific keyboard layout, follow these steps:
6. Click Start, point to Settings, and then click Control Panel.
7. Double-click the Keyboard icon, and then click the Input Locales tab.
8. If the keyboard layout you want to use does not appear in the list of installed input locales, click Add.
9. In the Input Locale box, select the language you want. Click OK.
10. Click Apply. Click OK.
Telling BibleWorks About the Change
After you have installed the Windows fonts you will need to inform BibleWorks of the change. To do this proceed as follows:
1. Start BibleWorks.
2. Open the Options Window by selecting Tools | Options from the Main Menu.
3. Select the Fonts Tab.
4. Locate the Cyrillic and Central European Fonts list boxes. Click on the lists to open them and select Arial CE and Arial CYR.
5. Go to the "Font Set to Edit" section and select "Browse Window Fonts". Repeat the procedure in point number 4.
6. Repeat for each of the three font sets.
7. Exit and restart BibleWorks.
If you have any trouble, exit BibleWorks, delete the file bw700.ini in the BibleWorks root directory and restart BibleWorks.
Adding Support for Non-English Keyboards
BibleWorks supports Bible Versions in more than two dozen languages. Most do not use the standard English Keyboard. Early versions of BibleWorks had internal support for non-English Keyboards, but beginning with Version 5 BibleWorks keyboard support is inherited from the operating system. Accordingly, if you are working in a language that requires a non-English Keyboard, you must insure the appropriate support has been loaded into Windows. You may see the following message displayed if BibleWorks cannot find keyboard support for a particular language or Bible Version:
The following Keyboard Layout Could not be loaded: ??????. You need to add support for this language. Click on Help for more information.
The ?????? shown in the example above will contain the name of the missing Keyboard Module. If you see a message like this you should exit BibleWorks and install the appropriate Keyboard support. To do that, proceed as follows:
If you are running Windows 95/98/ME
1. Click on the Start Button and select Settings | Control Panel.
2. Double-Click on the Keyboard Applet.
3. Click on the Language Tab.
4. From the dropdown list box select the Keyboard that you want to install.
5. You may be asked to insert the Windows Installation CD to complete the installation.
If you are running Windows 2000/XP
1. Click on the Start Button and select Settings | Control Panel.
2. Double-Click on the Regional Options Applet.
3. Click on the Input Locales Tab.
4. Click on Change.
5. Click on Add.
6. Click on Keyboard Layout.
7. From the dropdown Keyboard Layout List Box select the Keyboard that you want to install.
8. Click on OK.
9. Click on Apply.
You may be asked to insert the Windows Installation CD to complete the installation. If you still receive the above message when you start BibleWorks, go to Tools | Keyboard Layouts and manually select the Keyboard that you just installed.
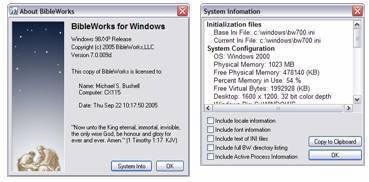
The About Box is displayed when you select Help | About from the BibleWorks Main Menu. If you specified a User Name and Serial Number when you installed BibleWorks this information will be displayed in the About Box. Otherwise the name of the currently logged-on user will be displayed.
The About Box also has a System Info button which opens a utility that gathers useful information about your system and BibleWorks installation. This can be very useful for technical support personnel. To use it you check the boxes in the lower left corner to specify what kinds of information you want to display. Then click the "Copy to Clipboard" button to copy the information to the system clipboard which you can use to paste it into a Word Processor or e-mail message.
BibleWorks allows you to manage checkpoints. A checkpoint saves the current program executable, INI file and context file for later recall in case of trouble. This allows you to easily revert to an earlier version of the program if you run into trouble. Because we respond in real time to user requests for new features and program fixes, it does happen occasionally that an unstable version of the program is distributed. It also happens very occasionally that a particular combination of settings causes unexpected program problems and it can be useful to revert to an earlier version of the program.
Checkpoints can also be useful for exploring BibleWorks and testing configuration settings. You can experiment and easily return to the original configuration by loading a previous checkpoint. There are a few BibleWorks settings that are not saved in a checkpoint but there are not many. Editor configuration settings, for example, are not saved. Verse and command line histories are also not saved.
Checkpoints always save the BibleWorks executable, INI file and context file, but you can choose to restore one or more of these files. This allows you to just revert to a previous INI file without changing the executable.
Checkpoints can be saved in two ways:
Saving Automatic Checkpoints
When you exit BibleWorks the current BibleWorks executable, initialization file and context file are saved to disk
under new names. The names are constructed from the current BibleWorks version number (as shown in the BibleWorks About Box). For example if your BibleWorks version is 7.0.018a the following files will be saved:
...\BibleWorks 7\7.0.018a-bw700lg.exe
...\BibleWorks 7\7.0.018a-bw700lg.ini
...\BibleWorks 7\7.0.018a-bw700lg.dat
...\BibleWorks 7\init\7.0.018a-bw700lg.swc
The "lg" stands for "last good" because this automatic checkpoint stores the state of BibleWorks in its last know good configuration for this version. Every time you run an executable with this version number this checkpoint will be overwritten if you exit successfully. When you update BibleWorks to a new executable that has a different version number, and exit successfully, a new checkpoint will be saved, and the old one will remain for later use if you need it. A maximum of 5 automatic checkpoints can be saved. If you reach this limit the oldest (as determined by version number, not date) will be deleted before saving a new one.
Keep in mind that only one automatic checkpoint exists for each version number of the executable. You can have any number of manually saved checkpoints for each version number of the program (see below).
Automatic checkpoints can be turned off by going to TOOLS | Options | Option Flags | Shutdown Options from BibleWorks Main Menu and unchecking "Save checkpoint on exit".
Saving Manual Checkpoints
You can manually save a checkpoint when you exit BibleWorks. To do this go to FILE | Checkpoints | Exit and Save Checkpoint from the BibleWorks Main Menu. This will exit BibleWorks, save the INI file and context file, and create a new checkpoint. The checkpoint has the same basic form as the automatic checkpoints except that the file names will have "bak" instead of "lg" and an automatically generated sequence number is added to the BibleWorks version number. Manual checkpoints are kept indefinitely and can only be deleted manually as described below. You can store up to 9999 manual checkpoints for each version number of BibleWorks. A particular checkpoint might look like this:
...\BibleWorks 7\7.0.018a.0004-bw700lg.exe
...\BibleWorks 7\7.0.018a.0004-bw700lg.ini
...\BibleWorks 7\7.0.018a.0004-bw700lg.dat
...\BibleWorks 7\init\7.0.018a.0004-bw700lg.swc
The sequence number (0004 in this case) is incremented automatically, with holes in the sequence being filled automatically if you delete items in the middle of a sequence.
Restoring Checkpoints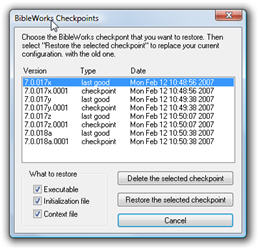
Checkpoints can be restored or deleted by opening the BibleWorks Checkpoint Window. It can be opened in any of three ways:
·
Choose FILE | Checkpoints | Restore/Delete
Checkpoint from the BibleWorks Main Menu.
·
Hold down the SHIFT+CTRL keys when starting BibleWorks.
This can be useful when the situation is so bad that the BibleWorks executable
crashes on launch.
· If BibleWorks crashes select the option to "Revert to an Earlier Version of BibleWorks" from the crash screen.
Once the Checkpoint Window is open you can restore a checkpoint by double-clicking on an entry or by selecting it and clicking on "Restore the selected checkpoint".
In the "What to restore" group box you can choose which parts of the checkpoint you want to restore. You should use some caution here as mixing executables with INI files created by earlier versions of the program can lead to unexpected results.
To delete an entry select it with the mouse and click on the "Delete" button. This will delete the entry from the list and delete the four files associated with the checkpoint. The checkpoint context file will be in the INIT directory. The others will be in the BibleWorks Main directory.
Under the "Type" column the word "checkpoint" indicates a manually saved checkpoint. "Last good" indicates a checkpoint saved automatically when you exited BibleWorks.