31 Using Colors in BibleWorks |
|
BibleWorks provides several ways to use colors to enhance the visibility and usefulness of information provided in the Browse Window and in exported text. You can add color to individual words in any Bible version, turn search results into permanent color sets and use colors to highlight the differences between texts displayed in the Browse Window. This section describes how to do all these things.
Color Filters and Text Coloring
The Color Selection Window
Using the Color Selection Window
Comparing Bible Versions
Color Filters and Text Coloring

BibleWorks provides a great deal of flexibility in the use of colors to make the text of Bible Versions displayed in the Browse Window more interesting and informative. You can color text manually by selecting the text with the mouse and choosing the colors and text attributes you want. Or you can automate the process by using the results of searches performed in BibleWorks.
Setting text colors may at first appear complicated, but once you understand what is going on it is quite simple. The first thing you need to understand is how color information is stored. BibleWorks can maintain an unlimited number of "color files" for each version in BibleWorks. Each color file can be turned on or off individually. This gives you a great deal of flexibility in the way colors are displayed.
Applying default colors to selected text in the Browse Window
can be done by selecting the text and clicking on the Color Selection
Button ![]() . If you click on the dropdown
arrow on this button the Color Selection Window will open. It can also be
opened by selecting Tools | Color Selection Window from the Main Menu.
. If you click on the dropdown
arrow on this button the Color Selection Window will open. It can also be
opened by selecting Tools | Color Selection Window from the Main Menu.
When you do that you will see a Window like the one above. The window is divided into sections corresponding to the general steps you would follow to colorize text.
The Color Selection Window
|
|
Click on this button to remove all coloring from the current verse, which is the last verse you clicked on in the Browse Window. This verse is also shown on the line just under the Color Filter Buttonbar. |
|
|
Click on this line to export all colorized verses in the active color file to the Search Window verse list. This button permits you to obtain a list of all verses in a color file. |
|
|
This checkbox turns the display of colors on and off. |
1. Source for color data
This option specifies the text that will be colorized,
·
Selected text
If this option is selected the currently selected text in the Browse Window
will be colorized.
·
Last search results
If this option is selected the hits from the last search will be colorized.
2. Color and Attributes
This option is used to specify the
color and text attributes for the selected text. Toc change colors just click on
the color buttons. There are also check boxes for bold, italic, underlined and
strike-thru text.
3. Color file to save color data
This section is used to specify the color file to which the color information will be saved. It has the following options:
|
|
This list box specifies the version to which the colors are to be applied. |
|
|
Click on this button to create a new color file. You will be prompted for a name. |
|
|
Click on this button if you want to save the currently selected color file with a new name. The selected file is the one with the grayed line. The name is also shown in the window title bar. |
|
|
Click on this button to delete the currently selected color file. The selected file is the one with the grayed line. The name is also shown in the window title bar. |
The list box at the bottom of this section lists all the color files that currently exist for the specified version. The radio button is used to select which color file will receive the color changes. The check box is used to activate the display of colors for each file.
4. Brother file to save color data
If Section 3 specifies a Greek or Hebrew morphological version you can choose to colorize the brother version at the same time. To do this check the "Save brother color data" button and select a color file.
Using the Color Selection Window
This section will walk you through the steps used to perform common colorizing functions.
Manually Marking Text Colors and Attributes
To set colors and text attributes of text in the Browse Window manually, do the following:
1. Open the Color Selection Window.
2. Using the mouse, select the text you want to colorize.
3.
In section 3 either choose the color file in which you
want to store the color information by clicking on the radio button next to the
file name; or, to create a new file to receive the color information, click on
the ![]() button.
button.
4. Make sure the "Selected Text" button is checked.
5. Select the colors and text attributes you want to set.
6. Click on the "Apply" button.
Note that you can leave the Color Filter and Text Highlighter Window open while you work, permitting you to make numerous manual changes quickly.
Using the BibleWorks Search Engine as a Color Filter
The Color Filter and Text Highlighter Window also allows you to use the full power of the BibleWorks search engine as a color filter. You can do a search and turn all the hits into color and text attribute information. This information is stored in files just as it is with manual coloring. You can accumulate information from multiple searches in one file or put them in separate files. If the information is in separate files, coloring for each file can be turned on and off individually.
To use a BibleWorks search as a color filter proceed as follows:
1. Do the search. For general searches such as *@n* or *@vi*, it is
advisable to use a linear phrase search (see
Doing a Linear
Phrase Search) rather than an AND
search. For example, instead of using
.*@n*
on the Command Line, use
;*@n*
2. Open the Color Filter and Text Highlighter Window.
3. Either choose the color file in which you want to store the color
information by clicking on the radio button next to the file name; or, to
create a new file to receive the color information, click on the ![]() button.
button.
4. Make sure the "Search Results" button is checked.
5. Select the colors and text attributes that you want to set.
6. Click on the "Apply" button.
Note that you do not need to select a version; the version is determined from the search you just did. If you have the "Include Brother Text" box checked when the search version has a Brother Text version (such as the morphology version that many Greek and Hebrew texts have), it will also be colorized. The version selections should be set automatically when you click on the "last search results" radio button.
Sharing Color Files
You can share your color files with other BibleWorks users simply by sending them your color files. They will all be located in the BibleWorks "Databases" directory and will all have a .clr extension. If you want to completely remove all color information from your setup, you can delete all *.clr files. You should also delete the bwcolors.dat file. It stores information about which color files are turned on or off.
Comparing Bible Versions
 Colors can also be
used in BibleWorks to help identify very quickly differences in Bible version
texts. For example, this feature facilitates comparing two translations in the
same language to see what the differences are. You can also use it to identify
immediately differences between the critical Greek New Testament text (GNT or
BNT) and one of the "Majority" texts in BibleWorks (like BYZ or SCR).
Colors can also be
used in BibleWorks to help identify very quickly differences in Bible version
texts. For example, this feature facilitates comparing two translations in the
same language to see what the differences are. You can also use it to identify
immediately differences between the critical Greek New Testament text (GNT or
BNT) and one of the "Majority" texts in BibleWorks (like BYZ or SCR).
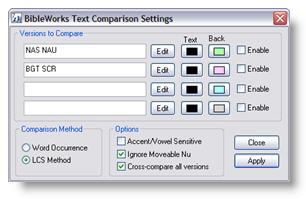
Comparing texts is easy. All you have to do is open the Text
Comparisons Settings Window and select the texts and colors. To open the window
you can either click on the Text Comparisons button ![]() or select Tools | Text
Comparison Settings from the Main Menu.
or select Tools | Text
Comparison Settings from the Main Menu.
You can define up to four sets of texts. Each set will be compared and colored separately. To choose the versions for a set you must enter the BibleWorks abbreviation for each version, separated by a space. Each Version in BibleWorks has a short name, three or more letters long, used to reference the version in BibleWorks. If you cannot remember the abbreviations, just click on the "Edit" button next to the text line for each set. Then you can select all the versions you want to compare.
Note that the order of the versions is significant. The first version will be the base version for the comparison. This matters, however, only if you are comparing more than two versions.
You can enable and disable comparisons for each set separately, permitting you to turn coloring off without removing version settings. You can also select the way the comparison is done. The LCS method is the most commonly used, and you should probably use it unless you have reasons to do otherwise. LCS stands for "Least Common Substring." LCS finds the set of common words with the least total length. The other method, the "Word Occurrence" method, finds words that occur in only one of the verses being compared.
The first option tells the program to ignore accents when doing the comparison. The second option tells the program to ignore cases where words differ only in a nu at the end of a word. The third option tells the program to repeat the comparison once for each version, using each version as a base, and then combine the results. This usually provides a better visual display of differences when you are comparing more than 2 versions.