5 Installing and Uninstalling BibleWorks |
|
Installing BibleWorks
Backing Up Files
Central European Fonts
File Types Used by BibleWorks
Installing BibleWorks
 To start
the BibleWorks installation all you have to do is insert Program Disc 1 in your CD drive. The Setup Program should start automatically.
To start
the BibleWorks installation all you have to do is insert Program Disc 1 in your CD drive. The Setup Program should start automatically.
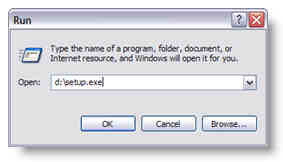
If the Setup Program does not start automatically, the Windows "autorun" feature may be disabled on your system. If this is the case you can manually run the setup.exe program on the CD. To do this click the Start Button, select Run, and enter the name of the setup program, including the full path to the CD. It will look something like the picture to the right. When you click on the OK button the Setup Program should start.
When the Installation Program starts you will be asked to enter your name and the product Serial Number. The Serial Number can be found on the registration card that shipped with your CDs.
You will also be asked to select the versions and databases you want to install. Keep in mind you can always return later and add/delete selections by rerunning the installation program (see below).
 Uninstalling
Old Versions
Uninstalling
Old Versions
Before installing BibleWorks 7 you should uninstall any previous versions of BibleWorks that you have installed. If the Setup Program detects the presence of a previous version of BibleWorks, it will give you the option of uninstalling that version. Unless you have good reasons to do otherwise, we recommend that you always uninstall the old program. The uninstall program will not delete any files that have been added or changed since the old program was installed, so no great harm can come from uninstalling it and it will free up a lot of disk space.
If you choose NOT to uninstall the old version you should be aware that the BibleWorks 7 Setup Program will delete the Uninstall (or Maintenance) program for the OLD version when it installs the new version. This is to prevent the old Uninstall program from uninstalling parts of the program that the old and new versions have in common, and thus damaging your new installation. If you need to delete the old version later you can just delete the old directory, making sure to back up any files that you need. The advantage of uninstalling the old version first is that it leaves the changed and new files behind, thus relieving you of the need to filter through them later. It is simpler just to let the new Setup Program uninstall the old version.
Note that on some systems the uninstaller for the older version may display error messages. You may safely ignore these and proceed with the BibleWorks 7 installation after the uninstall process is complete.
Reconfiguring or Uninstalling BibleWorks 7 after Installation
To uninstall or reconfigure BibleWorks, open up the Windows Control Panel and double click on the "Add/Remove Programs" icon. Then locate BibleWorks 7 in the menu that is presented and click on the "Change/Remove" Button. You should never uninstall BibleWorks simply by deleting the BibleWorks directories.
After you uninstall your old version of BibleWorks, a stub directory will be left behind. It will contain any files that were changed after you installed the previous version. These files should NOT be deleted until AFTER you install BibleWorks 7. The reason is that the old directory will contain any unlock codes that you installed previously. The BibleWorks 7 installation program will look for them and install them for you if it finds them. Otherwise you will have to reenter the unlock codes once BibleWorks 7 is up and running.

BibleWorks comes with all the basic tools that most people will need. We have always recommended that users invest their scarce financial resources in print books rather than electronic books. That is why BibleWorks has relatively few add-on modules compared to other companies. There are a few cases, however, where certain kinds of books benefit greatly from being in electronic form, enough in most cases to justify have copies in both print and electronic media. This is particularly true of lexicons and grammars. For that reason we try to provide users with standard works of a grammatical and lexical nature.
When you purchase an external module you use an installation program similar to the one you used to install BibleWorks. But all the installation program does is copy the files to your hard drive. You must still "unlock" the module so BibleWorks knows that you have a right to use it. This is done by selecting File | Unlock Database from the BibleWorks Main Menu. When you do that you will be presented with a Window with a dropdown list box containing available modules and a place for you to enter your serial BibleWorks Serial Number and the Product Unlock Code. All you do is enter these numbers and click on "Unlock".
Some modules will be available only by download from the Internet until the next Revision if the Modules CD is released. When you click on the "Unlock" button BibleWorks will check to see if the module has been copied from your Module CD or if it is available on the Internet. If it is available on the Internet it will be downloaded automatically. For this reason if you have an Internet connection you should log on to the Internet before unlocking databases. If you know that you have downloaded the module from your Modules CD you do not have to do this, but if the module is a new release not on your Module CD, you have to activate your Internet Connection to install the module.
The Unlock Window has these parts:
Module Selection List Box

From this list you choose the module that you want to unlock. Remember that you must first install the module from CD. In order to do this place your BibleWorks Modules CD in the CD drive and follow the onscreen instructions.
BibleWorks Serial Number
This number is provided on a card that was included with the program when you purchased it. It is the same number that you entered when you installed BibleWorks. If you entered it correctly it will also appear in the About Box that is accessed by choosing Help | About from the BibleWorks Main Menu.
Product Unlock Code
This number will be located on a card that was delivered when you purchased the module. You may also have received the number via e-mail. The number will look something like this sample unlock code for the BDAG Lexicon:
BDAG 83E68 9E5D6 3CBDF 5D2EF
Note that the "BDAG" prefix which identifies the module is part of the Unlock Code and must be entered.
Once you enter the numbers and click on "Unlock" you will receive a message indicating that the module was successfully unlocked. In some cases you may need to restart BibleWorks before accessing the new module.
Search for Unlock Codes
If you click on this button BibleWorks will search your entire system to find unlock registration files that may be left from a previous BibleWorks installation. This search is not necessary if you have all your unlock codes at hand.
When you install BibleWorks the following directory structure is set up on your Hard Drive:
|
Program Directory |
c:\Program Files\BibleWorks 7 |
|
Database Files |
c:\Program Files\BibleWorks 7\databases |
|
Timeline Files |
c:\Program Files\BibleWorks 7\timeline |
|
User Databases |
c:\Program Files\BibleWorks 7\userdb |
|
GSE Files |
c:\Program Files\BibleWorks 7\ase |
|
Diagrammer Files |
c:\Program Files\BibleWorks 7\diagram |
|
NT Diagrams Data |
c:\Program Files\BibleWorks 7\gntdgm |
|
Initialization Files |
c:\Program Files\BibleWorks 7\init |
|
Note Files Videos and related HTML Map Module Data |
c:\Program Files\BibleWorks 7\notes c:\Program Files\BibleWorks 7\images c:\Program Files\BibleWorks 7\videos c:\Program Files\BibleWorks 7\mapdata |
|
Temp |
c:\Program Files\BibleWorks 7\temp |
|
Patches |
c:\Program Files\BibleWorks 7\patches |
The "temp" and "patches" folders will not be created until you need them. The patches folder holds program and database updates that you download from the Internet. The "temp" folder holds temporary configuration files used by the BibleWorks editor.
Your setup may be slightly different if you specified a different installation directory. For a list of file types that are used by BibleWorks (depending on your setup selections) see File Types Used by BibleWorks.
A shortcut will be installed on your Start Menu/Programs menu. You can use this to start BibleWorks.
When you run BibleWorks for the first time. Two files, bw700.ini and bwdir.ini, will be installed in your BibleWorks directory. This is where configuration changes for the program are stored.
If you need to configure BibleWorks to serve multiple users on a network, see the topic entitled Configuring BibleWorks for Use on a Network.
Backing Up Files
It is always a good idea to do full system backup before installing major programs. If you choose not to do this you should at least be careful to backup all files from previous installations of BibleWorks that you might want to keep. These include:
|
Timeline Files (*.era and .tl) |
Synopsis Files (*.sdf) |
As a safety precaution, if you attempt to install BibleWorks in a directory containing a previous installation of BibleWorks you will be warned that some user-defined files may be overwritten or deleted. You will be offered the option of having the files backed up by the installation program. You can also exit the Setup Program and check yourself for files that you may want to keep, or you can proceed with the installation.
Central European Fonts
If you are running Windows 95/98/ME and the Windows Central European and/or Cyrillic TTF fonts are not on your system, BibleWorks will install its own Central European (bweess.ttf, bweeti.ttf) and/or Cyrillic (bwcyrl.ttf) fonts. Display quality will be better if you install the Windows Arial CE and/or Arial CYR fonts. To do this you will need to install the Windows Multi-Language Support Module. For details on how to do this see the section on Installing Support for Cyrillic and Central European fonts.
File Types Used by BibleWorks
The following is a list of file types used by BibleWorks:
|
Extension(s) |
Description |
|
afm, pfm, |
Postscript font files (four files, each with a different extension, for each font) |
|
asc, txt |
ASCII text files, readable in any text editor, used for a variety of purposes |
|
bes |
Temporary files used to store location, top line, etc. information for BW editor files between sessions. Can be safely deleted without loss of data |
|
bna, bnb |
Book Name Alias files |
|
bwc |
Saved BibleWorks Command Line |
|
bww |
Editor files |
|
bso |
Book Sort Order files used in the Verse List Manager |
|
chm,
hhc, |
BibleWorks HTML Help files |
|
clr |
Color Filter Files |
|
cnt, hlp |
BibleWorks Winhelp Help files |
|
cws |
Compound Word Definition files used by the Command Line |
|
dat |
BibleWorks ancillary database files used for a variety of purposes |
|
dbu,dbx, |
Version Database files. Each version in BibleWorks will have files with the last four extensions. Beginning with Version 5, BibleWorks Version Databases will also have a .dbu file |
|
def |
crc.def contains a list of CRCs for installed files. It is used by the check.exe program as directed by Tech Support |
|
dgm |
Diagrammer files |
|
dwd |
Diagrammer Widget Definition file |
|
era, erc, tl |
Database files used with the BibleWorks Timeline |
|
exe |
Program Executables. The BibleWorks program is called bw700.exe |
|
fmp |
Font mapping files used in the Font Options tab to export text to other fonts |
|
gz |
Base files used during the updating process |
|
hst |
Verse and word history informatio |
|
id |
bwver.id contains the installed BibleWorks Version ID. It is used by the Web Update feature |
|
ini |
Initialization file (contains user-modifiable settings) |
|
map |
bw700.map contains the executable link map file for bw700.exe. It is given to Tech Support when requested to assist in isolating bugs |
|
mdb |
Morphology Database Files. They contain lemma and form usage statistics for the various Morphology Version Databases |
|
pbn |
Downloaded patch files |
|
qf |
Graphical Search Engine query files |
|
sdf |
Synopsis Definition Files used by the Synopsis Window |
|
sdx |
Cross Reference Index files for the HTML modules |
|
ttf |
TrueType Font files |
|
udb |
User DataBase files used for a variety of purposes |
|
vls |
Verse List files |
|
vmf, vmc |
Verse Mapping Files (also see *.dbu files entry above) |
|
vrc, vrt |
Flashcard compiled (*.vrc) and source (*.vrt) files |
|
wdc |
Word occurrence data file, one for each Bible version |