30 Setup Options |
|
The Options Window
The Options Window Tabs
Option Flags - Miscellaneous BibleWorks Options
Command Line Configuration Options
Search Window Configuration Options
Browse Window Configuration Options
Main Window Status Bar Configuration
Export Options
Notes Options
General Greek options
General Hebrew Options
Hebrew Accent Options
Transliterated Hebrew Display Options
Internet Updater Options
Option Strings
Font Options
The Activate Export Fonts Option
Activating Unicode Export for Hebrew and Greek
Setting Search Limits
Setting Favorite Version Options
Changing the Version Display Order
Book Names
Editing Verse Maps
Wildcards and Compound Word Forms
Updating, Adding, and Removing Databases
The Configuration Manager
Configuring BibleWorks for Use on a Network
The Options Window
![]() Clicking on this button will open the BibleWorks Options
Window. This tabbed-Window is the centralized place where you can go to change
many of the configuration options in BibleWorks. Each section or tab in the
Window has a different set of options. To move to a different section in the
options, click on the appropriate tab at the top of the window. The Options
Window can also be opened from the Main Menu by selecting Tools | Options.
Clicking on this button will open the BibleWorks Options
Window. This tabbed-Window is the centralized place where you can go to change
many of the configuration options in BibleWorks. Each section or tab in the
Window has a different set of options. To move to a different section in the
options, click on the appropriate tab at the top of the window. The Options
Window can also be opened from the Main Menu by selecting Tools | Options.
The Options Window Tabs
The Options Window contains the following tabs:
§ Option flags - This Window enables you to set a large selection of option flags that cover a wide range of BibleWorks features.
§ Option strings - This Window permits you to change several miscellaneous options that all require some kind of text input, and hence could not be put in the Option Flags section.
§ Font Options - This Window is used to set fonts and font size options for text that is displayed in the Browse Window and Search Window. It is also used to configure the fonts used for printing and exporting text.
§ Search Limits - This Window is used to set search limits for searches. You can set search limits by selecting from lists of checkboxes, or you can enter limits manually in a text box. You can also define your own favorite limit selections and save them by name for later recall.
§ Version Options - This Window is used to set search and display versions, as well as define favorite named combinations that can be recalled later.
§ Version Order - This Window is used to set the display order for versions in the BibleWorks Browse Window when it is in Multiple-Version mode.
§ Book Names - This Window permits you to determine the way book names are displayed in the Browse Window and in exported text. You can also define book name aliases that can be used when specifying Command Line searches.
§ Verse Maps - This Window permits you to change the way verses are mapped between versions in BibleWorks. This determines how BibleWorks interprets a verse reference in one version when it is looked up in another version.
§ Wildcards - This option enables you to define compound word forms for use in Command Line searches. It also allows you to change the definition of several "wildcards" that have been custom-designed for use with Hebrew searches.
§ Updates - This can be used to update the BibleWorks program and databases via the Web, or to reconfigure BibleWorks using your BibleWorks CD.
Option Flags - Miscellaneous BibleWorks Options
The Option Flags tab in the Options Window contains a large number of BibleWorks options flags, categorized by type. To open a category and see the options it contains, click the + symbol next to the category.
Startup Options
§
Show splash screen at startup
Checking this option displays the BibleWorks startup graphic whenever the
program starts. Pressing any key or clicking the graphic with the mouse
will close it immediately.
§
Enable Configuration Manager
Checking this option shows the Configuration Manager when BibleWorks starts,
permitting you to save named BibleWorks configurations and select from among
them when you start the program.
§
Use separate directory for each configuration
Checking this box causes the Configuration Manager to create, for each new
configuration, a new user directory set in a "Config" subdirectory of
the BibleWorks Directory. Only directories containing user-configurable files
are duplicated. This feature permits, for example, having a different set of
notes for each configuration.
§
Hide Configuration Manager Details
Enabling this option simplifies the Configuration Manager startup window to
include only the list of available configurations. If you turn this off in the
Configuration Manager window, you must turn it back on here in the Startup
Options section.
§
Enable Dynamic Data Exchange (DDE) services
If this option is activated, BibleWorks will be set up as a DDE client and you
can use other applications to control BibleWorks. There is no reason to disable
this feature unless you are experiencing problems.
§
Enable Mouse Hooks (disable for debugging)
BibleWorks installs mouse hooks for a wide variety of purposes. This option
should not be disabled except as a part of trouble-shooting procedures used to
isolate particular problems under the guidance of BibleWorks support staff.
§
Check for Locked Databases on Startup
If this option is enabled BibleWorks will check on startup for installed databases
that require an unlock code, but which have not been unlocked. If it finds any
such databases it will prompt the user for an unlock code.
§
Allow Windows XP Display Themes (on restart)
If this option is selected BibleWorks will display many items (like scrollbars)
using the current XP display theme. Otherwise it will use the classic styles.
§
Enable Scripture Popups in External CHM Files
If this option is set when the mouse cursor moves over a tagged Scripture
reference in a CHM (HTML Help) file, a popup will open showing the text of the
Scripture reference.
§
Enable Frameless Main Window Buttons
If this option is enabled the Main Window button bar buttons will have the
XP frameless style. This affects only Windows 95 setups and XP systems using
the classic desktop style.
§
Show Getting Started Window on Startup
If this option is enabled the Getting Started Window will be shown when you
start BibleWorks. This Window gives you access to introductory videos and Study
Guides.
Shutdown Options
§
Prompt user before exit
"If you select this option, BibleWorks always requests confirmation of your
choice to leave Bibleworks. If you deselect this option, confirmation is
requested only if there are unsaved files."
§
Save setup options on exit
If this box is checked, the BibleWorks configuration will be saved on exit. The
size and relative orientation of the various windows in BibleWorks will be
saved as well. This information is saved in two files in the BibleWorks root directory.
The two files are bw700.ini and bwdir.ini.
§
Initialize INI on Exit
If you check this option, when you exit BibleWorks the BibleWorks
initialization file (bw700.ini) will be deleted from the BibleWorks root directory. The
next time you start BibleWorks, all options will be reset to their default
values. If you are having problems that cannot be resolved, this can sometimes
help you to restore functionality and isolate the option setting that is
causing the problem. This process does not affect the bwdir.ini file which
stores BibleWorks directory information.
§
Save full network paths in .ini file
If you check this option, when BibleWorks saves directory names in the
bw700.ini file, it will include full path information, including the network
computer name. Do not enable this option unless your .ini files are destined
for use on a network. Use of this option will slow disk access somewhat.
§
Save checkpoint on exit
If you check this option, when BibleWorks closes it will save the current
executable, initialization file and context file so that they can be loaded
later if you have problems or want to revert to a prior program version or
configuration. See the section on
Using Checkpoints for details.
Command Line Search Options
§
Include NOTs in Search Window hits
If this option is not checked, and your Command Line search included NOT-ed
words, the hits corresponding to those words will not be stored in the
highlighting data for the hit. Some NOT-ed searches can result in almost every
word being highlighted. Unchecking this flag prevents that.
§
Always compute hits for Command Line searches
Always calculate the exact number of logical hits in a Command Line query
(otherwise only word and verse counts will be reported). This increases the
time that a search will take, but gives you the exact number of times that a
particular construction occurs. If this option is turned off, there will be no
hit highlighting. It can be useful to turn this off for debugging purposes.
§
Compute Search Window hits by permutation
If this option is set, Command Line search hits will be computed by
permutation. Statistics for hits will include the various combinations of words
possible with the search criteria. If this is turned off, the number of hits
will be the same as the number of words highlighted.
§
Add multiple hits parameter to Search Window Verse List
If this option is set, the Search Window Results Verse List will show beside
each verse the number of hits occurring in the verse if it is more than one.
§
Notify user if OR search has unmatched elements
If this option is set and a Command Line OR search has unmatched elements, the
user will be notified. An OR search can have hits even if some of the words did
not occur anywhere in the version. It is useful to know if this is the case so
we recommend leaving this flag on.
§
Extend Strong's Tags to all words
If this option is enabled and you are doing a mixed Strong's Number and word
search, all words preceding a Strong's Number will be treated as if they were
tagged with the number. Otherwise the tag is assumed to apply only to the
immediately preceding word.
§
Search on West Euro versions is accent sensitive
If this option is turned on, searches on Western-European Bible versions will
be accent sensitive. This is the default setting. Note that the word list for
the version will display both accented and unaccented forms of words if they
occur, regardless of this setting. However, if you turn this flag off, searches
will find matching forms regardless of accents.
§
Enable Smart Apostrophes (English text only)
If this is turned on, apostrophes will not be treated as significant in English
searches. For example <.brother's>, <.brothers> and <brothers'>
will all yield the same results (in the NAU for example), namely the hits from all three cases. This
will insure that you aren't missing any verses. This is just a fail-safe
feature and is not necessary for most people. Activate it if you want and it
will not slow down searches appreciably. Searches initiated by clicking on a
word list are not affected (this permits you to look up the individual variants
easily without turning off the feature).
§
Include all verses with highlights
When you do a Search Window string search that crosses verse boundaries, a
match can span more than one verse. If this flag is turned on, both verses will
be tagged as hits and will show up in the final verse list.
§
Remember Command Line Ranges
If this option is enabled, when you enter a range on the Command Line, the
range will be remembered when the Browse Window is refreshed. The range is
remembered only for the last verse entered on the Command Line. This allows you
to scroll backwards and forwards and return to the original verse and have the
original range of verses restored. It also retains the Browse Window verse range
in multiple-version mode when the window is repainted by BibleWorks (for
example, when you highlight and color a portion of text). This option is
necessary for some people because by design the Browse Window was not intended
originally to display multiple verses in multiple version mode.
Command Line Configuration Options
§
Enable Command Line Morphology Code Help
Enabling this option pops up morphology help automatically as you type
morphology codes on the Command Line.
§
Beep on Command Line error
If you type in a reference or word that doesn't exist, BibleWorks will beep.
You may, for the sake of sanity, want to disable the beeper. This check box
will allow you to do that.
§
Enable Popup Command Line (disable for debugging)
If this option is enabled, the BibleWorks Popup Copy Window will be accessible
from any application by pressing the Shift-Ctrl-B key combination.
§
Track word list as you type on Command Line
You can specify whether or not the Full Word List Box will try to keep up with
your typing as you type in words. On some slower systems you may need to
disable this option.
§
Auto-Select CL Keyboard when version changes
If you have this flag enabled, BibleWorks will automatically switch to various
foreign keyboards depending on which search version is selected.
§
Enable BibleWorks Keyboard Hook (disable for debugging)
Disabling this option will prevent BibleWorks from installing keyboard hooks
when BibleWorks is started. This can be useful for debugging purposes. Change
only if instructed by Tech Support to do so.
§
Always Use English Font Maps for Hebrew/Greek
This flag will force the program to always use the default English Keyboard
Maps for Hebrew and Greek. This is the default. Disable only for debugging
purposes.
§
Command line and verse histories track version change
This flag will force command line and verse history entries to track the search
version. When you access an item from the history the search version will change
automatically to the version in effect when the history item was stored. You
might want to disable this option, for example, if you want to look up the same
phrase un multiple versions and want to fetch the phrase from the command line
history (by pressing the up arrow key).
§
Word history tracks version change
This flag will force the word history list to track the search version. When you
access an item from the history the search version will change automatically to
the version in effect when the history item was stored.
§
Use Israeli keyboard on command line
This flag will tell BibleWorks to use the Israeli Keyboard for Hebrew input.
This will be in effect only when vowel point sensitive searching is turned OFF.
For vowel point sensitive searching you must use the normal BibleWorks keyboard
layout. Because the Israeli keyboard does not distinguish Shin and Sin, the "a"
key has Shin and the "q" key has Sin. Thus
|
a |
shin |
j |
chet (heth) |
s |
dalet |
|
b |
nun |
k |
lamed |
t |
alef (aleph) |
|
c |
bet |
l |
kaph |
u |
vav (waw) |
|
d |
gimmel |
m |
tsade |
v |
he |
|
e |
kuf (qoph) |
n |
mem |
x |
samek |
|
f |
kof (kaph) |
o |
mem |
y |
tet |
|
g |
ayin |
p |
pe |
z |
zayin |
|
h |
yod |
q |
sin |
, |
tov (taw) |
|
i |
nun |
r |
resh |
|
|
Search Window Configuration Options
§
Put command Line at top of Search Window (not bottom)
This option causes the Command Line to placed at the top of the Search
Window, rather than the bottom. The default is for it to be at the top.
§
Put Search Window on left (not right)
This option causes the Search Window to be on the left side of the Main Window
rather than the right. This is the default.
§
Put Analysis Window on right (not under)
This option causes the Analysis Window to be on the right of the Browse Window
rather than under it. The default setting is for it to be on the right.
§
Use Floating Editor Windows
Enabling this option causes each editor window you open to appear in a floating
window instead of in a Multiple Document Interface Window in the BibleWorks
main window. Some options in the Main Menu will be removed and added to the
popup editor windows. You must restart BibleWorks to change this option.
§
Automatically remap Search Window Verse List on version change
Changing search versions can render the Search Window Verse List invalid
because different versions can use different numbering schemes or have
different books. For this reason, the Verse List is deleted unless you check
this option, which retains the current Search Window verse list, if there is
one, and remaps it to match the newly selected version. Because remapping can
be slow on some systems, you can disable the option or set the "Verse
Remap Threshold" (see below) to a low
number so that remapping occurs only for small verse lists.
§
Show hidden List Box items
There are times when words in the Search Window Word List Boxes are obscured by
the right side of the list box. If this option is turned on, when you pass the
mouse cursor over a list box item, a local window will open up showing the
entire entry.
§
Sort Search Window stats by Frequency
Selecting this option displays the Word Statistics List Box in the Search Window
in order of frequency of word occurrence rather than the default, alphabetical
order.
§
Enable context menus in Search Window
This option enables Context Menus in the Search Window. It is set on by
default.
§
Use 4.0 Style Limits Window from Button bar
BibleWorks in versions 5 and later uses a new, scrolling window for selecting
verse limits. Previous versions of BibleWorks let you select verse limits using
a single, non-scrolling window. This option restores the "old-style" limits
window.
§
Save Search Window State when switching Browse Windows
If this option is set and more than one Browse Window is open, a context is
stored with each Browse Window. When you switch between Browse Windows, the
current Search Window context is stored so that when you come back to that
Browse Window, the Search Window context can be restored.
§
Include Hits when saving context
This option controls how Search Window context is saved when the verse changes.
Normally all Search Window information is saved when you leave the window or
change to another verse. It is restored when you return to the window or click
a context button. Even search hits are saved. Especially on slower systems,
switching contexts may be uncomfortably long if you have recently done a very
large search (like searching on "and"). This option allows you to
turn off hit highlight saving.
§
Convert JPEG Graphic Files to BMP on first use
With this option activated, BibleWorks converts to BMP NET Bible JPEG map
files. There is no reason to select this unless you have problems with
the JPEG files.
§
Automatically save and load Search Window Tab Contexts
If this option is on the Search Window Tab Contexts will be saved and
loaded automatically between sessions.
§
Show morphology translation in Search Window word lists
If this option is enabled, Search Window Word Lists that contain morphology
codes will be translated in place to show the English meaning of the codes.
§
Use long version identifiers where possible
This obsolete option will be retained until we make sure eliminating it has no
effect. The Bible Versions menu (activated by the Bible Versions button left of
the Command Line or by the Browse Window Status Bar button) contains lists of
searchable Bible versions, shown in abbreviated form unless this option is
chosen, in which case a longer form containing the full version name is
displayed.
§
Show entire verse in List Box
If this option is on and the Search Window Verse List Box is configured to
display the text of verses, the entire text of the verses will be displayed on
multiple lines.
§
In Verse + Text Mode display FORM for morphology versions
If this flag is on and you are searching on a Morphological Version, the text
in the Verse List will show the corresponding text (i.e. brother or companion)
version instead of the version being searched. Otherwise just the lemma for
each word will be displayed. The default setting is ON.
§
Show Mouse Hints
Enabling this option causes BibleWorks to open hint messages in several places
where users typically need help. These hints are only shown once per session
and can be turned off individually via a checkbox on the message window.
§ Cross Version Search Mode
o
Search Only Current Search Version
If this option is active only the current search version will be searched. This
is the only mode that was available in previous BibleWorks versions.
o
Search All Display Versions
If this option is active all versions currently being displayed in the Browse
Window will be searched, if they are of the same language as the current search
version.
o
Search and Display All Same Language Versions
If this option is selected all installed versions will be searched and
displayed if they have the same language as the current search version.
§
Search and Prune All Same Language Versions
This is the same as the previous option except that versions with no hits will
be removed from the Browse Window display list.
§
List Box Layout Options
This set of options determines how Word
List and Word Statistics List Boxes are displayed. For normal searches, the
Vertical list boxes option is best, as it displays the maximum number of words.
However, for morphological searches, there is too much information with each
word to be able to show the data in vertical format, so the Horizontal stacked
list boxes option is better. With the Auto-sizing list boxes option, BibleWorks
will choose the best option for your current environment. But you can force the
vertical or horizontal modes to remain in effect for all versions. If you want
the text of each verse displayed beside the reference, you can choose the Verse
List Box on Top + Text option. If you choose to display the text of the verses,
you can determine whether to show only a part of the verse or the entire
wrapped verse by enabling the Show Entire Verse in list box option (above). The
"Word List Context" entry determines how much context will be
displayed if you choose to display only a part of the verse. The Verse List Box
on top + text of verses ONLY option hides the other two list boxes and shows
only the Verse List Box with the Bible text for each reference in the list box.
o
Horizontal stacked list boxes
The Word Statistics List Box will be above the Word List Box. This optimizes
the width of the boxes for versions with lengthy words (like morphology
versions).
o
Vertical list boxes
The Word Statistics List Box will be beside the Word List Box and to the right,
optimizing box height to display the maximum number of words.
o
Auto-sizing list boxes
BibleWorks will choose which of the two previous configurations to use, based
on the version being used.
o
Verse List Box on top + text of verses
The Search Window Verse List Box will be displayed on top of the Word List
Boxes and will extend the entire width of the Search Window. The text of the
verses as well as the references will be displayed, with one verse per line.
Note that you can turn the Show entire verse in List Box flag (in the
previous section) on and have the entire verse displayed rather than just a
portion.
o
Verse List Box on top + text of verses ONLY
The two Word List Boxes will be hidden. The Verse List Box will occupy most of
the Search Window. Note that you can turn the Show entire verse in List Box flag
(in the previous section) on and have the entire verse displayed rather than
just a portion.
Browse Window Configuration Options
§
Enable Browse Window colors
If this option is enabled, the Browse Window will display colors when you
mark text with the colorizer option. This just provides a quick way to
disable the color without having to delete the color files that you have
created. It is on by default.
§
Display Browse Window References in Bold
This option turns Bolded Browse Window References on and off.
§
Display Browse Window Version ID in Superscript
If this option is on, the Versions IDs in the Browse Window will be
superscripted.
§
Display Browse Window References as Superscripts
If this option is on lone verse numbers (i.e. those without a chapter
number) in the Browse Window will be superscripted, but only after the first
reference (e.g. in Browse Mode).
§
Show Outline List Box on Browse Window status bar
If this option is enabled, the Browse Window Status Bar will contain the
appropriate entry from the Bible Outline in the header of the Browse Window. A
List Box with the entire outline available will be used for the display. If
this option is off only the current entry will be shown (i.e. not the List
Box).
§
Automatically make morphology versions display versions
If this flag is set and you activate a Greek or Hebrew morphology as a search
version, it will automatically be activated as a display version. This permits
you to do morphology searches while having only the text version displayed. For
example, you can do GNM searches but have only the GNT displayed in the Browse
Window. For non-Hebrew/Greek versions, activating a version as a search version
always adds it to the display list as well. If this flag is not set and you
activate a Greek or Hebrew morphology as a search version, it will not be
activated as a display version. This permits you to do morphology searches while
having only the text version displayed.
§
Enable automatic secondary Browse Windows
The typical way of opening up an additional Browse Window is to click on the
New Browse Window icon in the Search Window. The typical reason for doing this
is to keep the text of a particular verse in front of you while you search for
related verses in another Browse Window. Turning on the Secondary Browse Window
option automates this process. If this box is checked, when you do a search in
a Browse Window by double-clicking or by means of the context menus, a new
Browse Window will open up automatically to display the results of the search.
The next time you do a search from the original window, BibleWorks will
remember that there is already a secondary window open to receive the results.
If you do a search from an already existing secondary window, then a new one
will be opened to receive its results. BibleWorks will also remember which
window was used to open up each secondary window.
§
Show TSK Cross References in Analysis Window
If this option is selected, the Analysis Window will display a list of Cross
References for appropriate versions.
§
Show NAS Cross References in Analysis Window
If this option is selected, the Analysis Window will display a list of Cross
References for the NAS and NAU versions.
§
Show Geneva Bible Notes for KJV Version
If this option is activated and the Geneva Bible Notes are installed, the
notes will be displayed in the Analysis Window when a KJV verse is being
examined.
§
Keep Lexicon Focus when looking up Lexicon verses
If this option is activated the Lexicon Window will retain focus when you
look up hypertext verse references. Otherwise the Browse Window that displays
the verse will be activated.
§
Show Word Tips
If this option is on, when you move the mouse cursor over a word in the
Browse Window, a popup window will open giving information about the word. For
Greek and Hebrew this will be a brief gloss and morphology information. For
versions tagged with Strong's Numbers, the Strong's Lexicon entry will be
shown.
§
Keep Word Tips Open
If this option is checked the Word Tips window (see previous item) will remain
open. You can move it just by clicking and dragging with the left mouse button.
§
Automatically update last active Resource Window
If this option is checked the last active Resource Summary Window
will update automatically as you move the mouse. This includes floating Resource Summary Windows
as well as the copy on the Analysis Window Resource Summary tab.
§
Maintain search version after lemma search
If this option is checked the search version will not change when you right
click on a Greek or Hebrew word and do a morphology lemma lookup. Otherwise the
version would switch to the morphology version used for the lemma search.
§
Enable verse popups in Analysis Window and Lexicons
If this option is checked verse popups will be enabled in the Lexicon
Browser and in lexicons displayed in the Analysis Window.
§
Show Matthew Henry Bible Notes for KJV Version
If this option is checked Matthew Henry Bible Notes will be displayed in the
Analysis Window for the King James Version.
Main Window Status Bar Configuration
§
Enable Status Bar at Bottom of Main Window
If this option is enabled the Main Window Status Bar at the bottom of the BibleWorks
Window will be visible. If it is disabled, the top part of the Search Window
will be used for message display (as was the case in BibleWorks 4.0).
The following options determine which status indicators are displayed in the Main Window Status Bar. Unless you have a high-resolution display they will not all fit. You can select the ones you find most useful. See the Main Status Bar topic for details.
§
Current Search Version
If this option is set the Status Bar will display the current search version.
§
Search Limits Active
If this option is grayed out, there are currently no search limits set for
Command Line searches. If it is not grayed there are limits set. Double-click
on the status area to open the Search Limits Window.
§
Strong's Numbers Active
If this option is grayed, versions with Strong's Numbers will NOT show the
numbers when verses are displayed in the Browse Window. Otherwise they will be
displayed.
§
Browse Mode Active
If this option is grayed, the Browse Window is in Multiple-Version mode. If it
is not grayed the Browse Window is in Browse mode. To change the state
double-click on the status indicator.
§
The Analysis Window On
If this option is not grayed, the Analysis Window is activated for the current
Browse Window. To change the state of the Analysis Window, double-click on the
status indicator.
§
Verse-Based User Notes On
If this option is not grayed, verse-based user notes are turned on. A note
window will be loaded automatically into the BibleWorks Editor when the current
verse changes.
§
Notify User When Verse-Based Note Available
The "V" to the left of "Verse-based User Notes" indicator
will be ungrayed if user notes exist for the currently displayed verse.
§
Chapter-Based User Notes On
If this option is not grayed, chapter-based user notes are turned on. A note
window will be loaded automatically into the BibleWorks Editor when the current
verse changes.
§
Notify User When Chapter-Based Note Available
The "C" to the left of "Chapter-based User Notes" indicator
will be ungrayed if user notes exist for the currently displayed chapter.
§
Translator Notes On
If this option is set, versions which have embedded translator notes will have
those notes displayed in the Browse Window with the text. This flag also
toggles the superscript indicators in versions like the NAS, which have
Analysis Window notes with superscript markers in the text. You can toggle this flag
by double-clicking on the status area.
§
Accent-Sensitive Searching
If this option is active, Command Line searches will be accent-sensitive. This
flag reflects the state of searches for Greek, Hebrew and European Versions
even though the underlying mechanisms are quite different. A separate internal
flag is kept for each language type so you will see this indicator change as
you change search versions. You can toggle this flag by double-clicking on the
status area.
§
Vowel-Point-Sensitive Searching
If this option is active, Hebrew Command Line searches will be vowel-point
sensitive. Search text must include the full pointed text. This flag does not
affect Hebrew accents. You can toggle this flag by double-clicking on the
status area.
§
Search on Qere (Hebrew)
If this option is not set, words in Hebrew text that have a Qere marker are
ignored. You can toggle this flag by double-clicking on the status area.
§
Search on Kethib (Hebrew)
If this option is not set, words in Hebrew text that have a Kethib marker are
ignored. You can toggle this flag by double-clicking on the status area.
§
Show Current Keyboard Language
This status area shows the currently loaded Command Line Keyboard Layout.
Export Options
§
Send RTF to clipboard when exporting
Text copied to the clipboard is normally sent in both an ASCII format without
formatting/font information and a rich-text format (RTF) with full format/font
information. The target word processor chooses which it uses. If your word
processor has trouble with RTF formatting, you may want to uncheck this box.
§
Send CR/LFs to clipboard when exporting
To have text pasted from the clipboard into a single target word processor
paragraph, you do not want Carriage Returns/Line Feeds copied to the clipboard
with the text: thus you should uncheck this option. Since word processor Hebrew
text wrapping is unpredictable, this option's setting is ignored if Hebrew text
is copied.
§
Export colors to Clipboard and Editor
With this box checked, text exported to the clipboard or Copy Center
retains colors.
§
Export formatting to Clipboard and Editor
If this option is enabled exported text will contain all formatting, including
bold, italic, superscript, etc., except coloring, which is determined by the
previous flag.
§
Force Popup Copy Window to Use Copy Center
With this option (necessary for proper function of some word processors)
selected, the Popup Copy Window always defaults to the Copy Center Window.
§
Export Reference String when Exporting Browse text
This option copies verse references with Browse Window text in Browse Mode.
§
Remove Hebrew Accents when exporting
This option strips off Hebrew Accents when Browse Window text is exported.
§
Remove CR/LFs when exporting Browse Text
Checking this option replaces Carriage Returns/Line Feeds with blanks in
text exported from the Browse Window in Browse Mode.
§
Keep Hebrew wrap format when exporting Hebrew text
Checking this option retains BibleWorks wrap formatting for exported Hebrew
text; i.e., exported text will have carriage return/line feed characters spaced
according to the Hebrew line width set in the Copy Format Window.
§
Export Hebrew superscripts (Unicode)
If this option is checked, when you export Hebrew Bible text (from the
Browse Window or Copy Center), superscripted verse numbers will be exported
using the default Unicode Hebrew font, instead of English. This will render the
entire reference except for the initial book, chapter and verse, as Hebrew text.
This may work better for some cut and paste operations. If you do not do this
the verses will be treated as Hebrew verses interspersed with non-Hebrew verse
numbers. The default is off.
§
Use Windows 98 Print Window
Setting this option forces the Windows 98 Print Window to be used, even on
later systems, permitting a workaround on Windows versions with a Print Window
bug.
§
Buffer Multiple-Verse Copies (debug)
This option buffers for performance reasons multiple verses copied via the
Copy Center. You should turn this off only if you are having problems.
§
Enable Lexicon Browser drag and drop.
You can drag selected text in the Lexicon Browser from BibleWorks to an
external application like a Word processor. On some systems this process is
unstable. In such cases this option can be used to turn the feature off.
§
Enable Browse Window drag and drop.
You can drag selected text in the Browse Window from BibleWorks to an external
application like a Word processor. On some systems this process is unstable. In
such cases this option can be used to turn the feature off.
§
Filter RTF Export for maximum compatibility.
If this option is enabled, when you export RTF text, it will be filtered to
enable maximum compatibility with other applications. You may lose some
formatting so you should use this option only if you are having problems getting
another application to accept RTF text exported from BibleWorks.
§
Close Copy Dialog/Popup on copy.
If this option is enabled, when you copy text using the BibleWorks Copy Center
or the Popup Copy Window, the Copy Center and/or the Popup Copy Window will be
close automatically after the text is copied.
Notes Options
§
Maintain user notes for each chapter (not verse)
User notes will be saved per chapter, rather than per verse, if this option is
selected. Notes file names are constructed from the three-letter book
abbreviation plus a chapter number and the normal extension for BibleWorks text
files (.bww). For example, with BWORKS the main BibleWorks
directory, the notes for Genesis Chapter 30 will appear in
BWORKS\NOTES\GEN30.BWW. These files are kept in a subdirectory called
NOTES under your main BibleWorks directory.
If this option is not selected, a note file will be maintained for each verse
for which user notes have been entered. File names will then be
constructed from current chapter and verse numbers and stored in a subdirectory
(different for each book) called NOTES\XXX (where XXX represents the three
letter book name abbreviation for the current book), located in the main
BibleWorks directory. An example file name for Gen 30:22 would be
BWORKS\NOTES\GEN\30_22.BWW.
§
Show availability on status bar when verse changes
This option checks for available user notes once a verse is changed in the
Browse Window. The “Verse Notes” or “Chap Notes”
indicators (if enabled) on the Main Status Bar will be ungrayed if there is a
note.
§
Make User Notes Read-Only
If this option is checked User Notes will not be editable.
§
Load User Notes Automatically
With this option enabled, user notes will automatically load into the
Analysis Window User Notes Tab when a verse changes in the Browse
Window. If you are in single version Browse Mode, notes will also change
when you move the mouse cursor over a new verse.
General Greek options
§
Show entries from all Greek Lexicons in Analysis Window
If this option is active, the Analysis Window will show the Lexicon entries
from all available Greek lexicons when the user places the mouse cursor over a
Greek word. This setting overrides the default Greek lexicon setting in the
Analysis Window.
§
Search on Greek versions is accent sensitive
If this option is set, Command Line searches on Greek Versions will be accent
sensitive.
§
Show all LXX variants in Browse Window
If this option is set, BibleWorks will automatically display LXX variant
readings when verses from the LXX are displayed.
General Hebrew Options
§
Display vowel points for Hebrew text
If this option is turned off, vowel points will be stripped from Hebrew text
displayed in the Browse Window.
§
Ignore Dagesh in Hebrew Searches
If this option is active, Hebrew Command Line searches will be
Dagesh-insensitive. This flag is meaningful only if you have vowel-point
sensitivity turned on as well.
§
Include Qere readings (Hebrew) in searches
If this option is not set, words in Hebrew text that have a Qere marker are
ignored.
§
Include Kethib readings (Hebrew) in searches
If this option is not set, words in Hebrew text that have a Kethib marker are
ignored.
§
Reverse Order of Hebrew Analysis Window Definitions
Many Hebrew words can be decomposed into several lemmas. When you move the
mouse over a word, definitions for each of these will be displayed in the
Analysis Window. The order will be the normal right-to-left reading order.
However, in the majority of cases the most significant part of a form is at the
end (just think of how many words begin with a waw). This option
reverses that order so that in most cases the most significant entry will be
shown first. This minimizes scrolling.
§
Search on Hebrew versions is vowel point sensitive
If you have this flag turned on, searches on Hebrew versions will be vowel point
sensitive.
§
Show full Analysis Window data for Hebrew words with Maqqef
If this flag is set and the mouse cursor is over a Hebrew word with a Maqqef,
lexical information will be show for both parts. Otherwise information will
just be shown for the part immediately under the mouse cursor.
§
Display a plus between morphemes in WTT
If this option is checked a plus sign will be displayed between morphemes
in the WTT display in the Browse Window.
§
Display all homonyms in Analysis Window
If this option is checked all homonyms will be displayed in the Analysis Window
(not available for all Hebrew Lexicons). Off by default.
Hebrew Accent Options
§
Permit accent code searching in Hebrew morph. version(s)
If this option is enabled, extra parsing codes will be added to the WTM
database so that you can search for accent information.
§
Show the following Hebrew word accents in Browse Window
If this option is turned on, all of the Hebrew accents that are checked in the
following list will be displayed in the Browse Window when the WTT text is
displayed. Each of these accents can be turned on and off individually.
|
Segolta (a) |
Sinnorit (s) |
|
Zarqa, Sinnor (b) |
Pazer (t) |
|
Pashta, Azla Legarmeh (c) |
Pazer Mag or Qarne Parv (u) |
|
Pashta (with previous left) (d) |
Zaqep Magnum (v) |
|
Telisha Parvum (e) |
Mahpak or Mehuppak (w) |
|
Paseq [separator] (f) |
Mereka (y) |
|
Yetib (g) |
Mereka Kepulah (z) |
|
Dehi or Tipha (h) |
Tipha, Majela, or Tarha (0) |
|
Mugrash (i) |
Munah (1) |
|
Telisha Magnum (j) |
Silluq [meteg (left)] (9,2) |
|
Ole or Mahpakatum (k) |
Meteg (right) (3) |
|
Geresh or Teres (l) |
Tebir (4) |
|
Gershajim (m) |
Atnah (5) |
|
Azla or Qadma (n) |
Galgal or Jerah (6) |
|
Illuj (o) |
Darga (7) |
|
Shalshelet (mag,parv) (p) |
Telisha Qetannah (med) (A) |
|
Zaqep Parvum (q) |
Telish Magnum (med) (B) |
Transliterated Hebrew Display Options
The following tags are used with the BHT transliterated BHS Hebrew text in BibleWorks. They toggle the display on and off for the indicated character(s).
§ Show accents.
§ Show Metheg.
§ Show Silent Shewa
Internet Updater Options
§
Backup files that are updated by the patch
If this option is selected files that are updated by the patch will be
first copied to a backup directory as a safety precaution. It is normally off to
save disk space.
§
Save patch file after applying the patch
If this option is selected patches will be saved to disk after being
applied. Otherwise they will be deleted. If you think you may need to reapply
patches later, or transfer them to another machine, you should select this
option. It is normally off.
§
Display all patch files (including applied patches)
Normally after a patch is applied it will no longer appear in the list of
available patches. If this option is selected all patch files will be
displayed, even those that have already been applied. This permits you to
reapply old patches to revert to an earlier version.
Option Strings
 The Option Strings Tab in the Options
Window permits you to change several miscellaneous options that all
require some kind of text input, and hence could not be put in the Option Flags
section. The options are as follows:
The Option Strings Tab in the Options
Window permits you to change several miscellaneous options that all
require some kind of text input, and hence could not be put in the Option Flags
section. The options are as follows:
§
Popup Copy Key
It often happens that you are in your favorite word processor and want to
insert a few verses. You could run BibleWorks and use the Clipboard over and
over to do this, but that could get a little tedious. Fortunately BibleWorks
provides an easier means to do this. What you must do is first run BibleWorks,
and then your word processor. Then while in the word processor, if you hold
down the <Ctrl> key and the <Shift> key and then press the
<B> key, the Popup Copy Window will open. For details see the
Popup
Copy Window topic.
The setup parameter labeled "Popup Copy Window Key" allows you to
choose which key combination calls up the Popup Copy Window. If there is a
conflict with your word processor, you can change it. The default is the
"Control-Shift-B" combination, which is entered in the Options window
as "+^B". To change the setting, all you do is enter a letter from A
to Z preceded by one or more characters selected from the list "^+%".
These three characters stand for the shift key ("+"), the control key
("^") and the alt key ("%"). The text in the box labeled
"word processor Insertion String" represents the key sequences that
are sent to your word processor after the verse you enter is looked up, to
cause the text to be copied from the Windows Clipboard to your word processor.
The standard Windows default is the "Control-V" combination and you
probably will not have to change it. If you do need to change it, you enter the
proper sequence by using the "+", "^" and "%"
characters, as before, to indicate the shift, control and alt keys
respectively. Alphabetic characters are represented by themselves and other
special keys are entered by special key words enclosed by curly braces. Thus
"+{insert}" stands for the <Shift-Insert> key sequence. Other
key words that you might need to use are as follows:
|
Key |
Code |
Key |
Code |
|
Backspace |
{BS} |
End |
{end} |
|
Break |
{break} |
Enter |
{enter} |
|
Caps Lock |
{capslock} |
Insert |
{insert} |
|
Delete |
{del} |
Left |
{left} |
|
Down |
{down} |
Num Lock |
{numlock} |
|
Page Down |
{pgdn} |
F6 |
{F6} |
|
Page Up |
{pgup} |
F7 |
{F7} |
|
Scroll Lock |
{scrolllock} |
F8 |
{F8} |
|
Tab |
{tab} |
Escape |
{esc} |
|
F5 |
{F5} |
Home |
{home} |
§ WP Insertion String
This specifies the hotkey to use to
paste from the clipboard into your word processor. For most word
processors, Ctrl-V will paste the current clipboard contents into the
word processor.
§
Meter Threshold
When you do a word search, the text box
just below the Search Window Button bar (the Verse Statistics Box) will keep you
informed of the progress of the search. Normally this just amounts to an
indication in words of the various stages in the search process. For long
searches a graphical progress "meter" bar will show you the current
status. There is however a lot of overhead involved in displaying the graphical
"meter" and you may want to turn it off except for very long searches
where you need to have some idea of how much further you have to go (so you can
abort the search if need be). This parameter allows you to set the threshold at
which BibleWorks will begin to display the bar. The number is roughly
equivalent to the number of distinct words resulting from the wildcard
expansion of your search expression. Since simple searches are almost
instantaneous anyway, you do not want the status bar displayed for them, as it
will slow the search significantly. A value of 2000 is reasonable for most
computers. A value of zero turns the graphical status bar off entirely.
§
Word List Context
The Search Window Word List box
displays a list of all the words surrounding the word being examined. This box
is scrollable through the entire word list of the version being searched.
However the "click and drag" feature which allows you to select a
series of words for lookup will only function for a specified range around the
starting word. This option specifies that range. You can make it as large as
you want, but keep in mind that large values may slow down your typing response
if you have the "track word list" option enabled. If you expand the
Search Window box so that the word list box becomes larger than the total
length of words that you have specified, your number will be overridden by one
calculated by BibleWorks.
§
Verse List Context
The Results Verse List Box in
the Search Window can display results in three different modes. The results of
a search can be displayed (1) as a list of references, (2) as a list of
references along with a phrase from each verse , or (3) as a list of references
along with the full text of each verse. When you are displaying a phrase from
each verse in the Verse List Box, this field specifies how many words from the
verse should be displayed in front of the first highlighted word.
§
Remap Threshold
When you change search versions the
Search Window Verse List is often no longer valid because different versions
use different numbering schemes and not all versions have the same books. For
this reason the Verse List is deleted unless you check the "Remap Verse
List on Change" option in the | Setup | Flags 1 | section (see
above). If this option is checked the current Search Window Verse List, if
there is one, will be retained but remapped to match the new version. This can
be slow on some systems. If speed is a problem you can set the "Verse
Remap Threshold" to a low number so that remapping only occurs for small
verse lists. Remapping will occur only for lists that are below this number.
Initially it is set high enough (99999) so that all verse lists will be
converted.
§
Search Context
This parameter allows you to define the
default verse context setting for BibleWorks AND type word searches and Linear
String Searches. When you do an AND type word search on more than one word or a
Linear String Search, the search will find all verses that contain all the
specified words within the specified number of verses.
§
Misc Font Size
This option specifies the font size
used in a number of List Boxes and textboxes in BibleWorks. This part of the
program is under development. Current users should have no need to change the
default setting.
§
Default Text Editor
When you are creating a user-defined
Bible version, you can edit the text of the Bible version just by clicking on
the Edit button in the Version Database Compiler Window. This entry specifies
the editor to use for editing the Bible text. By default, this is set to use write.
In Windows 98 and following, this command will actually load WordPad, the RTF
editor that ships with Windows.
§
Default Style Name
This option lets you set the style name
that is applied to RTF text exported to the clipboard. If you uncheck the
"Tag Exported Text" checkbox no style name will be exported. This
permits you to control how text is integrated into the target paragraph. It is
also useful if you want to tag exported text for search and replace purposes.
§
Word Tip Settings
If you have Word Tips enabled (the
default) a brief definition and morphology summary will appear in a popup
window when you pass the mouse cursor over a Greek NT or Hebrew OT word. The
window will not open until you have "dwelt" for a certain period over
the word and it will remain open for a set period after the mouse stops moving.
The Word Tips section allows you to set these time delays and also enable or
disable Word Tips.
Font Options
 The Fonts Tab in the Options Window
contains a number of controls which allow you to set the default typefaces,
styles and sizes for the English, Greek, Hebrew, Cyrillic, Vietnamese, and
Central European fonts used in the Search Window and Browse Windows. You can
also change the default printer and clipboard fonts. For each language group,
three different sets of fonts and fonts sizes can be selected. One set
of fonts and font sizes is used for the Search Window, one set is used for the
Browse Windows, and one is used for the printer and clipboard. To see a list of
fonts that ship with BibleWorks and a discussion of BibleWorks Font and
Keyboard Options see BibleWorks Keyboard Layouts .
The Fonts Tab in the Options Window
contains a number of controls which allow you to set the default typefaces,
styles and sizes for the English, Greek, Hebrew, Cyrillic, Vietnamese, and
Central European fonts used in the Search Window and Browse Windows. You can
also change the default printer and clipboard fonts. For each language group,
three different sets of fonts and fonts sizes can be selected. One set
of fonts and font sizes is used for the Search Window, one set is used for the
Browse Windows, and one is used for the printer and clipboard. To see a list of
fonts that ship with BibleWorks and a discussion of BibleWorks Font and
Keyboard Options see BibleWorks Keyboard Layouts .
Choosing a Font Set
To make any changes you must first select the Font Set that you want to work with. This is done by choosing one of the radio button options in the "Font Set to Edit" group box. You can choose one of three possible font sets:
§ Search Window Fonts - When you select this button, fonts and sizes in the "Font Sets" group box at the bottom of the window will show font settings used for the Search Window windows and list boxes.
§ Browse Window Fonts - When you select this button, the fonts and sizes in the "Font Sets" group box at the bottom of the window will show font settings used for the Browse Window.
§ Export Fonts - When you select this button, fonts and sizes in the "Font Sets" group box at the bottom of the window will show font settings used for text exported to the Clipboard or sent to the printer. When you select this font set, you can also set font-remapping options in the "Export Options" group box (see below).
After selecting the font set you want to edit, just click on the controls in the "Font Sets" area and choose the typefaces, sizes and styles that you want for each language group. You may want to experiment with different point sizes and styles. If you have a high-resolution monitor, for example, you may want larger point sizes. You may have to exit BibleWorks and reenter for all changes to become effective. You will be notified if this is necessary. Notice that the Command Line and list boxes will adjust automatically to new point sizes and fonts. The fonts defined as defaults for the Browse Window will be used also when you copy text to the BibleWorks editor.
The Activate Export Fonts Option
When you export text to the Clipboard or send it to the printer, the same fonts and point sizes as are used in the Browse Window will be used. They will not be changed for the exported text. This is not always desirable. Fonts which look good on the screen do not always look as good in print. This is the reason an option was implemented to force font conversions to the fonts used in the target medium.
To activate this font conversion option, you must first select the Export Fonts option in the "Font Set to Edit" group box. For all other Font Set options the Export Options group box is disabled. Then check the "Activate Export Fonts" check box. Once this is done, all text matching the characteristics set for the Browse Window fonts will be changed to the printer and clipboard font characteristics before being transferred. This allows you to print with different fonts than the ones you use for the screen.
Activating Unicode Export for Hebrew and Greek
When you select the "Export Fonts" Option under "Font Set to Edit" you will see an additional column in the Font Set lists called "Unicode". If you want exported Greek and/or Hebrew text to be converted to Unicode you will need to check the checkbox in the "Unicode" columns and also select a Unicode capable font in the "Typeface" column. You will probably also need to change the point size depending on the font that you choose. BibleWorks ships with two Unicode Hebrew fonts called "Ezra SIL SR" and "SBL Hebrew". Point sizes of 12 or 14 look good for each. Unicode Greek is planned for a future release but you can download many free Unicode Greek fonts from the Internet. The Microsoft Arial Unicode MS fonts also has Unicode Greek, though many people do not like the style.
Once you make these settings all Hebrew and/or Greek text exported from the Lexicon browser, Word Analysis Window and Browse Window will be converted to Unicode.
Font Remapping
The previous section describes how to change the fonts and font sizes used when you export text to the clipboard or printer. Some fonts, however, use entirely different keyboard mapping tables. If you want to export text using these fonts, the actual characters must be remapped to a different Keyboard Layout. For example, the final sigma may be on one keyboard character in one font and on another keyboard character in another font. Text designed for one font will not display properly using the other font unless the text is remapped.
BibleWorks provides a utility to do precisely this. It lets you define and customize font mapping files. For instance, if you wanted to convert Greek text using BWGrkl, the BibleWorks Greek font, into text using the SIL Greek font, you would need to translate the text when the font is changed. BibleWorks ships with mapping files for commonly used Greek and Hebrew fonts, like the SIL fonts and the Linguist Software Greek and Hebrew fonts.
To use this feature you must first install the fonts that you want to be used for exported text. Then you simply change the typeface for the Greek or Hebrew font, and check the Activate Export Fonts checkbox. You must also create a font mapping table, if one does not already exist, to tell BibleWorks how to translate a character in one font to the same character in the other font. Four sample mapping files are included (they have a .FMP extension). They map the BibleWorks Bwgrkl and Bwhebb fonts to Linguist Software (Hebraica and Graeca) and SIL (SIL Ezra and SIL Galatia) fonts.
Creating Font Maps
To create or edit font map files, click on the "Edit Export Font Maps" button. This will open an editor which you can use to create or modify font map files. The font mapping files are very simple. A font map file consists of a text file listing the character mappings in two columns. The first column contains the character number in the source font (the BibleWorks font). The second column contains the translated character number in the destination font. So, for example, if character 35 in the source font maps to character 63 in the destination font, an entry in the font map file would read "35 63".
For fonts like the SIL Hebrew fonts, you have to precede vowel point characters with a '<' character. This tells BibleWorks that the character is a "forward spacing" character. This is necessary because SIL vowel point characters are typed before their consonant, while in some other fonts, like Hebraica and BibleWorks fonts, they are typed after their consonant. If a target character maps to two BibleWorks characters, simply include two ASCII numbers separated by a slash. See the sample SIL Galatia font for an example.
Setting Found Text Attributes
In the "Found Text" section you can specify the style, text and background colors for hits in the Browse Window.
Setting Analysis Window Font Sizes
If you select the "Browse Window Fonts" as the Font Set to Edit, a new column will be added to the Font Sets section under the title "AW". Changing these settings allows you to specify the font sizes of text displayed in the Analysis Window.
Selecting Fonts for Double-Byte Languages (Chines, Korean, etc.)
If you click on the "More" Button a Window will open to permit you to select the fonts that will be used for Arabic, Chinese, Korean and Japanese versions. The default font is "Arial Unicode MS" but since not all systems will have this font, you may need to specify another. These font selections will be used only if the font specified in the version's DBU file is set at "default".
Setting Search Limits
 This Window permits you to limit searches to a particular
passage of Scripture. The Search Limits tab in the Setup Window can also be
activated by clicking on the Search Window Utility button
This Window permits you to limit searches to a particular
passage of Scripture. The Search Limits tab in the Setup Window can also be
activated by clicking on the Search Window Utility button  and selecting
"Choose Search Limits", or from the Main Menu by selecting Search
| Set Search Limits or Tools | Options | Search Limits. You can also
access the Search Limits Window by double-clicking on the "Limits"
area in either the Main Status Bar or the GSE Status Bar.
and selecting
"Choose Search Limits", or from the Main Menu by selecting Search
| Set Search Limits or Tools | Options | Search Limits. You can also
access the Search Limits Window by double-clicking on the "Limits"
area in either the Main Status Bar or the GSE Status Bar.
Search Limit Options
In this window there are three choices for how to set search limits:
§
Do not apply any limits to the search
Choosing this option deactivates all search limits. All searches will
search the entire Bible version. If this option is selected, the
settings from other sections of this Window are ignored.
§
Limit the search using the books checked below
If this option is selected, searches will be limited using the limits
specified in the "Available Books" tree view window in this Window.
To see all of the books, you will need to scroll down in the window. With the
Select and Clear buttons (All, NT, OT, and Apoc), you can quickly select or
unselect all books, the entire Old Testament, New Testament, or the Apocrypha.
§
Limit the search using a custom search range
If this option is selected, the search will be limited using the settings
in the "Predefined Ranges" window. This allows you to create
customizable preset search ranges. It also allows a finer level of granularity
in the search limit range. You can specify arbitrary books, chapters, and
verses in the creation of search limits.
When you click on a range in "Predefined Ranges" the selected range
will be used to limit all searches. The details of the selected range will be
displayed to the right of the window. To edit the existing ranges, click the Edit
button.
Adding New Custom Ranges
To add a new custom range, edit the current range making sure
that you change the description. Then click on "Add". You can also
edit the custom ranges by clicking on the "Edit" button. This will
load the entire list of custom ranges in raw form into an edit control. Make
the changes that you want and click on OK. The raw file requires that the
Description, Version, and Range setting be separated by a forward slash.
When adding verses to the Range field, multiple sub-ranges must be
separated by semicolons. If you do not put the full verse reference, BibleWorks
will make a judicious guess at what you intend. A book name by itself, for
example, will be interpreted as the entire book. For example, to create a
search limit for the four gospels, you would enter:
|
Mat;Mar;Luk;Joh |
You can also create ranges that span books and chapters, such as
|
Joh 14-17; 1Co 13, 1Ti 1:1 - Heb 13:25 |
To delete a predefined range, select it from the "Predefined Ranges"
list and click the Delete button.
Setting Favorite Version Options
 The Versions tab in the Options Window provides three
related options having to do with the use of Search and Display Versions in
BibleWorks:
The Versions tab in the Options Window provides three
related options having to do with the use of Search and Display Versions in
BibleWorks:
Setting the Current Search and Display Versions
If you click on the "Choose Search Versions" Button a window will open that permits you to select the current Search Version for Command Line Searches. If you click on the "Choose Display Versions" button, a window will open that permit you to select the current Display Versions used in the Browse Window when it is in Multiple-Version Mode. This is one of many ways in BibleWorks to change Search and Display Versions.
Creating Search and Display Version Favorites
If you use BibleWorks frequently you will find that you use some combinations of Bible versions more than others. It can become tedious to change the mix of versions displayed in the Browse Window back and forth between favorite combinations if you do it by selecting and deselecting versions. To solve this problem BibleWorks allows you to define sets of versions that you like to work with and give them names that you can use to recall them later.
Creating Display Favorites
To create a favorite display version setup, all you have to do is click on the "Add" button in the "Search and Display Favorites" group box. This will create a new favorite based on the current display versions set in the Browse Window. A default name will be given to the favorite composed of the current search version plus the list of display versions (e.g. "KJV+KJV GNT NIV"). You can change this name to something more descriptive like "My_Favorite" and also add and remove versions by clicking on the "Edit Button." If you change the name of the favorites you are encouraged to use names with no blanks and to keep the names short. Instead of blanks use the underscore character "_". The reason for this is that you can load the favorites from the Command Line if they have no blanks.
Using Display Favorites
If you want to change the Browse Window and Command Line so
that they use one of your predefined "favorites" all you have to do
is click on the Version Button ![]() to
the left of the Command Line. When you do that you will notice that the Display
Favorites that you defined have been added to the menu. All you have to do is
select the one you want to use. An alternative method is just to enter
"display" or just "d" on the Command Line followed by the
custom name that you have defined.
to
the left of the Command Line. When you do that you will notice that the Display
Favorites that you defined have been added to the menu. All you have to do is
select the one you want to use. An alternative method is just to enter
"display" or just "d" on the Command Line followed by the
custom name that you have defined.
Creating Parallel Version Favorites
The Parallel Versions option in BibleWorks allows you to open a single window with multiple versions that are displayed sided-by-side and scroll in unison. This is done by opening the Parallel Versions Setup Window and choosing the versions you want to use. This can become tedious if you use the same versions frequently. For that reason a feature has been added that permits you to define Parallel Version favorites, in a fashion very similar to what you can do with Search and Display Versions.
Creating a Parallel Version Favorite
To create a Parallel Versions Favorite all you have to do is click on the "Add" Button in the "Parallel Versions Favorites" group box. A new "favorite" will be initialized using the display versions in the current Browse Window. You can then edit the "favorite" by clicking on the "Edit" button to change the name and/or the versions included. If you want to change the order of the versions, select the version you want to move and click on "Up" or "Down". To delete a version, highlight the version by clicking on it and click on "delete". To add a version, find it in the upper list boxes, select it, and then click on the "Add" button. It will be inserted after the selected version in the Favorites List Box.
Reviewing and Editing the Favorites
For both the Parallel Favorites and Display Favorites group
boxes, the list of favorites on the left side shows all of your favorites. When
you click on a favorite in this list, the details for that favorite are
displayed in the text area on the right. If you double-click on the favorite,
or if you select it and click the Edit button, a window opens in which
you can modify the favorite. Power Users can display a Parallel Versions
favorite by entering "p" on the Command Line followed by the custom
name they have defined.
Changing the Version Display Order
 This tab can also be opened by selecting View |
Version Display Order from the Main Menu or from the Browse Window Options
Button
This tab can also be opened by selecting View |
Version Display Order from the Main Menu or from the Browse Window Options
Button ![]() menu.
menu.
When you are in Multiple Version mode in the Browse Window , the text from several Bible versions can be displayed at the same time. The Version Order Window lets you change the default order in which Bible versions appear.
To change the order of a Bible version, click on the Bible version in the list, and click the Move up and Move down buttons. The selected Bible version will move up or down in the list accordingly. To move a Bible to the very top of the list or bottom of the list, select the Bible version and click on the Move to Top button or Move to Bottom button.
The list of versions in this window is fairly long. If you are interested in just ordering the versions currently displayed, you can click on the Show Active Only checkbox. If this box is checked, only the current display versions will be shown.
Book Names
 The Book Names Tab in the Options Window permits
you to customize the Bible book names used in BibleWorks, both for display and
for searching. The Bible books names are used when text and references are
displayed in Browse Windows, when text and references are exported to the
clipboard, and when you enter references on the Command Line.
The Book Names Tab in the Options Window permits
you to customize the Bible book names used in BibleWorks, both for display and
for searching. The Bible books names are used when text and references are
displayed in Browse Windows, when text and references are exported to the
clipboard, and when you enter references on the Command Line.
When you enter verse references to look up on the Command Line, you enter the appropriate abbreviation for the book containing the verse that you want to look up. For example, <Rom 8:28>. By default BibleWorks recognizes three-letter abbreviations which, for the most part, are made up of the first three letters of the book. You can define aliases for these abbreviations, which BibleWorks will then recognize when you do searches. You can define up to three aliases for each book.
The most prominent part of the Book Names Tab is the list of current book names and aliases. This is shown in the center of the window. Across the top of the window you will see the filename for the current book name scheme. You can define more than one book name scheme and save each one to a different file, but only one can be active at a time. The default book names file is books.bna.
The list of book name abbreviations contains the following columns:
§
Def
This is the internal three letter abbreviation of the book. It is always
used in verse lists and file names constructed from book names (user notes).
This entry cannot be edited. It usually is the first three letters of a book
name.
§
Browse Window
This is the book name that is printed with references in the Browse Window.
It can contain blanks if you like. This allows you to specify how book names in
text that you export are spelled.
§
Export
This is the book name that is used when Search Window verse lists (just the
lists, not including the text of the verses) are exported to the clipboard or
BibleWorks editor. It can contain blanks if you like.
§
Alias 1, Alias 2, Alias 3
These are Command Line aliases for the book names. The Command Line will
accept them as valid book names for searches. You can enter up to three
aliases, but you must have at least one and the entries cannot contain any
blanks. When you enter a reference on the Command Line, these entries are first
checked for an exact match, and if no exact match is found, then all these
entries are checked for a partial match.
§
Editing the book names list
To edit a book name, double-click in the Def. column (the first column) on
the book name that you want to edit. A window will open for that book name,
allowing you to edit the fields listed above.
§
Checking consistency
When you click the Check Consistency button, BibleWorks will check your abbreviations
for duplicates and inconsistencies. If any are found the list will not be
implemented. It is suggested that you use the Check Consistency button to check
the entries before exiting, so that you can have the opportunity to make any
necessary corrections.
Multiple configurations
You can define many different sets of book names. This may be useful if you are working in different languages -- you might have one set of book names in French, and another set of book names in English. The way to manage different sets of book names is to use different book name files. The name of the currently loaded book name file is displayed across the top of this window.
To create a new book name file, make the changes you desire in the current settings, click on the Save as button, and give the file a new name. To switch to another previously saved book name file, click on Open and select the file to load. When you press Save, the changes to the currently loaded book name file will be saved.
It might be helpful to keep in mind that the file name of the current book name alias file is stored in your configuration file. This means that you could have a different configuration file (using the Configuration Manager) and hence a different set of aliases for use with different languages.
Editing Verse Maps
 The Verse Maps Options Tab of the Options
Window permits you to edit the tables that are used in BibleWorks to
convert a verse reference in one version to a verse reference in another
version. These tables are necessary because several of the versions supported
by BibleWorks have different verse numbering schemes and text bases. This means
there is not, for example, a one to one correspondence between the verses in
the BHS Hebrew and the LXX Greek Old Testament, or between the BHS and any
English version. When you look up a verse in one of these versions BibleWorks
will attempt to display the right verses for each version (if they exist) even
if the verse numbers do not match. In many cases, particularly where the LXX is
concerned, the choice of which verses to display is quite subjective.
The Verse Maps Options Tab of the Options
Window permits you to edit the tables that are used in BibleWorks to
convert a verse reference in one version to a verse reference in another
version. These tables are necessary because several of the versions supported
by BibleWorks have different verse numbering schemes and text bases. This means
there is not, for example, a one to one correspondence between the verses in
the BHS Hebrew and the LXX Greek Old Testament, or between the BHS and any
English version. When you look up a verse in one of these versions BibleWorks
will attempt to display the right verses for each version (if they exist) even
if the verse numbers do not match. In many cases, particularly where the LXX is
concerned, the choice of which verses to display is quite subjective.
Mapping File Format
Rather than impose our own choices on the user, we have decided to implement verse mapping databases that users can customize. These user-definable databases are accessed by selecting Tools | Options | Verse Maps from the main menu of BibleWorks. When you do that, the verse maps editor will open. To create your own verse mappings, follow the patterns already there and make or edit the verse mapping entries. There is a mapping file for each version in BibleWorks.
Each line in a mapping has the following entries:
§ Source Ref - The verse reference in the version being edited
§ Dest Ref - The corresponding reference in one of the original language versions or the NRS. The possibilities are WTT, GNT, LXT or NRS.
§ Ver - The BibleWorks name for the version used in the Dest Ref column. Each Version in BibleWorks has a short name, three or more letters long, used to reference the version in BibleWorks.
§ Comment - A user supplied comment. This is just for documentation and does not affect the mapping.
If the verse reference in Source Ref specifies a verse range, then the reference in Dest Ref must cover the same number of verses. Ranges cannot span books.
The reference specified in Dest Ref (and Ver) does not specify the origin of the Bible translation being mapped. It would be better to think of the reference in Dest Ref and Ver as a reference in an imaginary universal Bible version (non-existent) to which all verses in all versions can be mapped. This provides a reliable way to map a verse reference from any one real Bible version to another. The rules for adding a verse to the mapping file are as follows:
§ If a verse in the version being mapped exists in the WTT or GNT and the verse numbers in the version and GNT/WTT are different, there should be an entry in the mapping file.
§ If a verse in the version being mapped exists in the WTT or GNT and the verse numbers in the version and GNT/WTT are the same there should NOT be an entry in the mapping file. The verse mapping routines will assume that all verses in the version without an entry in the mapping file, have a corresponding verse in the GNT or WTT and that the reference is the same in both versions. This keeps the size of the mapping file small.
§ If the verse in the version being mapped is in an Apocryphal book, and has a corresponding entry in the LXX, but the reference is different in the two versions, there should be an entry in the mapping file.
§ If the verse in the version being mapped is in an Apocryphal book, and has a corresponding entry in the LXX, and the reference is the same in the two versions, there should NOT be an entry in the mapping file. The verse mapping routines will assume that all Apocryphal verses in the version without an entry in the mapping file, have a corresponding verse in the LXX and that the reference is the same in both versions. This keeps the size of the mapping file small.
§ If a verse in the version being mapped has no corresponding verse in the WTT or GNT, or LXX if it is Apocryphal, and there is a corresponding verse in the NRS, then there should be an entry in the mapping file with NRS in the last column.
§ If a verse in the version being mapped has no corresponding verse in the WTT, GNT, LXX or NRS, then there should be an entry in the mapping file with the same verse reference in column 1 and 2 and with the third column containing the BibleWorks name for the version in question. This tells the verse mapping routines that this verse is unique to the version being mapped.
The LXX-BHS mappings for BibleWorks were originally obtained from the University of Pennsylvania Center for Analysis of Texts (CCAT) Aligned LXX-BHS Database, courtesy of Dr. Robert A. Kraft. See the section on Database Source and Copyright Information for details. These verse mappings have been corrected by BibleWorks staff, and extensively modified as a result of input from users. BibleWorks contains mapping files for almost every Bible version. These have been developed over many years by BibleWorks staff with input from many users, and especially from Mark Eddy, for whose unselfish work we are thankful.
The mapping files are saved with a .vmf extension and are ASCII text files. The actual files used by BibleWorks to do the mapping are saved in binary files with the same name, but with a .vmc extension. BibleWorks will construct the binary files behind the scenes from your text files, so you do not have to worry about it. If you edit one of the text files outside of BibleWorks, you will need to delete the corresponding .vmc file, so that BibleWorks will know that it needs to construct a new one the next time you run it.
Editing verse maps
To view the verse map for a specific version, simply select the language group for the version from the Languages control, and then select the Bible version from the Version control. To edit a particular entry in the mapping, double-click with the left mouse button on the entry in the Source Ref column. A small window will open in which you can edit the information for the four mapping columns described above.
If you want to copy or delete rows, you must first select them by clicking with the left mouse button (select multiple rows by clicking and holding the shift key or control key) in the Source Ref column. Then click on the Edit button. This button opens a menu with basic clipboard features (cut, paste, etc.). In addition, the Edit button allows you to insert blank rows into the mapping table. In this way you can cut, paste and delete rows of references.
After editing a mapping table, you should press the Check Consistency button to test the mapping. This will test the mapping for duplicate entries and mapping problems. When you are sure you want to keep your mapping table, press the Save button. The .vmc and .vmf files for that version will be created.
Manual Editing
If you like, you can edit the mapping files externally. They are stored in ASCII text files with a .vmf extension (VMF stands for verse mapping file). Just follow the format that you see in any of the .vmf files. After editing you should load them into the Verse Map window so you can check them for consistency. All versions have a .vmf file. It will have the same name as the version but with the .vmf extension. After you edit a .vmf file manually you should delete the corresponding .vmc. This is a compiled version of the mapping file. If you delete the .vmc file the program will create a new one when you start the program. The compiled files are created to make loading of the maps in real time more efficient.
A Mapping Example
As an illustrative example consider a sample from the Latin Vulgate VUL Mapping file. It has the following lines:
|
Psa 35:1 |
Psa 36:1 |
WTT |
|
Psa 35:1 |
Psa 36:2 |
WTT |
|
Psa 35:2 |
Psa 36:1 |
WTT |
Suppose that the WTT and VUL are display versions. And suppose your search
version is the VUL and you enter the reference Psa 35:1 on the Command Line. The
program searches all the entries in column one from beginning to end.
Everywhere it finds Psa 35:1 it will display the corresponding WTT verse.
In this case Psa 36:1 and Psa 36:2 will be displayed.
Now suppose you make the WTT your search version and enter Psa 36:1 on the Command Line. The Browse Window will display Psa 36:1 in the WTT and Psa 35:1 and Psa 35:2 in the VUL version. It will search the Dest Ref column from beginning to end and display a VUL verse every time it finds Psa 36:1.
Note that if you want the same verse number to be displayed in two versions in addition to a collateral verse, you will need two entries. The English Version Psalm headings are good examples. The KJV mapping file, for example, has these lines:
|
Psa 3:1 |
Psa 3:1 |
WTT |
|
Psa 3:1-8 |
Psa 3:2-9 |
WTT |
The Psalm Headings in the KJV are combined with the first verse of the Psalms.
But in the WTT they are in verse one, with the Psalm text beginning in verse two.
The above fragment handles this case. If you have the KJV as your search
version and enter Psa 3:1, you will get both Psa 3:1 and Psa 3:2 in the WTT.
But if you have the WTT as your search version and enter Psa 3:1, you will get
only Psa 3:1 in the KJV. Note the duplicate Psa 3:1 entry in the first row.
This is necessary here, but remember that if a single verse maps completely to
another single verse with the same reference, a mapping file entry is usually
not needed (this would make for very large mapping files!).
When you enter a reference in a version that is not the WTT, GNT, LXX or NRS, and want to display a verse in a version that is also not the WTT, GNT, LXX or NRS, two mapping files are used. For example, if you have the KJV and TOB as your display versions and the KJV as your search version, and enter Psa 3:1 on the Command Line, this is what happens when the Browse Window decides what verses to display: the KJV mapping file is opened and the Source Ref column is searched for all entries of Psa 3:1. The corresponding Dest Ref column (WTT) entries are stored. Then the TOB mapping file is opened and its Dest Ref column is searched for the previously stored entries from the first mapping file. For every one that is found, the corresponding Dest Ref column TOB reference is displayed.
The best way to learn how all this works is to open up some mapping files and experiment. Make sure you back up the mapping files (all .vmc and .vmf files) first. If you make a mistake, however, you can always re-install these files from your CD.
Wildcards and Compound Word Forms
 The Wildcards Tab in the Options Window deals
with two different (but related) topics.
The Wildcards Tab in the Options Window deals
with two different (but related) topics.
§ The top half of the Wildcards Tab deals with what are called compound word form wildcards. A compound word form wildcard is a wildcard used in Command Line searches to represent multiple words. Compound word form wildcards are entered on the Command Line as something like "#1" or "#2" or "#3", etc., where each number can represent any of a list of excluded or included words. They function as user-defined wildcards. This section of the window lets you create and edit the words that are assigned to the numerical wildcards.
§ The bottom half of the Wildcards Tab contains an interface for defining special wildcard characters for use in Hebrew vowel-point sensitive searches.
This window is opened by selecting Tools | Options | Wildcards from the main menu of BibleWorks. Alternately, you can RIGHT-click on the Command Line and select Define Compound Forms from the menu that opens.
An Example
An example of the power of the Hebrew vowel point wildcards may be helpful. Suppose you wanted to find all occurrences any consonant with a hireq, followed by a doubled yod. Here is the search you would enter:
![]()
To enter the box with a plus in it (standing for a consonant) press the insert key and release it. Then press the number 1 key and press the insert key again. Note that for this search you must also turn off the Ignore Dagesh in Hebrew Searches option in Setup Flags | General Hebrew Options.
Command Line Compound Word Form Wildcards
When you are doing a Command Line search the "#N" operator stands for a list of words to be included and a list of words to be excluded from the match. In the Wildcards Window, you can set up the list of words assigned to each "#N" operator. You can "attach" up to nine exclusion and inclusion lists to each Bible version in BibleWorks.
The Command Line Compound Word Form Wildcards group box contains the following options:
§
Version
This List Box is used to determine the version for which you want to define
the compound word forms.
§
Form Number
This List Box is used to specify which compound word form wildcard you want
to define (#1 through #9).
§
Use Match Lists
If this box is not checked, "#N" codes will only be used for
lemma matching, and no compound word operations will be done with this version.
See Lemma
Agreement and Compound Word Forms for more information on lemma
matching searches. The word lists defined in this window in the next two
numbered items will not be used if this option is not checked. If this box is
checked the two text entry boxes under the checkbox will be used as described
below.
§
Include the following words
This text box is used to enter the list of included words for the
"#N" operator to represent. The "#N" operator must find at
least one of these words in the Bible text in order for a match to be made. You
can add any number of words to each of these lists, separated by spaces.
§
Exclude the following words
This text box is used to enter the list of excluded words for the
"#N" operator to represent. You can add any number of words to each
of these lists, separated by spaces. If a word is in this list, it will not
result in a match.
An Example
A simple English example will help to illustrate the use of these parameters.
1. Change to the KJV version
2. Select #1 as the form number
3. Enter the following on the inclusion line: god lord jesus christ
4. Select #2 as the form number
5. Enter the following on the inclusion line: said spoke answer* repl*
6. Then do the following search on the Command Line: 'and #1 #2
The search will find all verses with strings like "and God said", "and God answered", ... "and Jesus said", "and Christ answered" and so on. If we had added "answers" to the EXCLUSION list for the #2 definition, matches like "and God answers" would be eliminated. The only reason to include words in the exclusion list is to reduce irrelevant hits produced by wildcards in the inclusion list.
For English and non-morphological Hebrew and Greek searches, this procedure is useful, but for morphological searches it is extremely powerful. It eliminates one of the greatest problems involved with the use of wild cards in string searches, namely reducing the accumulation of unwanted verses from the search. It also allows you to do in one search what would otherwise take perhaps dozens of searches.
You should note that, just as in Command Line parameter specification, if you are searching a morphological version (GNM, BLM, BGM, TIM, SCM, BYM, STM or WTM), when you enter lemmas in the inclusion and exclusion lists, if you do not add morphological code forms to the lemmas, a "@*" will be added behind the scenes and ANY form of the lemmas will be matched or excluded.
Vowel Point Searches in Hebrew
The bottom half of the Wildcards Tab contains an interface for defining special wildcard characters for use in Hebrew vowel-point sensitive searches.
This feature was introduced to address a longstanding problem with Hebrew vowel-point searches. It has been very difficult to do wildcard searches with vowel-point sensitive Hebrew. The reason is obvious to anyone who has tried it. There was no way to distinguish between consonants and vowels, and the display of the * and ? wildcard characters with Hebrew text was problematic at best. The solution that we have come up with is a set of wildcard characters specifically designed for use with Hebrew text.
There are five new wildcards that can be used with pointed Hebrew text. The meaning of each one can be changed to suit your needs simply by editing the list of characters in the text boxes associated in the display with each wild card. In the text boxes, the alephs are just holders for the vowels. They are just there to make the vowels readable.
§
(Ins-2) One Vowel a´
The first wildcard is entered by pressing the INS key followed by the numeral 2
key. Then press the INS key again to turn off the special code insertion mode.
The wildcard will appear as a small open box under its consonant. It represents
any of the vowels in the list.
§
(Ins-5) Zero or One Vowel a®
The second wildcard is entered by pressing the INS key followed by the
numeral 5 key. Then press the INS key again to turn off the special code
insertion mode. The wildcard will appear as a small closed box under its
consonant. It represents any of the vowels in the list or none of the vowels.
It is somewhat similar to the familiar ? wildcard except that it also matches
zero vowels, whereas the ? requires the presence of a single character.
§
(Ins-1) Any Consonant µ
The next wildcard is entered by pressing the INS key followed by the
numeral 1 key. The wildcard will appear as an empty box with a plus sign in it.
It represents any of the consonants in the list. The list initially contains
all consonants with and without dagesh.
§
(Ins-4) Consonants without Dagesh ¤
The next wildcard is entered by pressing the INS key followed by the
numeral 4 key. The wildcard will appear as an empty box. It represents any of
the consonants in the list. The list initially contains all consonants without
dagesh.
§
(Ins-3) Consonants with Dagesh £
The next wildcard is entered by pressing the INS key followed by the
numeral 3 key. The wildcard will appear as a box with a dot in the middle. It
represents any of the consonants in the list. The list initially contains all
consonants with dagesh.
When you click the Default button next to each field, the default values
for that wildcard are restored.
Updating, Adding, and Removing Databases
 The Updates tab in the Options Window contains
the controls you need to update and modify your BibleWorks installation. There
are two different update options available:
The Updates tab in the Options Window contains
the controls you need to update and modify your BibleWorks installation. There
are two different update options available:
§
Web Updates
If you want to check the BibleWorks
server for program and database updates, press the "Check for
Updates" button. This will connect you to the BibleWorks Internet server
and show you available updates. You may need to first connect to the
Internet before pressing this button. For more information see
Getting
Updates.
§
Adding Bible Versions, Removing Other
Databases
If you need to add or remove databases
or Bible versions to your installation, insert the BibleWorks CD and click the
"Proceed" button in the "Add or Remove Databases" section.
This will open InstallShield, which will walk you through the steps to add and
remove databases and versions.
The Configuration Manager
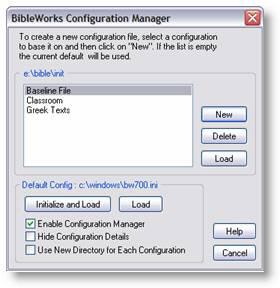 BibleWorks is probably one of the most configurable
programs you are likely to find. You will probably find many different
configurations that suit different purposes. And you might begin to wish that
there was a way to store different configurations and save them for later use.
The Configuration Manager will help you to do precisely that.
BibleWorks is probably one of the most configurable
programs you are likely to find. You will probably find many different
configurations that suit different purposes. And you might begin to wish that
there was a way to store different configurations and save them for later use.
The Configuration Manager will help you to do precisely that.
Enabling the Configuration Manager
To enable the configuration manager go to the Options Window and open the Startup Options section. Then check the "Enable Configuration Manager" box. Then shutdown BibleWorks.
The next time you start BibleWorks you will not see the familiar BibleWorks interface. Instead you will see the BibleWorks Configuration Manager Window The window consists basically of a list of named configurations. To activate one you just click on it and then click on "Load".
Creating a New Named Configuration
To create a new configuration proceed as follows:
§ In the list of available Named Configurations click on the one that you want to use as the basis of the new configuration.
§ Click on the "New" button. You will be prompted for a name to give the configuration. Name it anything you like but you should use only alphabetic characters. The name will be used as a filename so you can only use valid file name characters. Blanks are permitted of course. Then click on OK.
That's all there is to it. To start the new configuration just click on it, and then click on "Load". Make whatever changes you want in the program and exit as you always do. Then the next time you start BibleWorks the new configuration will be in the list.
If you want to delete a Named Configuration just click on it and click on the "Delete" button.
Reinitializing and returning to the Default Configuration
The group box at the bottom of the Configuration Manager provides you with a variety of ways to startup without using the Named Configurations. The caption of the group box tells you where the default configuration file is located. You have two options:
§ If you just click on load the indicated default initialization file will be loaded and BibleWorks will be started.
§ If you click on "Initialize and Load" the default initialization file will be deleted and BibleWorks will be started. This will start BibleWorks with all default settings.
In both cases if you have the "Enable Configuration Manager" checkbox checked, BibleWorks will start with the Configuration Manager enabled. Otherwise it will be disabled.
Hiding Configuration Details
If you enable the checkbox labeled "Hide Configuration Details", the Configuration Manager startup window will be simplified to include only the list of available configurations. If you enable this option in the Configuration Manager Window, you must go to the Option Flags tab under the Options Window to turn it off again. This option is useful especially for network setups where the system manager wants to enable multiple users to have their own configuration files but wants to hide confusing configuration details from them.
Use New Directory for Each Configuration
If you enable the checkbox labeled "Use New Directory for Each Configuration", the Configuration Manager will create a new set of user directories for each new configuration. They will be placed in a new directory called "Config" under the BibleWorks Directory. Only directories containing user-configurable files will be duplicated. This is useful, for example, if you want to have a different set of notes for each configuration.
Configuring BibleWorks for Use on a Network
BibleWorks can be configured for use by multiple users on a network. Setting up BibleWorks for use in this way consists of the following steps: