29 Copying Results |
|
An Overview of Copying Methods
Selecting Different Font Options for Exported Text
The Copy Center
Copy Center Format Options
Attaching a Popup Copy Window
Copying the Verse List
Exporting Large Sections of Bible Text
Choosing the Bible Version for the Export
Selecting the Verse Range to Copy
Using the Report Generator
An Overview of Copying Methods
The Copy Center
![]() We have attempted to simplify the
process by making it possible to perform the most important copying tasks from
one centralized place, which we call the BibleWorks Copy Center . The
source and destination options provided by the Copy Center are summarized
below:
We have attempted to simplify the
process by making it possible to perform the most important copying tasks from
one centralized place, which we call the BibleWorks Copy Center . The
source and destination options provided by the Copy Center are summarized
below:
The exported text can be formatted in fine detail. You can control the presence, format and location of version names, book names, and chapter and verse labels. You can export verses lists with or without their text, and verse lists can be formatted and have consecutive verses merged and marked with the familiar "f" and "ff" labels. For details see the Copy Center and Copy Center Format Options .
Keyboard Shortcuts
The usual Windows keyboard copying shortcuts are supported in the BibleWorks Editor and in the Browse Window. To copy text from these windows to the Clipboard, highlight the text and press Ctrl-C. For other keyboard shortcuts defined in BibleWorks see the Keyboard Shortcuts topic.
Context Menus and Windows
Many subsections of the BibleWorks interface have context menus that give you access to related features. Some allow you to print or copy. For example, copying parts of the Search Window Results Verse List Box and the Browse Window can be accomplished by RIGHT clicking on a selected area and choosing the appropriate menu option. Information in the Analysis Window and in the text area of the Lexicon/Dictionary Browser can be copied by highlighting the text to be copied and RIGHT clicking on the highlighted text. Also, many of the Windows that you can open, the Word List Manager for example, or the Timeline, or the Detailed Statistics Window, have menu options that you can select to copy items to the Clipboard. Consult the documentation for each Window, as appropriate, for details.
Selecting Different Font Options for Exported Text
Many times you will want exported text to be in a different font from the font used to display text on the screen. What looks good on the screen may not look good in print. You may also want to re-map the Greek and Hebrew fonts used by BibleWorks to other Greek and Hebrew fonts that you prefer to use in printed documents for sharing with other people. BibleWorks provides mechanisms for both of these requirements. For details see the Font Options topic.
The Copy Center

![]() Clicking on this button opens up the BibleWorks Copy
Center. Many of the most frequently used copy functions in BibleWorks are
centralized in this Window. The Copy Center can also be opened via the Main
Menu by selecting Tools | Copy Center. A Copy center option is also
available on the Utility Button to the right of the Command Line.
Clicking on this button opens up the BibleWorks Copy
Center. Many of the most frequently used copy functions in BibleWorks are
centralized in this Window. The Copy Center can also be opened via the Main
Menu by selecting Tools | Copy Center. A Copy center option is also
available on the Utility Button to the right of the Command Line.
Using the Copy Center
To use the Copy center all you have to do is select a source and destination for the copy and click on the "Copy" button to perform the copy operation. The copy sources are listed in two group boxes. The options presented to you are summarized in the table below:
|
Source Options |
Destination Options |
|
1. Browse Window Text 2. Analysis Window Text 3. Statistics Word List 4. The Search Window Verse List 5. Text of Verses in Verse List 6. An arbitrary Range of Verses |
1. The Clipboard 2. The BibleWorks Editor 3. A word processor |
The exported text can be formatted in fine detail. You can control the presence, format and location of version names, book names, and chapter and verse labels. You can export verse lists with or without their text, and verse lists can be formatted and have consecutive verses merged and marked with the familiar "f" and "ff" labels. For details see the Copy Center Format Options .
To perform a copy using the Copy Center you must specify three things: (1) what to copy, (2) where to copy it and (3) what formatting options to use for the copy. These first two options are chosen by selecting radio button options in the Copy Center Window. Formatting options are selected by clicking on the "Format Options" Button, which will open up another window with choices for you to make.
What to Copy
The "What to Copy" group box presents you with the following options for what kind of text you want to copy:
§ Browse Window Text - The text displayed in the currently active Browse Window will be copied. If nothing is highlighted by the mouse, all of the text in the Browse Window will be copied. If you have highlighted text in the Browse Window using the mouse, only the highlighted text will be copied.
§ Analysis Window Text - The text currently highlighted in the Analysis Window of the currently active Browse Window will be copied. You must first highlight the text to be copied.
§ Statistics Word List - The list of words displayed in the Search Window Word Statistics List Box will be copied.
§ Search Window Verse List - The list of verses displayed in the Search Window Verse List Box is copied without the text of the verses. This list can be exported with or without a new line between the references by clicking on the Format Options button. You can also choose to merge consecutive references. See Copy Center Format Options for more information.
§ Text of Verses in Verse List - The list of verses displayed in the Search Window Verse List Box is copied including the text of the verses. You can determine how the verses will be formatted by clicking on the Format Options button. See Copy Center Format Options for more information.
§ Range of Verses - The reference or range of verses that you enter here will be copied. Examples of what to enter in the Range text area include "Gal 1:1", "Gen 5:1-10", "1Th 1:1-1Ti 1:1". In the text area labeled Versions you specify the Bible versions from which you want the text to be copied by entering their BibleWorks version abbreviations. You can specify more than one Bible version here and the text will be copied from each Bible version listed. The easiest way to specify multiple versions is to click on the ">>" button and select versions for the list presented there. Initially the Range and Versions text boxes will be initialized to the current Browse Window verse and current Browse Window display versions.
Where to Copy It
Once you have chosen what information you want to transfer, you must next choose where you want the information to be copied. The "Where to copy it" group of radio buttons gives you the following choices:
§ Copy to Clipboard - The information will be copied to the system clipboard. You should be able to paste the information into any other program that supports the Paste command. If the target word processor supports RTF text import via the Clipboard, font attribute information will be preserved in the copy.
§ Copy to BibleWorks Editor - The information will be copied to the current BibleWorks Editor Window . The current editor window will be the last one you clicked on with the mouse.
§ Copy to Application with this Title - If you have another program (such as a word processor or e-mail program) that is already open, you can select a destination program for the information that you are copying. You can select a destination program from the dropdown list that appears next to this button. Make sure the application is open before opening the menu. Then select the application from the list of window titles. The information will be copied to the currently active window in that program. The target application must be able to handle RTF text properly for formatting information to be preserved in the transfer.
Note that if you are transferring Browse Window text, Hebrew text transferred in this way will be wrapped by BibleWorks in the same places as in the current Browse Window and soft line breaks will be replaced with hard returns. If you are transferring a range of verses, Hebrew text will be wrapped at the length specified in the Format Options Window.
If you click the Attach button, BibleWorks will hide itself and open a small Copy Center window next to the program you selected. This small Copy Center window will let you enter references and Bible versions and quickly paste the text into your program. When you click the Close button in this small Copy Center window, BibleWorks will reappear. See Attaching a Popup Copy Window for more information
How to Format It
When you copy lists of references (with or without the text of the references), you can also specify how you want to format the text and references. After choosing what to copy and where to copy it, you can click on the Format options button to customize the appearance of the information you are copying. See Copy Center Format Options for more information.
Copy Center Format Options
![]() The
"Format Options" Window is opened from within the Copy Center Window
by clicking on the "Format Options" button. This window
permits you to specify in detail how to format the text that you are copying.
This window is opened from the Copy Center window.
The
"Format Options" Window is opened from within the Copy Center Window
by clicking on the "Format Options" button. This window
permits you to specify in detail how to format the text that you are copying.
This window is opened from the Copy Center window.
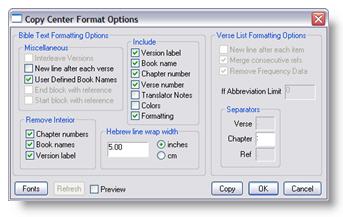
The "Format Options" Window is linked to the Copy Center window. You will notice that there are grayed out sections and options in the Format Options Window. Which options are grayed out will depend on the options that are selected in the Copy Center. This is because some of the format options do not apply to all of the source options. This permits you to see immediately which format options are relevant to the particular copy that you are performing.
Previewing the Copy
When you click the Preview checkbox, this Format Options Window will be enlarged to show a preview window. This permits you to see immediately the effect of various formatting options before you actually do the copy. In most cases the preview screen will update automatically, but in a few cases you may need to click on the "Refresh" button to redraw it.
Bible Text Formatting Options
The "Bible Text Formatting Options" group box has options that pertain mostly to the copying of Bible verse text (rather than just verse lists without text). These options will affect text copied from the Browse Windows, as well as text transferred when you copy an arbitrary range of verses. The options in this section are subdivided into functional groups as follows:
Miscellaneous
§ Interleave Versions - When copying multiple verses from multiple Bible versions, this option will copy verse text from all Bible versions selected before moving to the next verse in the list. If this option is off, (1) text from multiple verses will be copied from a single Bible version at a time; and (2) after all verses from a single Bible version are copied, the same verses will be copied from the next Bible version.
§ New line after each verse - If this option is checked, when multiple verses or references are being copied, each verse or reference will be separated by a line break. If this option is not checked, all verses or references will appear in a single large paragraph.
§ User Defined Book Names - If this option is checked, when Bible references appear in the copied information, the Bible Book Names defined in the Tools | Options | Book Names window will be used. Otherwise the default BibleWorks names will be used. For more information on how to set user-defined book names, see Book Name Abbreviations.
§ End block with reference - This option specifies that, when Bible text is being copied, a verse reference for the text will be placed at the end of the text.
§ Start block with reference - This option specifies that, when Bible text is being copied, a verse reference for the text will be placed at the beginning of the text.
Include Options
These options describe what information should be included when a verse reference is being displayed.
§ Version label - If this option is checked, the three-letter abbreviation for the Bible version is included.
§ Book name - If this option is checked, the book name is included. See also the "User Defined Book Names" option in the previous section.
§ Chapter number - If this option is checked, the chapter number of the reference is included.
§ Verse number - If this option is checked, the verse number of the reference is included.
§ Translator notes - If this option is checked, any footnotes or translation-specific notes embedded in the text will be included. Not all Bible versions have these notes.
Remove Interior Options
These options apply only when you are copying a range of verses using the "Range of Verses" option in the Copy Center. It lets you remove certain items only when they appear in interior text, i.e. text that is not at the beginning of the paragraph. Sometimes, for example, you want to begin a range copy with the full references, but show only the verse number in subsequent verses.
§ Chapter numbers - If this option is checked, interior chapter numbers will be removed.
§ Book names - If this option is checked, interior book names will be removed.
§ Version names - If this option is checked, interior version names will be removed.
Hebrew line wrap width
This option only applies when Hebrew text is being copied. Most word processors do not support the left wrapped text. So when lines of Hebrew text are longer than one line, the word processor will break the line and wrap it, but the line will be broken incorrectly. With this option, you can specify a column width for the Hebrew text and have BibleWorks automatically break and wrap Hebrew lines when you are copying. A hard return will be placed at the end of each line. In the text area for this option you can specify the maximum width of the lines as they are wrapped for exporting. You should make it less than the maximum line width in the document you are creating.
Verse List Formatting Options
The "Verse List Formatting Options" group box contains options that apply to verse lists, i.e., lists of references without the text itself. The prime example would be the Search Window Results Verse List. Some options also apply to word lists. These options allow you to put raw verse lists into a format more suitable for journal and article publication.
§ New line after each item - If this option is checked, each reference or word will be separated by a line break. If the option is unchecked the references will be merged into a paragraph using the separators defined in the next section.
§ Merge consecutive refs - If this option is checked, consecutive references will be merged. For example, a string of references such as "Gen 1:1, Gen 1:2, Gen 2:1" would be converted to "Gen 1:1-2; 2:1".
§ Remove frequency data - If this option is checked, and you are copying a word list from the Search Window, word frequency data will be removed from the list.
§ ff Abbreviation Limit - When a list of references is being copied and the "Merge consecutive refs" option (above) is on, large ranges of verses (such as "psa 119:1, psa 119:2,... psa 119:50") will be abbreviated as "ff" ("Psa 119:1ff"). This text area lets you specify the minimum number of verses in a range that will be abbreviated in this way. For example, if you set this to 50, and if a verse range contains 50 or more verses, it will be abbreviated as ff. If this parameter is greater than zero and the range only covers two verses, an "f" will be used instead of an "ff".
§ Separators
o When multiple verse references are being copied and the "New line after each item" option is off, the references will be separated by punctuation. These text boxes let you specify the different punctuation marks to use. This is useful for European users because outside the United States different delimiters are normally used than the colon and semi-colon.
§ Verse - This option specifies the punctuation mark that appears between two verse numbers.
§ Chapter - This option specifies the punctuation mark that appears between a chapter number and a verse number in a verse reference.
§ Ref - This option specifies the punctuation mark that appears between two verse references.
§ Fonts - This button opens the Options window to the Font Options tab, where you can specify the fonts and font sizes to use when exporting text.
§ Preview - When checked, this opens a window in which the formatting options are applied and displayed using the text you are copying. This permits you to see the effect of formatting changes before you actually do the copy.
Attaching a Popup Copy Window
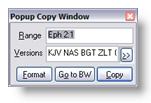 The Popup Copy Window is a small window that you can
attach to an external program, such as a word processor. When it is open,
BibleWorks will hide itself until the window is closed. The Popup Copy Window
gives you a quick way to import verses into an external program. It is a
miniature version of the BibleWorks Copy Center with just the
"Copy Range of Verses" section shown.
The Popup Copy Window is a small window that you can
attach to an external program, such as a word processor. When it is open,
BibleWorks will hide itself until the window is closed. The Popup Copy Window
gives you a quick way to import verses into an external program. It is a
miniature version of the BibleWorks Copy Center with just the
"Copy Range of Verses" section shown.
Opening the Popup Copy Window
There are three ways that the Popup Copy Window can be opened:
§ The Popup Copy Window opens when you click the Attach button in the Copy Center . When opened from the Copy Center, this window will open up and attach itself to the application you chose in the Copy Center in the dropdown List Box just under the Attach Button.
§ On most systems the Popup Copy Window can also be opened by opening BibleWorks first, and then starting and switching to the external application, and then pressing the "Shift-Ctrl-B" key combination from within the external application. This system-wide keyboard "hook" provides an alternative way of opening the Popup Copy Window.
§
The Popup Copy Window can also be opened from the BibleWorks Button bar
by clicking on the ![]() button.
This will open up a Window from which you can choose an application to which to
attach the Popup Copy Window.
button.
This will open up a Window from which you can choose an application to which to
attach the Popup Copy Window.
After the Popup Copy Window is attached to your word processor, BibleWorks will hide itself so you can concentrate on your word processor without interference. If you want to work with BibleWorks and your word processor, and copy verses with everything all visible at the same time, you should open the full Copy Center instead of a Popup Copy Window.
Using the Popup Copy Window
§
Specifying a Range to Copy
Using the Popup Copy Window is very simple. You simply enter the range of
verses that you want to copy in the "Range" text box and click on the
"Copy" Button. You may enter a single verse or a range of verses,
such as "Gen 5:1-10".
§
Specifying the Versions to Copy
In the text area labeled Versions you can specify the Bible versions
from which you want the text to be copied. You can specify more than one Bible
version here and the text will be copied from each Bible version listed. The
versions should be entered using the BibleWorks abbreviations for the Bible
version. See Bible Version Abbreviations for more information.
When you click the ">>" button, a window will open with
a list of versions from which you can choose.
§
Specifying Format Options
If you want to control the way the copied text is formatted (fonts,
reference formatting, etc.), click on the "Format" button. This opens
a window which allows you to customize how the Bible text will be copied. See
Copy
Center Format Options for more information.
Copying the Verse List
![]() When you are copying information from BibleWorks using
the Copy Center, you can set up a default destination for the copied
information. The destination can be some external program, like a word
processor, the BibleWorks Editor, or the clipboard. See the
Copy Center for
more information on how to set the destination. Once you have selected a
default destination for copied information, you can use the
When you are copying information from BibleWorks using
the Copy Center, you can set up a default destination for the copied
information. The destination can be some external program, like a word
processor, the BibleWorks Editor, or the clipboard. See the
Copy Center for
more information on how to set the destination. Once you have selected a
default destination for copied information, you can use the ![]() button,
on the button bar of the Search Window, to quickly copy the contents of the
Search Window Verse List to the default destination. Since this avoids opening
the Copy Center, this saves you a few clicks.
button,
on the button bar of the Search Window, to quickly copy the contents of the
Search Window Verse List to the default destination. Since this avoids opening
the Copy Center, this saves you a few clicks.
Exporting Large Sections of Bible Text

![]() Clicking on this button
opens up the BibleWorks Export Window. This is an option that provides you with
a convenient way to export large sections of Bible text in raw form to a file.
The Export Window can also be opened via the Main Menu by selecting Tools |
Export Database. When you need to export large sections of text from
BibleWorks, the Copy Center and clipboard are not always the best way to do it.
Clicking on this button
opens up the BibleWorks Export Window. This is an option that provides you with
a convenient way to export large sections of Bible text in raw form to a file.
The Export Window can also be opened via the Main Menu by selecting Tools |
Export Database. When you need to export large sections of text from
BibleWorks, the Copy Center and clipboard are not always the best way to do it.
Choosing the Bible Version for the Export
To choose a version for the text to be exported, simply choose a version from the "Version" List Box. This list box shows an alphabetical listing of all the versions available in BibleWorks.
Selecting the Verse Range to Copy
After you select the version, you can enter the range of verses to export in the Range textbox. This textbox will initially display the range necessary to cover the entire text of the version selected. When you click on the "Reset Range" button the range will be reset to this default range.
Export Options
The lower part of the Export Window has four checkboxes which control the options available for the export process. These options are:
§ Include companion text (Greek morphology only) - When exporting Greek text, if a companion text exists, it will be exported along with the selected text. See the discussion on matched pairs, p. 83, for a description of companion texts.
§ Save as template (references only) - This exports only the references, one reference per line, without the Bible text. This is useful for creating your own commentary or translation, when you merely need a list of references from which to start. It is used mostly with the Version Database Compiler as a useful starting point for creating a new version.
§ Export notes and cross references - if this option is selected and a Bible version has footnotes and cross-references, these will be exported with the text.
§ Remove accents and vowel points (WTT only) - if this option is selected, accents and vowel points will be removed from Hebrew text before it is exported.
File Types
When you click the OK button, another window will open up asking you for a file name to use when saving the text. In this window you can also determine the format used for the export. The formatting options are:
§ BibleWorks (BWW) Format - This option exports the text in BibleWorks native format. It is basically the same as RTF format with some changes to permit BibleWorks to store and retrieve left-wrapped Hebrew text. This format should be readable by other applications except that Hebrew text probably will not wrap correctly.
§ Text Format (TXT) - This option will export the text in simple ASCII text format. There will be no font information included. This text should be readable by any text editor or word processing program.
§ CCAT Format (CAT) - This option will export the text in the format used by the University of Pennsylvania Center for the Computer Analysis of Texts. This is a special ASCII text format used for Greek and Hebrew text. If you are compiling your own databases in BibleWorks the text is currently required to be input in this format for Greek and Hebrew text.
§ RTF Format - This option will export the text in the Microsoft Rich Text Format, which is designed as a portable format for the exchange of documents among different programs and operating systems. Font information is preserved but Hebrew text will probably not be read properly by other programs.
Using the Report Generator
![]()
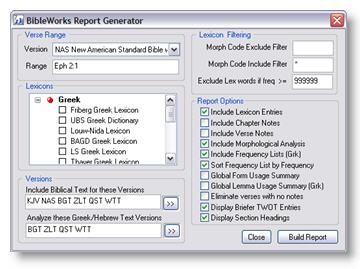
The Report Generator permits you to generate "Reports" on particular verses or verse ranges that you are working with. To generate a report choose a "Base Version" from the drop down list box and then enter a verse reference or range of verses from that version. Then select the options indicating what you want in the report and click on the "New Report" Button. The report will be generated and opened up in the BibleWorks Editor. If you select "Replace Report" the report will replace the last report generated, instead of opening up a new file. You can choose to include any or all of the following items:
The Bible text from each of the versions specified in the "Include Biblical Text" edit box will be included in the report.
In the Lexicons group box place a check beside each lexicon that you want to use for word definitions. Lexical entries will be included for every word in each of the versions specified in the bottom left edit line. The versions in this list must be Greek or Hebrew text versions (not morphology versions). Each word in these versions will also be parsed for you. To activate lexicon output you must also select "Include Lexicon Entries" in the "Report Options" group box.
This section allows you to set several options that determine how lexical entries are handled: The filters in this section affect which words are included in lexical entry lists, as well as which words are included when you check the "Include Morphological Analysis" option.
in this box you can enter a string to filter the morphology codes of lemmas before they are looked up in the lexicons specified. Lemmas with codes that match the filter will not be included. If you leave it blank no exclusion filtering will be done. Note that the include filter is applied first. Then the exclusion filter is applied. You can use wildcards and grouping codes, just as in morphology codes entered on the command line. Example: the string [nv]* will cause all nouns and verbs to be excluded (assuming GNT/GNM is your base version). Do not include the "@" or "%" when you specify the filter.
in this box you can enter a string to filter the morphology codes of lemmas before they are looked up in the lexicons specified. Only lemmas with codes that match the filter will be included. If you leave it blank no inclusion exclusion filtering will be done and all forms will be included (unless excluded by the exclusion filter). Note that the include filter is applied first. Then the exclusion filter is applied. You can use wildcards and grouping codes, just as in morphology codes entered on the command line. Example: the string [nv]* will cause all nouns and verbs to be included (assuming GNT/GNM is your base version).
Lemmas with frequencies of occurrence greater than or equal to this number will be excluded from the lexical entries. To include all entries, make this a very large number, like 999999. Currently only Greek words are filtered.
§ Include Lexicon Entries - if this option is checked a mini-lexicon will be built based on the words in the range of verses selected.
§ Include Chapter Notes - if this option is checked user-defined Chapter notes, if they exist, will be included. Chapter notes are only included with the first verse of each chapter.
§ Include Verse Notes - if this option is checked user-defined Verse notes, if they exist, will be included.
§ Include Morphological Analysis - if this option is checked a morphological analysis of all the words in all the verses will be included.
§ Include Frequency Lists - if this option is checked a frequency list including all words in the verse range will be included.
§ Sort Frequency List by Frequency - if this option is checked the frequency list described in the previous item will be sorted by frequency of occurrence in the specified verse range rather than alphabetically.
§ Global Form Usage Summary - if this option is checked a global form usage summary for each form in each Greek/Hebrew text version will be included. This describes the various ways in which the forms are parsed throughout the entire version.
§ Global Lemma Usage Summary - if this option is checked a global lemma usage summary for each lemma in each Greek/Hebrew text version will be included. This describes the various ways in which the lemmas are used throughout the entire version.
§ Eliminate verses with no notes - if this option is checked verses with no user notes will not be included.
§ Display Briefer TWOT Entries - if this option is checked and the TWOT is a selected Hebrew Lexicon, only the preliminary definitions for each entry will be included.
§ Display Section Headings – if this option is unchecked section headings will be eliminated from the Report.